Tools / Saws
Owner's Manual for Craftsman 10-Inch Radial Saw Guard Kit 509398/509399
Complete installation and operating guide for the Craftsman 10-Inch Radial Saw Guard Kit (models 509398 and 509399). Includes assembly steps, safety instructions, ripping and crosscutting procedures, and maintenance tips.
Table of contents
Manual images
Click an image to enlargeQuick Start and Important Information
This manual provides instructions for installing and using the 10-Inch Radial Saw Guard Kit on specific Craftsman radial saw models. This kit is intended to be used in conjunction with your original saw owner's manual. If you are missing your original manual, contact customer service at 1-800-325-1184.
Safety Hazards
Operating a radial arm saw involves significant risks. Always prioritize safety:
- Outfeed Zone Hazard: Rotational force can pull hands into the blade. Never reach around the blade to the outfeed side.
- Kickback: Occurs when the blade binds or pinches in the workpiece. Ensure the riving knife is properly aligned and pawls are used.
- Wrong Way Feed: Never feed the workpiece into the outfeed side of the blade. Always feed against the blade rotation.
- Personal Protection: Always wear ANSI Z87.1 safety goggles, ear protection, and a dust mask. Do not wear loose clothing, gloves, or jewelry.
Assembly and Installation
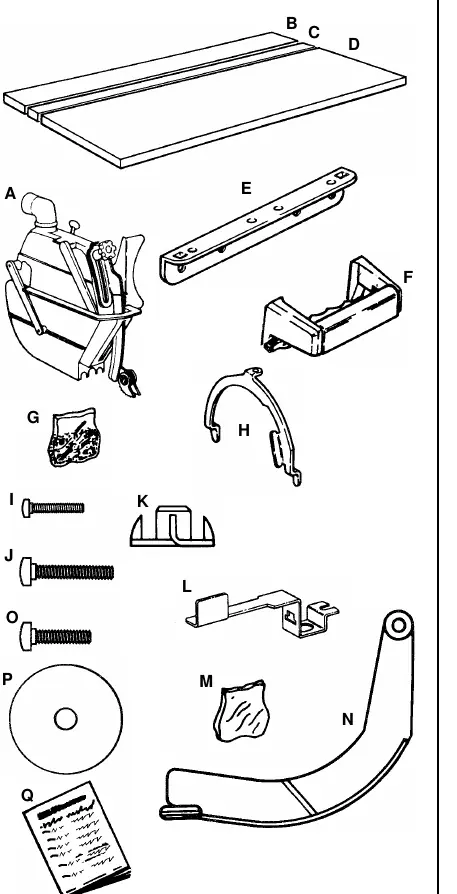
Before beginning, verify all parts are included according to the parts list for your specific model (509398 or 509399). Do not plug in the saw during assembly.

Removing Old Components
Remove the original guard, table boards, and mounting supports. Retain original hardware as specified in the manual, as some will be reused for the retrofit.
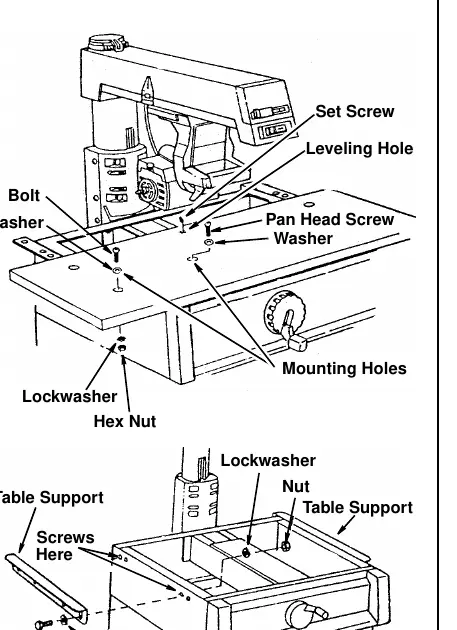
Installing Table Supports and Front Table
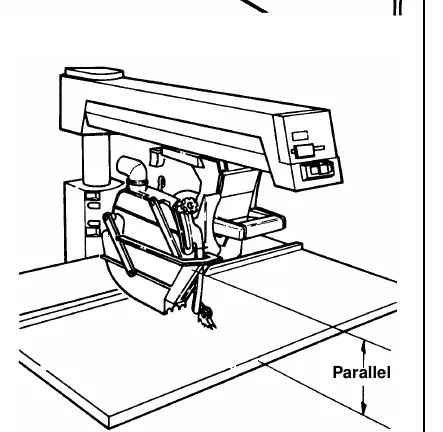
Attach the new table supports to the saw base. Install the front table, ensuring it is flat and parallel to the radial arm. Use the provided U-clips and leveling screws to secure and adjust the table surface. For 44-inch wide models, additional drilling in the saw base may be required.
Installing the Guard
Install the guard adapter onto the motor. Mount the guard assembly, ensuring the notch fits securely into the tab on the motor adapter. Test the trigger mechanism to ensure the clear plastic guard raises properly.
Operating Instructions

Crosscutting
Crosscutting is used to cut a workpiece to length. Always hold the workpiece firmly against the fence. Use the guard and ensure the riving knife is lowered to clear the fence or workpiece by 1/4 inch.
Ripping
Ripping changes the width of a workpiece. Choose between In-rip (blade toward column) or Out-rip (blade toward table front) positions based on the cut width. Always use push sticks or push blocks to keep hands away from the blade. Ensure pawls and the riving knife are set correctly to prevent kickback.
Maintenance
Regularly inspect the guard assembly. If it becomes difficult to raise, clean sawdust from the slot and slider, and apply a small amount of light grease to the slot, slider, and between the trigger and pull link. Ensure pawl teeth remain sharp; replace them if they become dull.
Manufacturer information
CRAFTSMAN
Practical help
Common problems
Guard is difficult to raise
Clean sawdust from the slot and slider, then apply a small amount of light grease to the slot, slider, and trigger/pull link mechanism.
Blade jams during operation
Turn off the saw immediately, remove the yellow key, and then free the blade. Do not attempt to free the blade while the saw is running.
Kickback
Ensure the riving knife is aligned with the blade, use pawls correctly, and do not rip irregular workpieces without a straight edge.
Before use
- Verify all parts are included before starting assembly.
- Ensure the saw is unplugged during the entire assembly process.
- Wear ANSI Z87.1 approved safety goggles.
- Clear the table of all objects except the workpiece and necessary fixtures.
- Check that the riving knife is aligned with the blade.
- Ensure the yellow key is removed when the saw is not in use.
Specs in practice
- Riving Knife
- Keeps the workpiece kerf open to reduce blade pinching and the risk of kickback.
Images and diagrams
- Exploded view of the guard assembly and components.
- Illustration of table support installation and leveling.
- Visual guide for In-rip vs. Out-rip blade positioning.
Model compatibility
- Fits specific Craftsman 10-inch radial saw models listed on page 1.
- Requires the original saw owner's manual for complete operation and safety procedures.

Manual page author
David Miller
Documentation analyst
Organizes user manual content into clear summaries, with attention to model details, product context, and everyday usability.