Power / Batteries & Chargers
User Guide for CTEK CHARGESTORM CONNECTED 3 Charging Station
Quick guide for the CTEK CHARGESTORM CONNECTED 3 EV charging station. Learn about charging modes (Open/RFID), LED status indicators, error troubleshooting, maintenance, and technical specifications.
Quick answers from the manual
Quick answer
- The CHARGESTORM CONNECTED 3 is an advanced EV charging station supporting Open and RFID access. It features built-in RCD Type B protection and requires annual maintenance and bi-annual RCD testing. p. 3, 4
Key actions
- Perform RCD test p. 4
- Annual maintenance p. 4
First start
- Connect cable to station and vehicle p. 3
Show 4 more answers Show less
Problems and fixes
Pulsating Red LED
Fault after vehicle connection. Try reconnecting the vehicle.
p. 3Maintenance and reset
- Reset RCD FAULT LED p. 4
Technical specifications
| Parameter | Value | Meaning | Pages |
|---|---|---|---|
| Power Input | 230V/400V AC, 50Hz, Max 64A | Electrical supply requirements | p. 5 |
| Ingress Protection | IP54 | Dust and water resistance | p. 5 |
Where to find it in the PDF
- Getting Started p. 3
- Additional Information p. 4
- Technical Specification p. 5
Table of contents
Manual images
Click an image to enlargeQuick Guide: Charging Your Vehicle
The CHARGESTORM CONNECTED 3 supports two primary charging modes: Open Access and RFID Access. Ensure your vehicle is compatible with Type 2 charging cables before use.
Product Overview
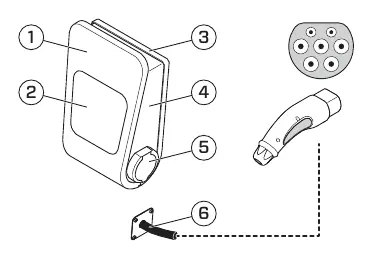
The charging station consists of a front panel with a display for status symbols, a technical box, and either a Type 2 outlet or a fixed Type 2 cable. It is designed for wall or pole mounting, suitable for both indoor and outdoor use.
Charging Procedures
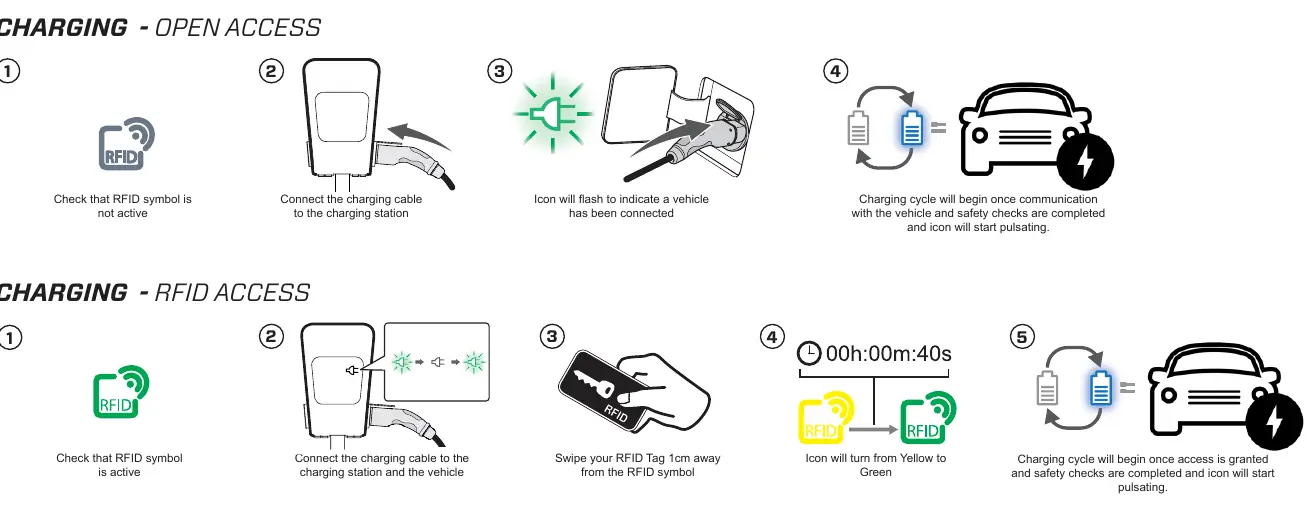
Open Access
- Ensure the RFID symbol is not active.
- Connect the charging cable to the charging station.
- Connect the cable to the vehicle.
- The icon will flash to indicate a vehicle is connected. The charging cycle begins once communication and safety checks are complete, and the icon will start pulsating.
RFID Access
- Ensure the RFID symbol is active.
- Connect the charging cable to the charging station and the vehicle.
- Swipe your RFID tag 1cm away from the RFID symbol.
- The icon will turn from Yellow to Green.
- The charging cycle begins once access is granted and safety checks are complete, and the icon will start pulsating.
LED Status Indicators and Errors
- Solid Green: Awaiting and ready for charging.
- Single Flash Green: Connection detected.
- Solid Blue: Vehicle connected but not charging (after successful authentication).
- Pulsating Blue: Charging in progress.
- Solid Yellow: Authentication in progress (RFID).
- Solid Red: Outlet out of service.
- Pulsating Red: Fault after vehicle connection. Try reconnecting the vehicle.
Maintenance and Earth-Fault Testing
Maintenance must be performed once a year. This includes checking the charging outlet/cable, rubber gaskets, and cable glands. Any damaged components must be replaced with CTEK approved parts.
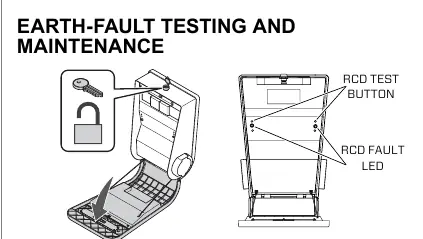
Earth-Fault Testing: Perform an RCD test at least twice a year. Press the RCD TEST BUTTON for each outlet. The RCD FAULT LED will turn red. To reset, a vehicle must be connected and a new charging session started, or the power supply must be disconnected and reconnected.
Technical Specifications
- Power Input: 230V/400V AC, 50Hz, Max 64A.
- EV Connector: Type 2 outlet or fixed cable.
- RFID Standard: Mifare 1k, 1k+, Classic (13.5 MHz).
- Connectivity: 4G, WiFi, Dual Ethernet.
- Ingress Protection: IP54.
- Operating Temperature: -30°C to +50°C.
Manufacturer information
CTEK
Practical help
Common problems
Pulsating Red LED after connection
Fault detected. Try reconnecting the vehicle to clear the error.
Solid Red LED
Outlet is out of service.
Solid Yellow LED (RFID)
Authentication is in progress.
Before use
- Ensure the charging cable is in good condition.
- Verify the charging station is powered on.
- For RFID access, ensure you have an authorized RFID tag.
- Check that the vehicle is compatible with Type 2 charging cables.
Show more Show less
Images and diagrams
- Overview diagram identifies the front panel, display, back cover, technical box, and outlet/cable.
- Charging diagrams illustrate the step-by-step connection process for both Open and RFID access modes.
- Earth-fault testing diagram shows the location of the RCD TEST BUTTON and RCD FAULT LED.
Model compatibility
- Only for use with Type 2 charging cables.
- Intended for charging electrical and hybrid vehicles.
- Requires installation by an accredited electrician.

Manual page author
Michael Turner
Technical manual editor