Home Appliances / Coffee Equipment
Installation and User Instructions for De'Longhi Alu Electric Radiator
Comprehensive user guide for the De'Longhi Alu electric radiator. Includes detailed wall mounting instructions, electrical connection diagrams, operating modes, and troubleshooting steps.
Table of contents
Manual images
Click an image to enlargeQuick Guide
The De'Longhi Alu electric radiator is designed for heating domestic rooms. Important safety rules: never cover the appliance, maintain minimum distances from walls and furniture (50 cm), and do not install it directly below a power socket. The radiator features multiple operating modes and can be controlled via the integrated panel or the provided remote control.
Specifications
The appliance operates at 230V ~ 50Hz and is IP24 rated. Available models include:
- 1000W: 60 cm length, 13 kg
- 1500W: 84 cm length, 19 kg
- 1800W: 100 cm length, 23 kg
Positioning and Installation
The radiator must be wall-mounted. Ensure the wall is suitable for the weight of the appliance. Follow these steps for installation:
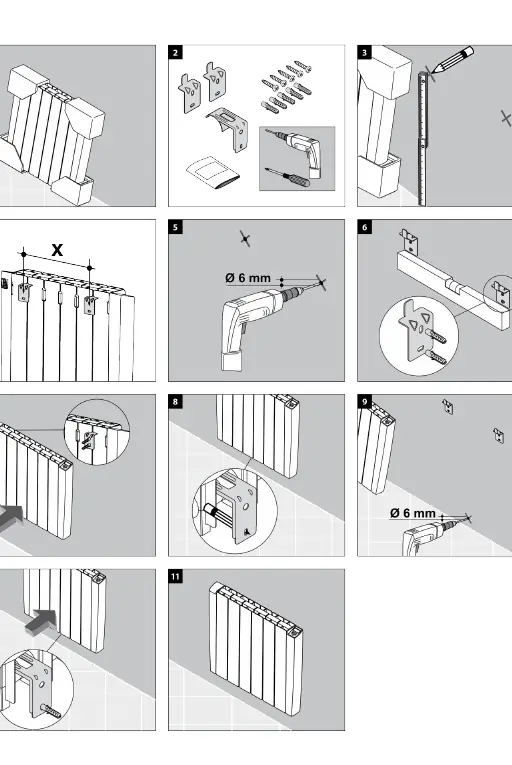
- Unpack the appliance and place it on a soft surface.
- Use the provided mounting kit and template to mark the wall.
- Drill holes (6 mm diameter) and insert anchors.
- Secure the mounting brackets to the wall.
- Mount the radiator onto the brackets and lock it in place.
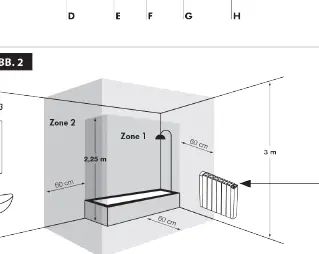
In bathrooms, the radiator must be installed outside Zone 1 (at least 60 cm from the bath or shower).
Electrical Connections
Installation should be performed by a qualified professional. The power line must be fitted with a disconnecting switch. If the Pilot Wire is not used, it must be terminated and insulated; never connect the Pilot Wire to the earth.

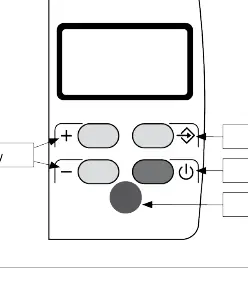
Operating Modes
Press the Mode button to cycle through the following settings:
- Pilot Wire: Temperature depends on external commands.
- Comfort: Maintains the user-defined temperature.
- Night/Eco: Maintains a lower temperature for energy saving.
- Anti-freeze: Keeps the room at 7°C to prevent freezing.
- Chrono: Follows a weekly program with different temperature periods.
Special Functions
- Open Window: Detects sudden temperature drops and pauses heating to save energy.
- Overdrive (2h): Heats the room at maximum power for 2 hours.
- Children Safety: Limits surface temperature to prevent burns.
- Keypad Lock: Prevents accidental changes to settings.
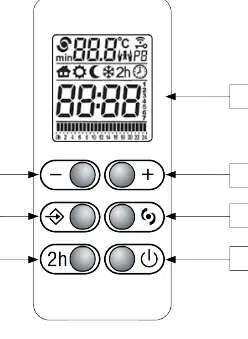
Remote Control
The remote control allows for programming and mode selection. It requires two AAA LR03 1.5V alkaline batteries. Point the remote at the radiator (max distance 5m) to transmit commands.
Cleaning and Maintenance
Before cleaning, ensure the appliance is turned off, cold, and disconnected from the mains. Use a soft, damp cloth and neutral detergent. Remove dust from the surface and inside at least twice a year using a vacuum cleaner.
Troubleshooting
If the radiator does not heat, check the power connection, increase the temperature set point, or ensure the safety device has not tripped. If the appliance heats continuously, reduce the temperature set point. For persistent issues or oil leaks, contact a qualified professional.
Practical help
Common problems
Radiator does not heat
Check power connection, increase temperature set point, or reset the electronic system by disconnecting from mains for a few minutes.
Radiator heats continuously
Reduce the temperature set point or ensure the Overdrive function is not active.
Open Window function not responding
Ensure the radiator is positioned correctly and the area around the control box is free from obstacles.
Leaks of liquid
Turn off the appliance immediately and contact a qualified professional.
Before use
- Unpack the appliance and check for damage.
- Verify the wall is suitable for mounting.
- Ensure minimum distances (50 cm) from furniture and walls are respected.
- Confirm the electrical supply is 230V.
- Ensure the Pilot Wire is properly terminated if not in use.
Specs in practice
- Overdrive (2h)
- A function that forces maximum heating for 2 hours.
Images and diagrams
- Fig 2: Shows installation zones in a bathroom (Zone 1, 2, 3).
- Fig 8: Wiring diagram showing connections for Phase, Neutral, and Pilot Wire.
- Fig 10: Shows the maximum distance (5m) for remote control operation.
Model compatibility
- The Pilot Wire must never be connected to the earth.
- The appliance is not compatible with fan heaters unless specifically equipped.

Manual page author
Emily Carter
User documentation editor
Prepares concise manual descriptions and highlights the most useful setup, operation, and maintenance information for readers.