Toys / RC Models & Drones
Owner's Guide for Sharper Image RISE 20H Tower Heater
Quick guide for the Sharper Image RISE 20H Tower Heater. Includes safety instructions, operating controls, cleaning, storage, and troubleshooting steps.
Quick answers from the manual
Quick answer
- The Sharper Image RISE 20H is a tower heater with three heat settings (750W, 1100W, 1500W), tip-over protection, and an automatic safety shut-off system. p. 10, 11
Key actions
- Resetting the heater after overheating p. 15
- Cleaning the heater p. 13
First start
- Check for damage, place on floor, plug into wall outlet, select heat setting, adjust thermostat. p. 12
Problems and fixes
Unit fails to power on
Check power connection, circuit breaker, GFCI, overheating, or tip-over switch.
p. 16Maintenance and reset
- Manual reset procedure for overheating p. 15
Technical specifications
| Parameter | Value | Meaning | Pages |
|---|---|---|---|
| Low Heat (I) | 750 watts | Power consumption | p. 11 |
| Medium Heat (II) | 1100 watts | Power consumption | p. 11 |
| High Heat (III) | 1500 watts | Power consumption | p. 11 |
Where to find it in the PDF
- Safety Instructions p. 4, 5, 6, 7
- Controls p. 11
- Troubleshooting p. 16, 17
Table of contents
Manual images
Click an image to enlargeQuick guide from the manual
The Sharper Image RISE 20H is a tower heater designed for floor use in indoor living spaces. It features three heat settings, an adjustable thermostat, and safety mechanisms including tip-over protection and an automatic safety shut-off system. Always plug the unit directly into a wall outlet and avoid using extension cords or power strips.
Safety Instructions

- Intended Use: For floor use only in indoor living spaces. Do not use in bathrooms, laundry areas, or damp locations.
- Placement: Place at least 3 feet away from furniture, bedding, curtains, and other flammable objects. Do not place on soft surfaces like beds.
- Electrical Safety: Plug directly into a wall outlet. Do not use extension cords, power strips, or surge protectors. Do not use with timers or dimmer switches.
- Supervision: Extreme caution is required when used around children or impaired persons.
Controls
The control panel allows you to adjust the heater settings:
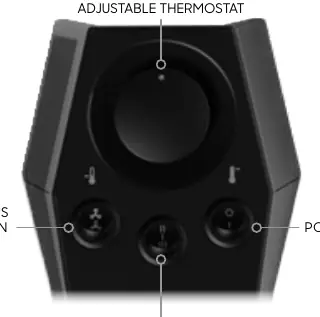
- Power Off-On: Turns the unit on or off.
- Mode: Select between Low Heat (750 watts), Medium Heat (1100 watts), and High Heat (1500 watts).
- Adjustable Thermostat: Controls the desired temperature. Turn clockwise to increase heat.
- Continuous or Auto Fan Mode: Selects whether the fan runs continuously or cycles on and off with the heating element.
How to Use
- Check the heater for visible damage before use.
- Use the integrated handle on the back to carry the unit.
- Position the heater on the floor where airflow is not obstructed.
- Press the power button and select the desired heat setting (Low, Medium, or High).
- Set the thermostat to the highest setting. When the room reaches the desired comfort level, turn the thermostat slowly counterclockwise until the heat cycles off.
Cleaning and Maintenance
Regular cleaning is recommended on a weekly basis.
- Unplug: Always turn off and unplug the heater before cleaning.
- Air Inlets: Use a vacuum cleaner with a brush attachment to remove dust from the air inlets on the sides.
- Outlet Grille: Vacuum the front angled outlet grille.
- Exterior: Wipe the entire heater with a soft, dry cloth.
- Internal Cleaning: Periodically blow out the heater with pressurized air to clear dust from the heat element and motor.
Resetting the Heater
If the heater shuts off due to overheating:
- Turn the heater off and unplug the power cord.
- Remove any obstructions blocking the airflow.
- Wait 5-10 minutes for the unit to cool down.
- Plug the power cord back in and place the heater in the desired position.
- Press the power button to turn the unit on.
Storage
During off-season, unplug the cord and bundle it loosely. Cover the unit or place it back in the retail carton if available. Store in a cool, dry location.
Manufacturer information
Sharper Image
Practical help
Common problems
Unit fails to power on
Check if plugged in, reset circuit breaker/fuse, ensure GFCI hasn't tripped, check for overheating (reset heater), or ensure the unit is on a level surface (tip-over switch).
Unit not producing sufficient heat
Ensure unit is set to High Heat, close all doors and windows, and allow time for the room to heat up.
Unit powered but no heat
If in Auto Mode, ensure the thermostat dial is turned clockwise. If the problem persists, the unit may be damaged.
Before use
- Check for visible damage.
- Place on a level floor surface.
- Ensure airflow is not obstructed.
- Plug directly into a wall outlet.
- Ensure the unit is in an upright position.
Specs in practice
- Medium Heat (II)
- 1100 watts
- High Heat (III)
- 1500 watts
Images and diagrams
- The control panel features an adjustable thermostat dial, a mode selector for heat levels, a fan mode switch, and a power button.
Model compatibility
- Do not use with extension cords or relocatable power taps.
- Do not use on soft surfaces like beds.
- Do not use in bathrooms, laundry areas, or damp locations.

Manual page author
Emily Carter
User documentation editor
Prepares concise manual descriptions and highlights the most useful setup, operation, and maintenance information for readers.