Home Appliances / Space Heaters
User Manual for TCP Smart WiFi Wall Heater SMAWHHEAT2000WHOR705
Comprehensive user guide for the TCP Smart WiFi Wall Heater (SMAWHHEAT2000WHOR705). Includes installation instructions, WiFi setup, heating modes, scheduling, and safety guidelines.
Quick answers from the manual
Quick answer
- The TCP Smart WiFi Wall Heater is a 2000W electric heater controlled via the TCP Smart App, remote, or manual panel. It features multiple heating modes, scheduling, and open window detection. p. 1, 3, 4, 9
Key actions
- Pairing with WiFi p. 9
- Setting Schedule p. 6
First start
- Set the rear power switch to 'I', mount securely, and connect to the TCP Smart App. p. 1, 2, 9
Problems and fixes
Heater stops heating
Check Open Window function or timer settings.
p. 6, 7Maintenance and reset
- Clean the outside of the heater by wiping with a damp cloth and buff with a dry cloth. Do not use any detergents or abrasives. p. 7
Technical specifications
| Parameter | Value | Meaning | Pages |
|---|---|---|---|
| Power | 2000W | Maximum heat output | p. 1 |
| Voltage | AC 230V 50-60Hz | Operating voltage | p. 1 |
| IP Rating | IP24 | Ingress protection rating | p. 2 |
Where to find it in the PDF
- Installation p. 1, 2
- Control Panel p. 3
- Operating Modes p. 4, 5, 6
- WiFi Setup p. 9
Table of contents
Manual images
Click an image to enlargeQuick guide from the manual
The TCP Smart WiFi Wall Heater is a 2000W electric heater designed for wall mounting. It features app-based control via the TCP Smart App, remote control, and manual operation. Key features include multiple heating modes (Comfort, Eco, Anti-frost), programmable scheduling, and open window detection. Ensure the device is installed in a suitable location (IP24 rated, suitable for bathroom Zone 3) and connected to a 2.4GHz WiFi network for smart features.
Installation
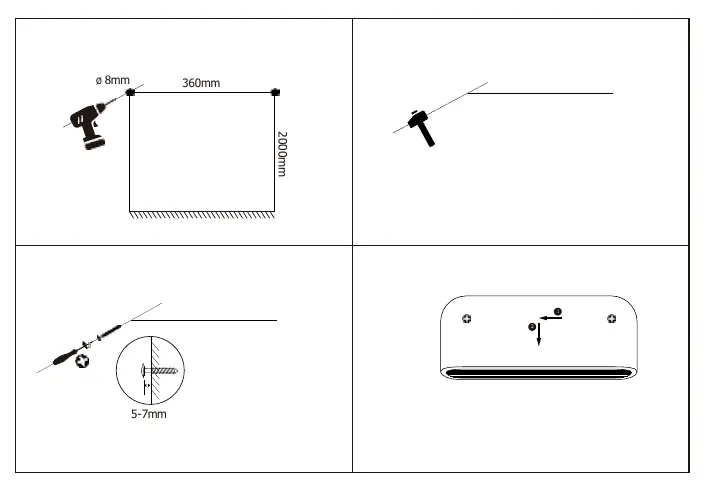
The heater must be installed directly to the wall. Ensure the surface is not damp, freshly painted, or electrically conductive (e.g., metallic surfaces). The product is IP24 rated, meaning it can be installed in bathroom Zone 3. Drill holes 360mm apart at a height of 2000mm from the floor, insert wall plugs, and secure the unit.
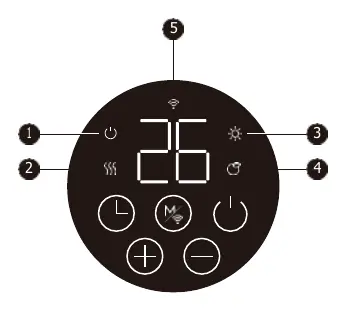
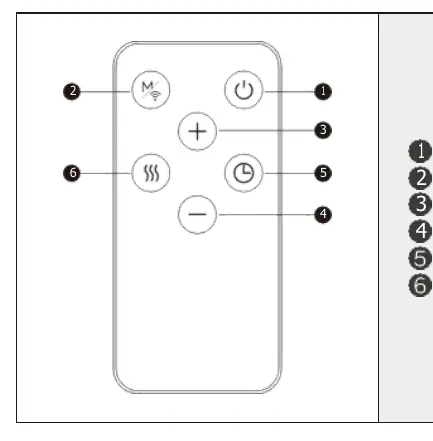
Control Panel and Remote
The heater can be operated via the onboard control panel or the included remote control. Both allow for standby, mode selection, temperature adjustment, and timer settings. The power-level switch located at the back of the heater must be set to 'I' before operation.
Operating Modes
- Comfort Mode: Allows manual temperature setting between 10-35°C.
- ECO Mode: Pre-set to 4°C below the Comfort mode temperature.
- Anti-frost Mode: Maintains a target temperature of 7°C to prevent freezing.
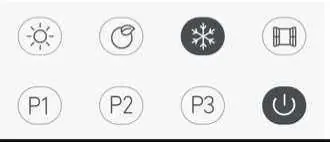
- Scheduling (P1, P2, P3): P1 and P2 are pre-programmed schedules. P3 is fully adjustable to your requirements.
WiFi Setup
To control the heater via the TCP Smart App, ensure your smartphone is connected to a 2.4GHz WiFi network (5GHz is not supported). Turn off any WiFi extenders during setup. Hold the Mode button on the heater for 3 seconds until it beeps and the WiFi LED blinks rapidly to enter pairing mode, then follow the instructions in the app.
Open Window Function
The heater includes an open window detection feature. If the ambient temperature drops by 4°C within 2 minutes, the heater will stop heating and enter standby mode. This can be toggled on or off using the Mode and +/- buttons.
Cleaning and Maintenance
Allow the heater to cool down completely before cleaning. Wipe the exterior with a damp cloth and buff with a dry cloth. Do not use detergents or abrasives.
Practical help
Common problems
Heater not connecting to WiFi
Ensure your router is set to 2.4GHz (not 5GHz), turn off WiFi extenders during setup, and ensure the device is in pairing mode (hold Mode button for 3 seconds).
Heater stops heating unexpectedly
Check if the 'Open Window' function has been triggered (drops 4°C in 2 mins) or if a timer/schedule has ended.
Odour during first use
This is normal and will disappear after a few minutes of operation.
Before use
- Ensure the wall surface is not damp, metallic, or freshly painted.
- Verify the installation location complies with IP24 zone requirements.
- Set the power-level switch at the back of the heater to 'I'.
- Ensure the power supply is a 13A socket.
- Check that the clock and day of the week are set correctly for scheduling to work.
Specs in practice
- Anti-frost mode
- Maintains a constant 7°C to prevent freezing in cold weather.
Images and diagrams
- Wall mounting: Drill holes 360mm apart, 2000mm from the floor.
- Control Panel: 5 buttons for Standby, Increase, Decrease, Mode/WiFi, and Timer.
Model compatibility
- Requires 2.4GHz WiFi network.
- Compatible with Amazon Alexa and Google Nest.

Manual page author
David Miller
Documentation analyst
Organizes user manual content into clear summaries, with attention to model details, product context, and everyday usability.