Home Appliances / Space Heaters
User Manual for Sealey CD2005TT.V2 Convector Heater
Comprehensive user guide for the Sealey CD2005TT.V2 2000W Convector Heater. Includes assembly instructions, operation steps for the thermostat and timer, safety warnings, and maintenance procedures.
Quick answers from the manual
Quick answer
- The Sealey CD2005TT.V2 is a 2000W convector heater with a turbo fan, 24-hour timer, and adjustable thermostat. It is designed for indoor use in homes, offices, or light industrial environments. p. 2
Key actions
- Attach the feet to the heater using the provided screws. p. 2
- Set the timer by turning the outer ring to the current time and moving the pins outwards for the desired active periods. p. 2
First start
- Place the heater in a suitable position with 500mm clearance, plug into the mains, turn the thermostat to high, and select the desired heat output. p. 2
Problems and fixes
Heater stops working unexpectedly
The safety cut-out may have activated. Unplug the unit, let it cool, check for obstructions, and ensure the cause is identified before restarting.
p. 2Maintenance and reset
- Clean the unit with a soft, dry cloth. Do not use abrasives or solvents. p. 2
Technical specifications
| Parameter | Value | Meaning | Pages |
|---|---|---|---|
| Power Settings | 750W / 1250W / 2000W | Adjustable heat output levels. | p. 2 |
| Supply | 230V | Required voltage. | p. 2 |
| Dimensions | 595 x 200 x 420mm | Physical size of the unit. | p. 2 |
Where to find it in the PDF
- Safety Instructions p. 1
- Assembly and Operation p. 2
- Technical Specifications p. 2, 4
Table of contents
Manual images
Click an image to enlargeQuick Guide
The Sealey CD2005TT.V2 is a 2000W convector heater designed for indoor use. Before use, ensure the unit is placed on a flat surface with at least 500mm of clearance from surrounding objects. Always check the power cable and plug for damage before connecting to the mains. The heater features three heat settings (750W, 1250W, 2000W), a turbo fan, and a 24-hour timer.
Assembly
The heater requires the feet to be attached before use:
- Turn the heater upside down and support it securely.
- Align the feet with the holes on the underside of the heater.
- Fasten each foot down using the provided self-tapping screws.
Operation
Selecting Heat Output:
- Low setting (750W): Select switch 'A'.
- Medium setting (1250W): Select switch 'B'.
- High setting (2000W): Select both switches 'A' and 'B'.
Thermostat: Turn the thermostat knob to a high setting. Once the desired room temperature is reached, turn the knob slowly towards 'Min' until the switch light goes out. The heater will cycle on and off to maintain the temperature.
Turbo Fan: Select switch 'D' (marked with a fan symbol) to boost air output. This can also be used to circulate cool air if the heat switches are off.
Timer Function:
- Turn the outer ring to the current time.
- Set the function selector to the center position (Timer).
- Move the timer pins outwards for the periods you want the heater to be active (each pin equals 15 minutes).
Safety Cut-Out
The heater includes a thermostatic safety cut-out. If the airflow is blocked or a malfunction occurs, the heater will turn off automatically. If this happens, unplug the unit, allow it to cool completely, and check for obstructions before attempting to restart.
Maintenance
- Always unplug the heater and allow it to cool before cleaning or maintenance.
- Clean the unit with a soft, dry cloth. Do not use abrasives or solvents.
- Periodically check the air inlet and outlet to ensure they remain clear of dust or debris.
Manufacturer information
Sealey Group
Practical help
Common problems
Heater does not turn on
Check if the safety cut-out has activated. Unplug the unit, let it cool, check for obstructions in the air inlet/outlet, and try again.
Timer is not working
Ensure the function selector switch is set to the center position (Timer) and that the timer pins are pushed outwards for the desired time slots.
Before use
- Ensure the heater is placed on a flat, stable surface.
- Maintain at least 500mm clearance from furniture and other objects.
- Check that the power cable and plug are undamaged.
- Ensure the voltage rating matches your power supply (230V).
- Do not use in bathrooms, shower rooms, or damp environments.
Specs in practice
- Power Settings
- Three levels: 750W, 1250W, and 2000W for gradual heating control.
- Safety Cut-out
- Automatic shut-off feature to prevent overheating.
Images and diagrams
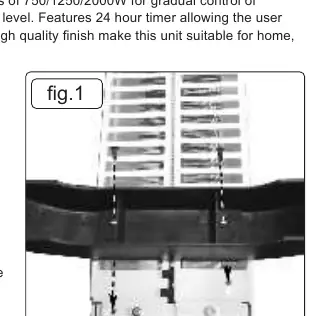
- Fig 1: Illustrates the assembly of the feet to the underside of the heater.
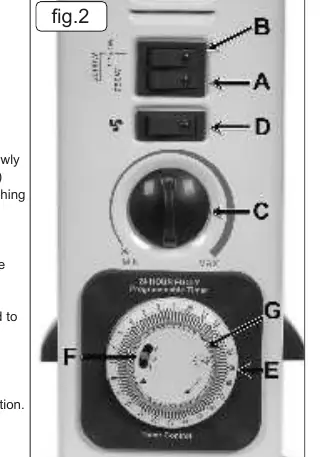
- Fig 2: Displays the control panel, including heat switches (A, B), thermostat (C), turbo switch (D), timer ring (E), and function selector (F).
Model compatibility
- Indoor use only.
- Not suitable for use in bathrooms or wet environments.
- Do not use on deep pile carpets.

Manual page author
Michael Turner
Technical manual editor
Reviews PDF manuals for structure, safety notes, and practical product details so readers can find the right information quickly.