Home Appliances / Space Heaters
User Manual for Somogyi FKF 42201 Electronic Wall Heater
Quick guide for the Somogyi FKF 42201 electronic wall heater. Includes installation instructions, operation modes, weekly programming, and maintenance tips.
Quick answers from the manual
Quick answer
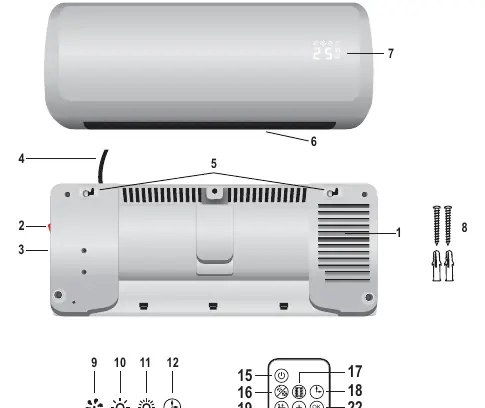
- The FKF 42201 is a wall-mounted PTC fan heater. It features adjustable output (1000/2000W), a built-in thermostat, weekly programming, and a remote control. p. 25, 26
Key actions
- Mounting the heater p. 6, 20
- Cleaning the heater p. 6, 21
First start
- Connect to a grounded 230V outlet and use the main switch (2) to power on. p. 6, 25
Problems and fixes
Unit does not heat
Check thermostat settings or overheating protection.
p. 6, 26Maintenance and reset
- Clean air vents monthly with a vacuum cleaner. p. 6, 21
Technical specifications
| Parameter | Value | Meaning | Pages |
|---|---|---|---|
| Power Supply | 230 V~ / 50 Hz | Standard grounded wall outlet | p. 26 |
| Output | 1000 / 2000 W | Adjustable heating power | p. 26 |
Where to find it in the PDF
- Structure and Installation p. 2
- Safety Instructions p. 4, 5
- Operation and Features p. 25, 26
Table of contents
Manual images
Click an image to enlargeQuick guide from the manual
The Somogyi FKF 42201 is a wall-mounted PTC fan heater designed for indoor use. It features adjustable heating output (1000W/2000W), a built-in thermostat, weekly programming, and a remote control. Important: The unit must be mounted at least 2 meters above the floor and requires specific clearance distances to operate safely.
Installation
Before installation, ensure the wall material can support the heater's weight. Follow these steps for mounting:
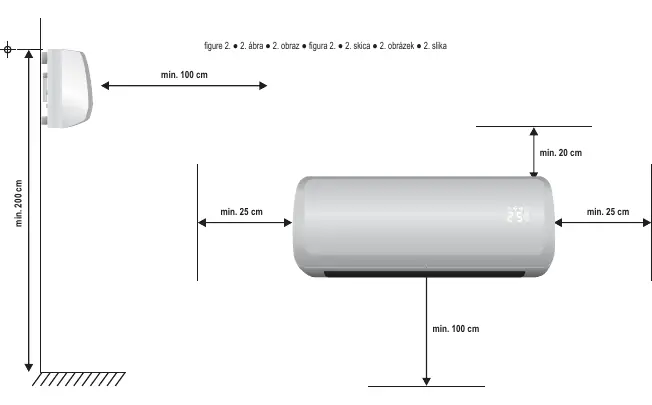
- Select a location on a vertical surface, ensuring at least 2 meters of height from the floor.
- Observe minimum clearances: 20 cm from the top, 25 cm from the sides, and 100 cm from the bottom (see Figure 2).
- Do not install the unit directly below a wall outlet.
- Drill two holes horizontally, 315 mm apart.
- Insert studs and screws, leaving the screw heads protruding approximately 10 mm from the wall.
- Hang the unit on the screws and slide it to the right to lock it in place.
Operation
The heater can be operated via the main switch on the side or the included remote control.
General Use
- Switch on the main power switch (2).
- Use the remote control (15) to turn the unit on. It starts in fan mode.
- Select heating stage or fan mode using button (16).
- Set the desired temperature (18-45 °C) using button (19) and the +/- selector buttons.
- The unit automatically switches between low and high heating stages based on the difference between the set and measured temperature.
Weekly Program
The weekly program (P1-P6) allows for scheduled heating. To use this, you must first set the current time and day on the device. Use button (20) to enter the time and program settings. P6 allows for custom daily on/off times.
Maintenance
To ensure optimal performance, clean the unit at least once a month:
- Switch off and unplug the unit from the power outlet.
- Allow the unit to cool for at least 30 minutes.
- Use a vacuum cleaner with a brush attachment to clean the air inlet and outlet openings.
- Wipe the exterior with a slightly moistened cloth. Do not use aggressive cleaners or allow water to enter the unit.
Troubleshooting
If the unit does not heat, check the thermostat settings or the overheating protection. If the overheating protection activates frequently, clean the air vents. If the remote control is unresponsive, check the batteries.
Manufacturer information
Somogyi Elektronic Kft.
Practical help
Common problems
Unit does not heat in heating mode
Check thermostat settings or the overheating protection section.
Overheating protection activates frequently
Clean the air inlet and outlet openings.
Unit does not respond to remote control
Check the batteries in the remote control.
Before use
- Ensure the wall can support the weight of the heater.
- Mount at least 2 meters above the floor.
- Maintain minimum clearances: 20cm top, 25cm sides, 100cm bottom.
- Do not install directly below a wall outlet.
- Ensure the unit is mounted on a vertical surface.
Images and diagrams
- Figure 1: Structure and components identification.
- Figure 2: Installation clearances and mounting distances.
Model compatibility
- For indoor use only.
- Do not use in bathrooms, near swimming pools, or in tight spaces like elevators.
- Do not use with extension cords or power strips.

Manual page author
David Miller
Documentation analyst
Organizes user manual content into clear summaries, with attention to model details, product context, and everyday usability.