Power / Power Supplies
User Manual for Delta 22-555 13-Inch Bench Planer
Quick guide for the Delta 22-555 13-Inch Bench Planer. Includes assembly, operation, safety, maintenance, and troubleshooting instructions.
Table of contents
Manual images
Click an image to enlargeQuick Guide from the Manual
This manual provides essential instructions for the safe operation and maintenance of the Delta 22-555 13-Inch Bench Planer. Always read the safety warnings before use. Ensure the machine is properly grounded and connected to a dust collection system before operation. The planer features a 15 Amp motor, a two-knife cutter head, and adjustable cutting height.
Safety Instructions
Woodworking machinery can be dangerous. Always wear safety glasses, hearing protection, and a dust mask. Keep the work area clean and well-lit. Never operate the machine while tired or under the influence of drugs or alcohol. Ensure the switch is in the OFF position before connecting to power. Keep hands and fingers away from the cutter head, chip exhaust, and feed rollers.
Assembly
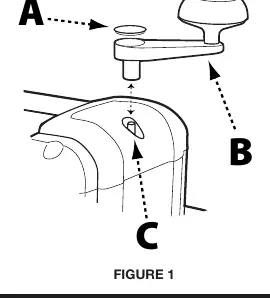
Height Adjustment Handle: Remove the rubber cap from the crank shaft. Secure the handle using the provided M5 x 16mm hex head screw, M5 flat washer, and T-handle hex wrench. Replace the rubber cap.
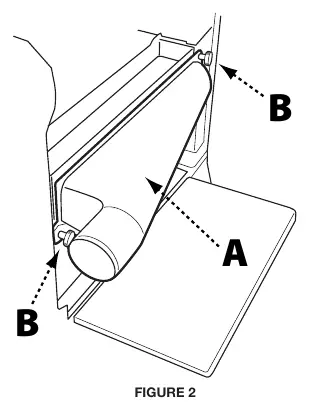
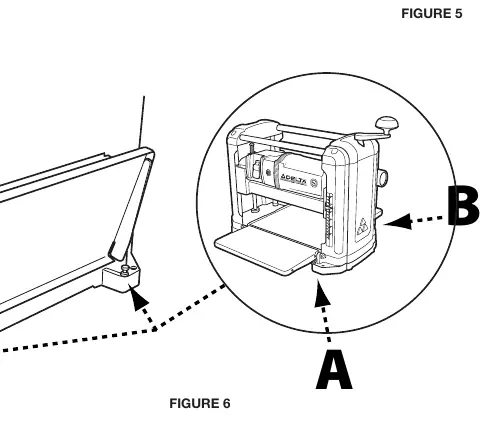
Reversible Dust Port: Attach the dust port to the tool housing on either the left or right side using the two M6 x 15mm lock knobs.
Dust Collector Connection: It is strongly recommended to connect the planer to a shop vacuum or dust collector. Use a 2" to 4" adapter if necessary. Always turn on the dust collector before starting the planer.
Operation
Starting and Stopping: The ON/OFF switch is located on the front. Move the switch up to turn ON and down to turn OFF. Always move the switch to OFF in the event of a power outage.
Safety Key: The machine includes a safety key that locks the switch in the OFF position. Remove the key to prevent unauthorized use.
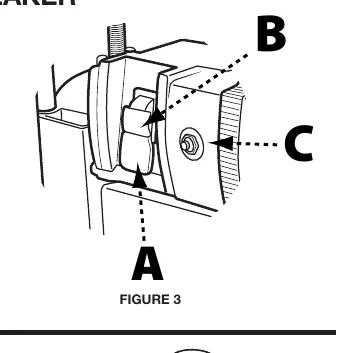
Circuit Breaker: If the motor overloads, the on-board circuit breaker will trip. To reset: turn the machine off, unplug it, wait 2-3 minutes for the motor to cool, and press the reset button.
Adjusting Cutting Height: Rotate the height adjustment handle. Clockwise raises the cutter head; counterclockwise lowers it. One full revolution moves the head 1/16 inch.
Eliminating Snipe: Snipe is a depression at the start or end of a board. To control it, fully support the workpiece as it enters and exits the planer. If snipe persists, adjust the infeed and outfeed table stop screws.
Maintenance
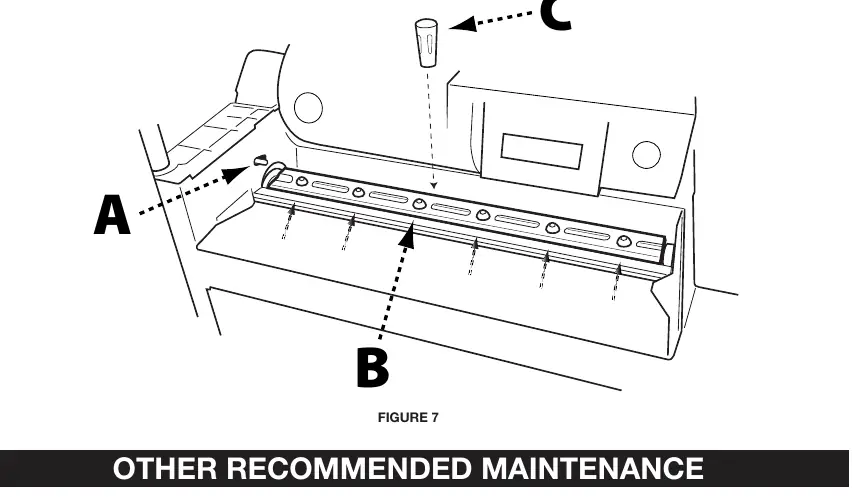
Changing or Reversing Knives: Disconnect power before maintenance. Remove the dust chute and cutter head cover. Lock the cutter head using the red spring-loaded tab. Loosen the six screws on the knife hold-down bar. Use the magnetic knife removal tool to lift the bar and knife. Install the new or reversed knife, ensuring pins align with holes. Retighten screws and repeat for the second knife.
Technical Specifications
- Cutting Width: 13 inches
- Cutting Height: 6 inches
- Max Cut Depth: 3/32 inch per pass
- Feed Rate: 28 ft/min
- Motor: 15 Amp, 120V
- Cutterhead Speed: 9,400 RPM
Practical help
Common problems
Machine will not start
Check if the safety key is inserted, the power cord is plugged in, and the circuit breaker has not tripped.
Snipe on board
Ensure the workpiece is fully supported as it enters and exits the planer. Try reducing the depth of cut.
Motor stops during operation
The circuit breaker may have tripped due to overload. Let the motor cool for 2-3 minutes, then press the reset button.
Before use
- Ensure the machine is secured to a stable work surface.
- Verify all safety guards are in place.
- Check that knives are sharp and properly secured.
- Connect the machine to an adequate dust collection system.
- Ensure the switch is in the OFF position before plugging in.
Specs in practice
- Max. Cut Depth
- The maximum amount of material that can be removed in a single pass (3/32 inch).
- Cutterhead Speed
- The rotational speed of the knives (9,400 RPM).
Images and diagrams
- Figure 1: Shows the installation of the height adjustment handle.
- Figure 2: Illustrates attaching the reversible dust port.
- Figure 3: Identifies the ON/OFF switch, safety key, and circuit breaker reset button.
- Figure 7: Demonstrates the cutter head locking mechanism for knife changes.
Model compatibility
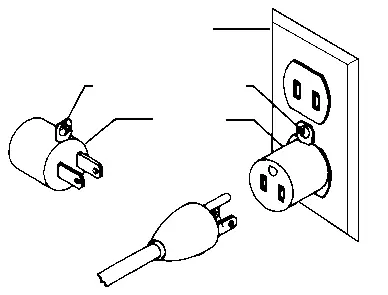
- Requires a 120V, 60Hz power source.
- Use a 2-inch to 4-inch adapter for standard dust collector hoses.

Manual page author
Emily Carter
User documentation editor
Prepares concise manual descriptions and highlights the most useful setup, operation, and maintenance information for readers.