Electronics / Security Systems
DMP 1100T Wireless Translator Installation Guide
A comprehensive installation and setup guide for the DMP 1100T Wireless Translator. Includes step-by-step programming instructions for XR and XT series panels, wiring diagrams, mounting procedures, and battery replacement steps.
Table of contents
Manual images
Click an image to enlargeQuick Guide
The DMP 1100T Wireless Translator allows you to upgrade non-DMP systems (Interlogix, Honeywell 5800, 2GIG, and DSC) to a DMP wireless connection. It is compatible with DMP XT Series and XR Series panels (version 203 or higher). Note that this device is not compatible with life safety devices.
Programming the Panel
All programming must be completed in Device Setup and Zone Information on the panel.
For XR Series Panels
- Device Setup: Enter 6653 (PROG) at the keypad. Select DEVICE SETUP, then 1100T. Enter the Serial number and select the non-DMP system frequency (Default is HWL for Honeywell).
- Zone Information: Enter the zone number and name. Set DMP WIRELESS to NO and COMP WLS to YES. Manually enter the transmitter serial number or use the LRN function to transmit the serial number to the panel.
For XT Series Panels
- Device Setup: Enter 6653 (PROG) at the keypad. Select DEVICE SETUP, then 1100T? YES. Enter the Serial number and select the frequency.
- Zone Information: Follow the same steps as the XR Series (DMP WIRELESS: NO, COMP WLS: YES).
Powering the Translator
The 1100T requires a 12 VDC external power supply (model 372-500-W). The power supply must be located within 100 feet of the panel using 22 AWG wire.
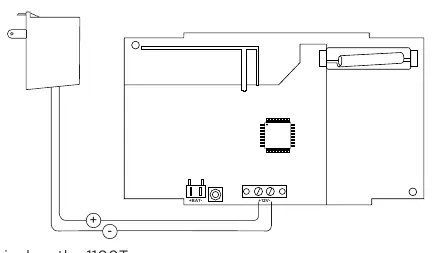
- Connect the positive wire to the positive terminal on the 1100T.
- Connect the negative wire to the negative terminal on the 1100T.
- Plug the power supply into a wall outlet not controlled by a switch.
Selecting a Location
The translator features a Survey LED to confirm communication with the panel:
- With the cover removed, hold the translator in the desired location.
- Press the tamper switch.
- Confirmed: The LED blinks immediately on and off. Repeat 5 times to confirm.
- Faulty: The LED remains on for about 8 seconds or flashes multiple times. Relocate the translator or receiver.
Mounting the Translator
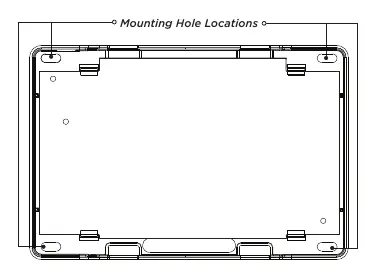
Mount the translator in a secure, dry place away from metal objects. Use the provided #6 screws in the four mounting holes. Ensure the translator is mounted a minimum of 4 feet from any wireless panels or repeaters.
Battery Replacement
- Open the housing and remove the PCB board.
- Unplug the battery connector and remove the old battery.
- Place the new battery in the holder and connect the battery connector.
- Snap the PCB board back in place and close the cover.
Specifications
- Operating Voltage: 12 VDC
- Standby Battery: 3.7 VDC, 800 mAh Lithium Polymer (24 hours standby)
- Frequency Range: 905-924 MHz
- Dimensions: 5.50” W x 3.75” H x 1.00” D
Practical help
Common problems
Communication faulty during survey
If the LED remains on for 8 seconds or flashes multiple times, relocate the translator or receiver until the LED confirms clear communication.
Power failure indication
If the DC power source is removed, the power failure is indicated as an open condition on the 1100T zone.
Before use
- Verify panel compatibility (DMP XT or XR Series, version 203 or higher).
- Ensure 12 VDC power supply (model 372-500-W) is available.
- Have 22 AWG wire ready for power connection.
- Identify the frequency of your non-DMP transmitter (Interlogix, Honeywell, 2GIG, or DSC).
- Ensure the installation site is dry and away from metal objects.
Specs in practice
- Frequency Range
- 905-924 MHz; supports various non-DMP transmitters including Interlogix 319.5 MHz, Honeywell 5800 345 MHz, 2GIG 345 MHz, and DSC 433 MHz.
- Standby Battery
- 3.7 VDC, 800 mAh Lithium Polymer battery providing 24 hours of standby time.
- Operating Voltage
- Requires 12 VDC external power supply.
Images and diagrams
- The wiring diagram shows the +BAT- and +12V- terminals for connecting the 12 VDC power supply.
- The mounting diagram illustrates the four corner mounting hole locations for securing the enclosure.
Model compatibility
- Not compatible with life safety devices.
- Compatible with DMP XT Series and XR Series panels (version 203 or higher).
- Compatible with 1100 Series Wireless Receivers.

Manual page author
David Miller
Documentation analyst
Organizes user manual content into clear summaries, with attention to model details, product context, and everyday usability.