Home / Security
DMP 1127W PIR Motion Detector Installation Guide
Quick installation and setup guide for the DMP 1127W PIR Motion Detector. Learn how to program the sensor, install batteries, mount the unit, and perform walk tests.
Table of contents
Manual images
Click an image to enlargeQuick Guide
The DMP 1127W is a wireless wall-mount PIR motion detector. Before installation, it is recommended to program zones and connect the receiver to the panel before installing batteries in the transmitters. Ensure you are free of static electricity before handling the circuit board.
Programming the PIR
When programming the 1127W in the panel, refer to your panel programming guide. Follow these steps:
- In ZONE INFORMATION, enter the wireless zone number and zone name.
- Select NT (Night) as the ZONE TYPE and select the AREA.
- At the NEXT ZN? prompt, select NO.
- Select YES when WIRELESS? displays.
- Enter the eight-digit SERIAL# and press CMD.
- Enter the SUPRVSN TIME and press CMD.
- Configure DISARM DISABLE (if using firmware Version 172 or higher).
- At PULSE COUNT, choose 2 or 4.
- At SENSITIVITY, choose LOW or HIGH.
- At the NEXT ZN? prompt, select YES to finish or NO for additional options.
Battery Installation
Use only 3V lithium batteries, DMP Model CR123. Observe polarity when inserting batteries into the holder.
- Remove the front cover.
- Remove existing batteries if present.
- Insert new batteries observing correct polarity.
- Reinstall the cover.
Caution: Risk of fire, explosion, and burns. Do not recharge, disassemble, heat above 212°F (100°C), or incinerate.
Selecting a Location
For optimal performance, mount the unit on a rigid, vibration-free surface where intruder movement is across the detection pattern. Avoid locations exposed to moisture, excessive metallic surfaces, direct sunlight, heat sources (radiators, heaters), or strong air drafts (fans, air conditioners).
LED Survey Operation: Use this to confirm communication with the receiver:
- Hold the 1127W in the desired location.
- Press the tamper switch to send data.
- Confirmed: The survey LED turns on when data is sent and off when acknowledged. Confirm five consecutive blinks.
- Faulty: The LED remains on for 8 seconds or flashes rapidly. Relocate the unit or receiver.
Mounting the Detector
Ensure you are free of static electricity before handling the circuit board.
- Remove the front cover.
- Remove the batteries and the PCB from the back cover to expose mounting holes.
- Select appropriate mounting holes for corner or flat wall mounting.
- Attach the back cover to the wall (up to 8' high) using screws and wall anchors. Do not over-tighten.
- Reinstall the PCB, batteries, and front cover.
Testing the Detector
Walk Test: From the panel's Walk Test menu, select PIR Walk Test to enable the LED for 30 minutes. Test the installation to ensure the protection pattern is correct. The test is local and no results are sent to the Central Station.
Transmission Test: After programming, close the cover to restore the tamper switch and verify the keypad display indicates a signal received from the detector.
Maintenance and Battery Life
Typical battery life is five years based on 300 trips per day. Life can be extended to seven years by enabling the Disarm Disable feature. Perform annual unit testing. Clean the cover with a water-dampened cloth as needed.
Specifications
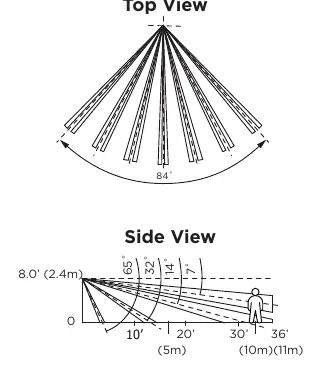
- Detection Area: 36° x 84° angle (Fresnel lens).
- Pet Immunity: Up to 40 lbs.
- Battery: 3V CR123.
- Mounting Height: 8 feet.
- Frequency Range: 905 - 924 MHz.
- Dimensions: 2.7" W x 1.77" D x 4.33" H.
- Outside Mounting Temp: 32 - 120°F.
Practical help
Common problems
False alarms
Ensure the unit is not located near heat sources, direct sunlight, or strong air drafts. Consider setting sensitivity to LOW.
Communication failure
Relocate the 1127W or the receiver until the LED confirms clear communication (five consecutive blinks).
Low battery signal
The unit remains operational for approximately 30 days after the low battery signal is sent; replace with 3V CR123 batteries.
Before use
- Program zones and connect the receiver before installing batteries.
- Verify panel firmware version (172+ required for Disarm Disable).
- Ensure you are free of static electricity before handling circuit boards.
- Confirm communication using the LED Survey operation before final mounting.
- Ensure mounting surface is rigid and vibration-free.
Specs in practice
- Pet Immunity
- The detector ignores movement from animals weighing up to 40 lbs.
- Mounting Height
- The unit should be mounted at a height of 8 feet.
Images and diagrams
- Figure 2 illustrates the detection pattern (Top and Side views) to help determine the best placement for coverage.
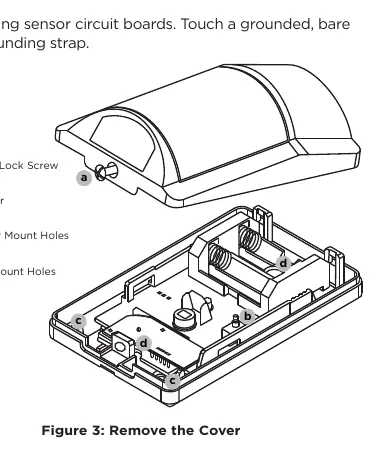
- Figure 3 identifies the cover lock screw, tamper switch, and mounting holes for both corner and flat wall installation.
Model compatibility
- Compatible with all DMP 1100 Series Wireless Receivers and panels.

Manual page author
Emily Carter
User documentation editor
Prepares concise manual descriptions and highlights the most useful setup, operation, and maintenance information for readers.