Home / Pet Supplies
Dogtra 1900S HANDSFREE Dog Training E-Collar User Manual
Comprehensive user guide for the Dogtra 1900S HANDSFREE dog training e-collar. Includes setup, HANDSFREE remote pairing, stimulation settings, charging, and troubleshooting.
Quick answers from the manual
Quick answer
- The Dogtra 1900S HANDSFREE is a dog training e-collar with a 3/4-mile range, featuring a remote controller for hands-free operation. It offers Nick, Constant, and Pager (vibration) modes with 127 stimulation levels. p. 5, 6
Key actions
- Turn on the transmitter by holding the button on the right side. p. 9
- Code the HANDSFREE remote by holding the on/off and function buttons on the transmitter until blinking, then holding the remote button. p. 14
First start
- Fit the receiver snugly on the dog's neck. p. 16
Technical specifications
| Parameter | Value | Meaning | Pages |
|---|---|---|---|
| Range | 3/4 mile | Maximum operating distance. | p. 6 |
| Stimulation Levels | 0-127 | Intensity adjustment range. | p. 6 |
| Waterproof Rating | IPX9K | Waterproof certification for transmitter and receiver. | p. 6 |
Where to find it in the PDF
- Overview p. 7
Table of contents
Manual images
Click an image to enlargeQuick Guide
The Dogtra 1900S HANDSFREE is a professional-grade dog training e-collar. Before first use, ensure the unit is fully charged for 2 hours. The system consists of a handheld transmitter, a receiver collar, and a HANDSFREE remote controller. Always start with the lowest stimulation level and adjust based on your dog's reaction. Ensure the receiver is fitted snugly so contact points touch the skin.
Overview
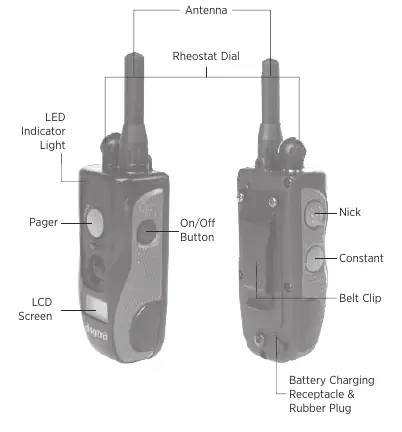
The system features a transmitter with a rheostat dial for precise stimulation control (0-127), a receiver collar, and a HANDSFREE remote controller that allows for discreet, multi-tasking operation. The transmitter includes buttons for Nick (single pulse), Constant (continuous stimulation), and Pager (vibration).
Turning the System On/Off
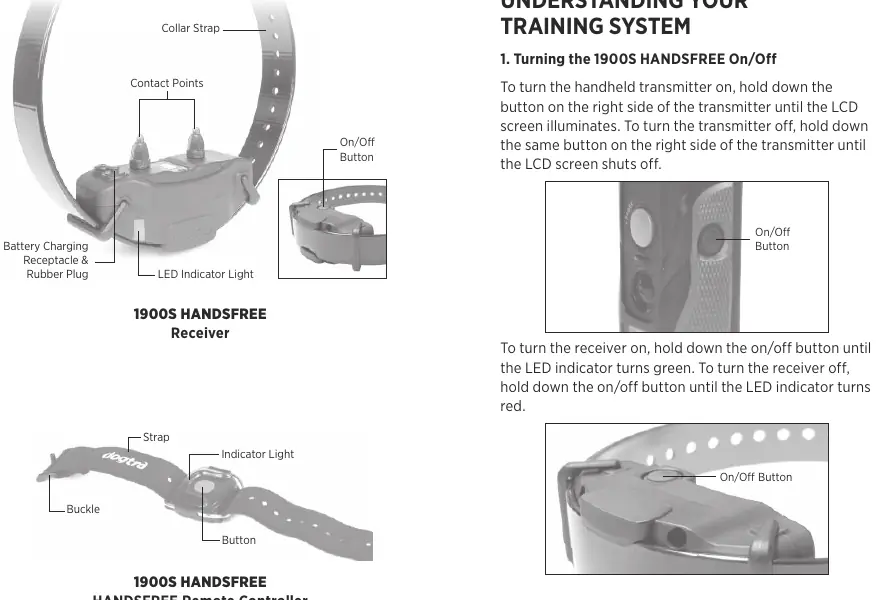
To turn the handheld transmitter on, hold the button on the right side until the LCD illuminates. To turn it off, hold the same button until the screen shuts off. To turn the receiver on, hold the on/off button until the LED indicator turns green. To turn it off, hold the button until the LED turns red.
HANDSFREE Remote Controller
The HANDSFREE remote allows you to trigger stimulation without holding the main transmitter. To code the remote: 1. Start with the transmitter off. 2. Hold the on/off button and the desired function button (Nick, Constant, or Pager) on the transmitter until the light blinks rapidly. 3. Release buttons. 4. Hold the HANDSFREE remote button until the transmitter and remote show a solid light. 5. Release all buttons.

Receiver Fitting
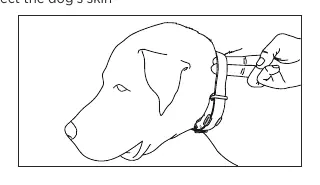
The receiver must be fitted so the stainless steel contact points press firmly against the dog's skin. You should be able to fit two fingers underneath the collar strap. The best location is on either side of the dog's windpipe. Reposition the receiver every few hours to prevent skin irritation and remove after 8 hours of use.
Finding the Right Stimulation
Use the Rheostat Dial on top of the transmitter to adjust intensity from 0 to 127. Always start at the lowest level and increase gradually until the dog shows a mild reaction. Intensity can be adjusted while stimulation is in use.
Charging the Battery
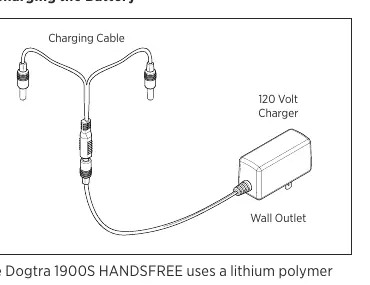
The system uses lithium polymer batteries. Charge for 2 hours before first use. Plug the charger into a 120V wall outlet. The indicator light will glow red while charging and turn green when fully charged. Always cover the charging receptacles with rubber plugs after charging.
Maintenance
Ensure the rubber charging cap is securely in place during use. After training, inspect the unit for damage and rinse the receiver to remove dirt or debris. Store the unit at room temperature and fully charge before long-term storage.
Troubleshooting
If the dog is not reacting, check if the unit is on, ensure the collar is tight enough, or increase the stimulation level. If the unit is not holding a charge, check the charging pin for damage or debris. For range issues, ensure the antenna is not covered by your body or obstructed by terrain.
Manufacturer information
Dogtra
Practical help
Common problems
Dog is not reacting to the system
Ensure the receiver and transmitter are on, the collar is tight enough for contact points to touch the skin, and the stimulation level is high enough.
LED light is on, but no stimulation is felt
Test the system using the included test light. Your personal tolerance may be higher than the dog's.
Range is reduced or stimulation is weak at distance
Ensure the transmitter antenna is not covered by your body or clothing. Avoid operating near electrical conductors like cars or metal structures.
Unit is not holding a charge
Check the charging pin inside the port; it should be straight and stiff. Clean the port with a cotton swab and rubbing alcohol.
Before use
- Charge the unit for 2 hours before first use.
- Ensure the receiver is fitted correctly (two fingers under the strap).
- Test the stimulation using the provided test light.
- Ensure the transmitter antenna is clear and not covered by your body.
- Check that the rubber charging plugs are secure.
Images and diagrams
- Transmitter buttons: Nick, Constant, Pager, and On/Off.
- Receiver fitting: Position on either side of the windpipe.
- HANDSFREE remote: Strap fastening instructions for wrist or finger.
- Charging: Connecting the splitter cable to the charger.
Model compatibility
- For dogs as small as 35 pounds.
- HANDSFREE remote must be within 33 feet of the transmitter.
- Auto charger input: 12V-24V, output: 10V 1500mAh.
- European charger: Designed for 220V AC outlets.

Manual page author
Michael Turner
Technical manual editor
Reviews PDF manuals for structure, safety notes, and practical product details so readers can find the right information quickly.