Tools / Automotive Tools
User Manual for Draper 19L Tyre Bead Seater 80000
Quick guide for the Draper 19L Tyre Bead Seater 80000. Includes assembly instructions, operating procedures, safety guidelines, and technical specifications.
Quick answers from the manual
Quick answer
- The Draper 19L Tyre Bead Seater (80000) is designed to seat tubeless tyre beads by dumping air into the tyre void. It requires an air supply and operates at 85-115psi. p. 5, 10
Key actions
- Charge the tank by attaching an air line to the inlet valve and opening the valve. p. 10
First start
- Assemble the outlet nozzle using PTFE tape for sealing, then connect to an air supply. p. 9, 10
Problems and fixes
Bead does not seat
Re-angle the nozzle (50-70 degrees) and ensure proper lubrication of tyre beads.
p. 10Technical specifications
| Parameter | Value | Meaning | Pages |
|---|---|---|---|
| Tank Capacity | 19 Litres | Volume of the air tank | p. 5 |
Where to find it in the PDF
- Technical Description p. 7
- Assembly p. 9
- Operations p. 10
Table of contents
Manual images
Click an image to enlargeQuick guide from the manual
The Draper 19L Tyre Bead Seater (Stock No: 80000) is designed to seat tubeless tyre beads by rapidly releasing compressed air into the tyre void. It is suitable for use on cars, commercial vehicles, agricultural machinery, and ATV tyres. Always ensure the unit is operated within the recommended pressure range of 85-115psi (6-8 Bar).
Technical description
The unit consists of the following key components:
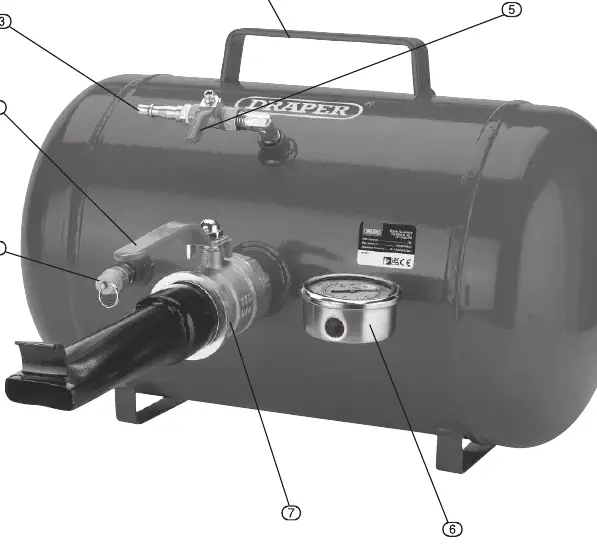
- Safety pressure relief valve: Prevents over-pressurising the tank.
- Air release valve lever: Used to trigger the air release.
- Air inlet connection: Where the air supply is attached.
- Pressure gauge: Indicates the current tank pressure.
- Outlet nozzle: Directs the air into the tyre rim.
Assembly
Before use, the outlet nozzle must be attached to the unit:
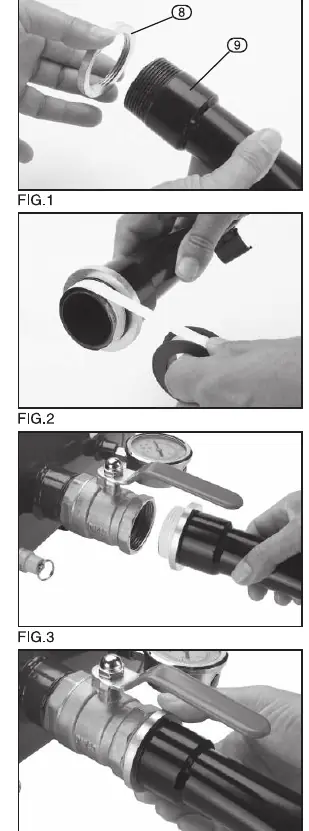
- Check that all components are present and in good condition.
- Screw the outlet nozzle firmly into the air outlet port.
- Use PTFE tape or an equivalent sealant on the threads to ensure a proper seal and ease of future removal.
Operation
Follow these steps to operate the bead seater:
- Charging the tank: Attach an air line to the air inlet valve. Open the inlet valve and charge the tank to the required pressure (recommended 85-115psi).
- Preparation: Ensure both beads of the tyre are well lubricated. Position the wheel on a stand with the valve stem pointing upwards.
- Positioning: Adjust the bead seater so the weight of the unit rests on your leg. Place the outlet nozzle flange on the rim of the wheel.
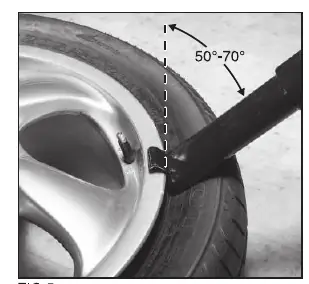
- Angle: The bead seater should be angled between 50 and 70 degrees, pointing directly into the largest gap between the tyre and the wheel.
- Activation: Hold the unit securely with one hand and quickly open the release valve with the other. If the bead does not seat, recharge the tank and repeat the procedure.
Safety and maintenance
- Safety: Never modify the product. Do not use in damp or wet locations. Keep children away.
- Inspection: Check for damaged parts before every use. If parts are damaged, they must be repaired or replaced by a qualified person.
- Storage: Store out of reach of children.
- Disposal: Do not dispose of with domestic waste. Contact local authorities for collection schemes.
Manufacturer information
Draper Tools
Practical help
Common problems
Bead does not seat
Ensure the bead seater is angled between 50 and 70 degrees and pointing directly into the gap between the tyre and the wheel. Recharge the tank and repeat the procedure.
Air leak at nozzle
Ensure the outlet nozzle is screwed firmly into the air outlet port using PTFE tape or equivalent for sealing.
Before use
- Check that all components are present and in good order.
- Ensure the lever on the bead seater is in the 'closed' position before connecting to an air supply.
- Check for damaged parts before use.
- Ensure the tyre beads are well lubricated.
- Position the wheel on a stand with the valve stem pointing upwards.
Specs in practice
- Tank Capacity
- 19 Litres (5 Gallon)
- Maximum Pressure
- 145psi (10 Bar)
- Operating Pressure
- 85 - 115psi (6-8 Bar)
Images and diagrams
- 1: Safety pressure relief valve
- 2: Air release valve lever
- 3: Air inlet connection
- 5: Air inlet valve lever
- 6: Pressure gauge
Model compatibility
- Suitable for use on cars, commercials, agricultural and ATV tyres.

Manual page author
David Miller
Documentation analyst
Organizes user manual content into clear summaries, with attention to model details, product context, and everyday usability.