Home Appliances / Space Heaters
User Manual for Draper Infrared Cabinet Heater 04745 / 04746
Quick guide for the Draper Infrared Cabinet Heater (models 04745 and 04746). Includes assembly instructions, operating modes, safety precautions, and maintenance procedures.
Quick answers from the manual
Quick answer
- The Draper Infrared Cabinet Heater is an indoor-use heater. To operate, connect to power, set the power switch to ON, and press the standby button. It features adjustable heating modes, a target temperature setting, and a shutdown timer. p. 11, 12
Key actions
- Assemble the heater by attaching the wheel frames to the base and the handle to the rear using the provided bolts. p. 10
- Enable the lower heating element by pressing the heating mode button. p. 12
First start
- Ensure the heater is on a level surface, connect to power, set the power switch to ON, and press the standby button. p. 10, 11
Problems and fixes
Heater does not operate
Check power supply, check for loose connections, or reset the tilt switch by tilting the unit in the opposite direction.
p. 17Maintenance and reset
- The tilt switch resets automatically when the unit is tilted in the opposite direction until an audible click is heard. p. 17
Technical specifications
| Parameter | Value | Meaning | Pages |
|---|---|---|---|
| Rated voltage (04745) | 230V | Operating voltage for model 04745 | p. 5 |
| Rated voltage (04746) | 110V | Operating voltage for model 04746 | p. 5 |
Where to find it in the PDF
- Product Overview p. 8
- Assembly p. 10
- Operating Instructions p. 11, 12, 13
- Maintenance p. 15, 16
Table of contents
Manual images
Click an image to enlargeQuick guide from the manual
The Draper Infrared Cabinet Heater is designed for indoor use to raise ambient temperatures. It is suitable for domestic and light commercial environments. Important: Always use the heater in an upright position on a firm, level surface. Maintain a minimum of 2m clearance from flammable objects. Do not use extension leads or multi-socket adapters; plug the unit directly into a power outlet.
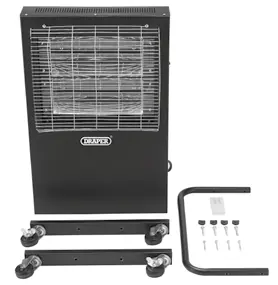
Product Overview
The heater features a control panel with an LCD display, a power switch, and a remote control. Key components include the upper and lower heating elements, reflectors, fireguard, and lockable wheel castors for mobility.

Assembly
Before use, the heater requires assembly of the wheel frames and the handle:
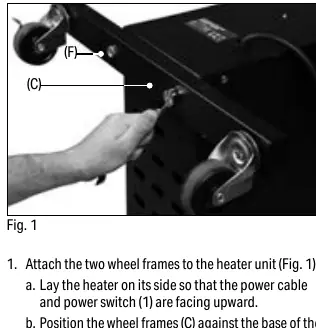
- Wheel Frames: Lay the heater on its side. Position the wheel frames (C) against the base and secure them using the 14mm x 40mm hex bolts (F). Stand the unit upright.
- Handle: Position the handle (B) at the back of the heater. Place handle mounts (E) between the handle and the heater at each hole. Secure using the four M6 x 45mm hex bolts (G).
Operating Instructions
The heater is controlled via the top-mounted control panel or the included remote control.
- Powering On: Connect to a power supply and set the power switch (1) to the "ON" position. The unit enters standby mode. Press the standby button (10) to start heating.
- Heating Modes: The upper heating element is active by default. Press the heating mode button (13) to enable the lower heating element for faster heating.
- Temperature Control: Use the up (14) and down (15) buttons to set the target temperature (range 15°C to 45°C).
- Shutdown Timer: Press the shutdown timer button (11) and use the up/down buttons to set the desired hours (up to 23:00). Press the timer countdown button (12) to initiate.
Safety Information
- Tilt Switch: The heater automatically enters standby mode if tilted forward or backward by 25° or more.
- Open Window Detection: If the ambient temperature drops more than 5°C within 10 minutes, the heater beeps and enters standby mode to save energy.
- Cooling: Always switch off, disconnect from power, and allow the unit to cool for at least 20 minutes before moving or performing maintenance.
Maintenance
Maintenance should only be performed by qualified personnel.
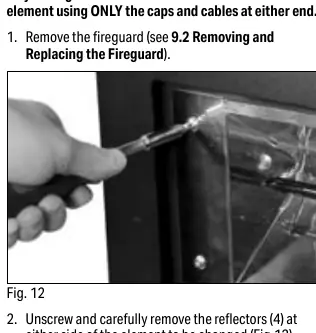
- Fireguard: Remove the attachment screws to tilt the fireguard forward and slide it out for access to elements.
- Reflectors: Clean gently with a dry cloth. Do not use abrasive materials or solvents.
- Heating Elements: If an element fails, contact Draper Tools for replacement. Follow the manual's specific steps to disconnect the spade connectors and replace the element.
Manufacturer information
Draper Tools
Practical help
Common problems
Heater does not operate when switched on
Check power supply, ensure plug/cable are not damaged, and verify the tilt switch has reset (tilt the unit in the opposite direction until it clicks).
Heater does not emit heat
Check if heating elements are damaged; replace if necessary.
Inaccurate ambient temperature reading
The thermostat sensor or connection may be faulty; contact Draper Tools.
Before use
- Inspect for broken, cracked, or loose parts.
- Ensure the heater is in an upright position.
- Verify 2m clearance from flammable objects.
- Lock the wheels when stationary.
- Ensure power switch is OFF before connecting to power.
- Do not use extension leads or multi-socket adapters.
Specs in practice
- 25° Tilt Switch
- Safety feature that shuts down the heater if it is tilted beyond 25 degrees.
Images and diagrams
- The control panel (8) includes buttons for Standby, Timer, Heating Mode, and Temperature adjustment.
- Assembly requires attaching wheel frames to the base and the handle to the rear.
- Element replacement involves removing the fireguard, unscrewing reflectors, and disconnecting spade connectors.
Model compatibility
- Indoor use only.
- Do not use in dusty environments.
- Do not use in small rooms occupied by individuals unable to leave on their own without supervision.

Manual page author
Michael Turner
Technical manual editor
Reviews PDF manuals for structure, safety notes, and practical product details so readers can find the right information quickly.