Accessories / Mounts & Stands
Installation and User Guide for Easee Base 1-Way / 2-Way Charging Post
Complete installation and user guide for the Easee Base 1-Way and 2-Way charging post. Includes technical specifications, safety instructions, assembly steps, wiring diagrams, and maintenance details.
Table of contents
Manual images
Click an image to enlargeQuick guide from the manual
The Easee Base is a modular charging post designed to mount up to four Easee Charging Robots. It supports 1-Way, 2-Way, and 4-Way configurations. Important: All installation, repair, and maintenance must be performed by an authorized electrician. Ensure the circuit is RCD protected before installation.
Technical specifications
- Dimensions: H: 1500 x W: 160 x D: 80 mm
- Weight: 6.1–7.7 kg
- Material: Aluminium and stainless steel
- IP degree: IP44
- Impact resistance: IK10
- Cable support: Up to 16mm² flexible conductors with ferrules and 25mm² solid conductors
Safety instructions
Read the entire manual before installation. Key safety points include:
- Installation must not be carried out in explosive atmospheres or areas with flowing water.
- The product must be installed on a permanent location.
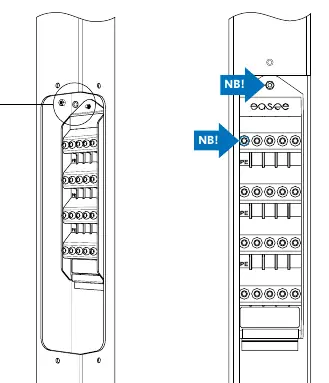
- Terminals in the backplate are energized when the circuit is closed.
- Do not use water to extinguish fires.
- Do not use high-pressure or running water to clean the product.
- Do not use extension cords or unapproved adapters.
Assembly instructions
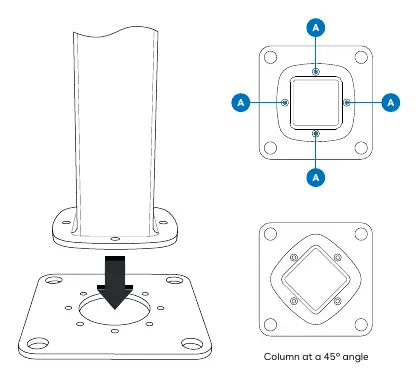
The Easee Base shares common parts across configurations. The adapter plate supports c/c 160 mm foundations and can be mounted in 45° increments for correct orientation. Recommended torque for the adapter plate is 30-40 Nm.
1-Way setup
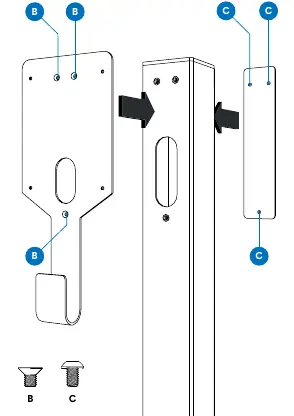
Attach the mounting plate to the column using 3 flat head screws and the cover using 3 rounded head screws. Ensure the top of the column is sealed with a plastic cap.
2-Way setup
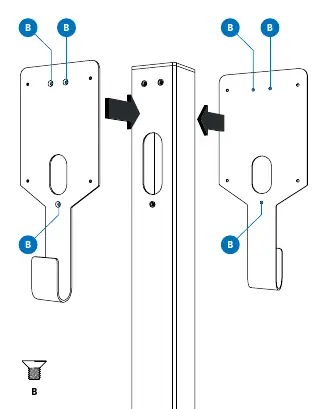
Attach the mounting plates to the column using 3 flat head screws per plate (6 total). Ensure the top of the column is sealed with a plastic cap.
Power Rail installation
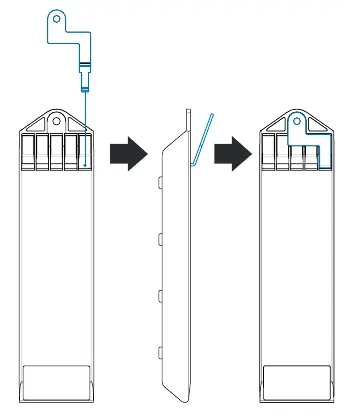
The Power Rail is a connection box for series connection of charging posts. Before installing, apply the ground connection plate to the PE terminal. Insert the serrated washer between the metal column and the Power Rail. Fasten the grounding nut with the spring washer. Notice: The grounding nut must be fastened and the top PE terminal screw tightened, regardless of whether a wire is present.
Practical details
For all flat and rounded head screws, a torque of 7-9 Nm is recommended. The device is covered by a 3-year limited warranty. For support, visit easee.support.
Official resources from the manual
Manufacturer information
Easee
Practical help
Common problems
Fire or smoke
Do not use water to extinguish. Cut power immediately.
Incorrect orientation during installation
The adapter plate can be mounted in 45° increments to achieve the correct direction.
PE connection failure
Ensure the grounding nut is fastened and the top PE terminal screw is tightened, even if no wire is present.
Before use
- Ensure installation is performed by an authorized electrician.
- Verify the circuit is RCD protected.
- Check foundation compatibility (c/c 160 mm).
- Ensure power is turned off before beginning wiring.
- Verify phase sequence for parallel backplates.
- Test wire connections by pulling on each wire.
Specs in practice
- Torque (Adapter plate)
- 30-40 Nm.
- Torque (Screws)
- 7-9 Nm.
- Torque (Terminals)
- 5 Nm.
Images and diagrams
- Adapter plate mounting with 45° increments.
- 1-Way and 2-Way mounting plate attachment.
- Power Rail grounding plate installation.
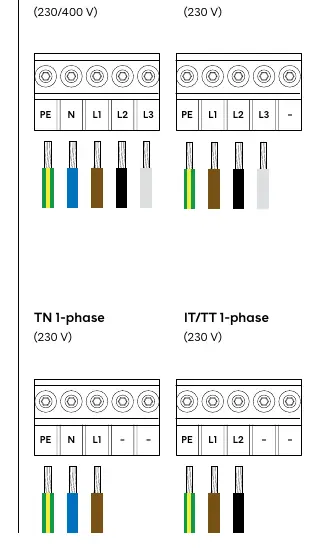
- Wiring diagrams for TN/TT and IT systems.
Model compatibility
- Supports up to four Easee Charging Robots.
- Compatible with c/c 160 mm foundations.
- Supports 16mm² flexible and 25mm² solid conductors.

Manual page author
Michael Turner
Technical manual editor
Reviews PDF manuals for structure, safety notes, and practical product details so readers can find the right information quickly.