Lighting / Fixtures
Installation and Operating Instructions for 110V Pendant Lighting
Quick guide for installing and operating your 110V Pendant Lighting. Includes assembly steps, wiring instructions, bulb requirements, and maintenance tips.
Table of contents
Manual images
Click an image to enlargeQuick guide from the manual
Before beginning, ensure the power is shut off at the fuse or circuit breaker. This pendant light requires a Phillips screwdriver, wire strippers, electrical tape, and a ladder for installation. Do not use bulbs with a wattage greater than specified.
Package contents
- Canopy (A)
- Mounting bracket (B)
- Outlet box screws (C)
- Mounting balls (D)
- 6 In. rods (E)
- 12 In. rods (F)
- Socket assembly (G)
- Shade (H)
- Socket collar (I)
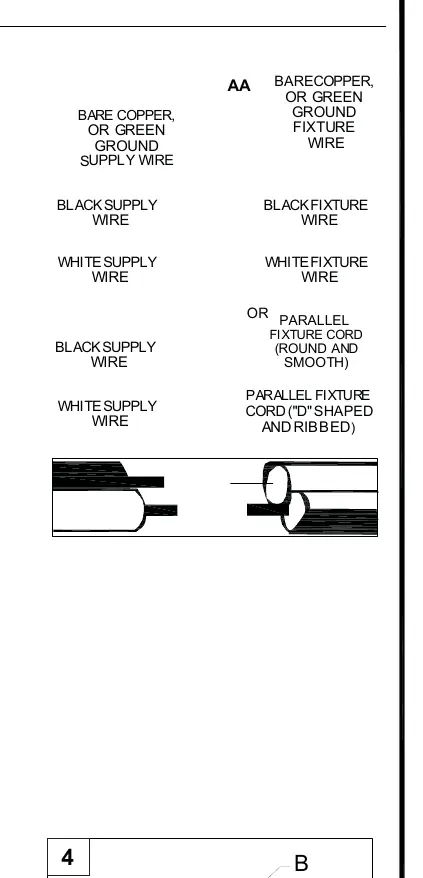
- Wire connectors (AA)
Assembly instructions
Step 1: Rod assemblyChoose the desired hanging length. Assemble the rods (E, F) to the desired length, passing the fixture wire through the rod assembly. Attach the rod assembly to the socket assembly (G) and hand-tighten. Thread the canopy (A) to the uppermost rod and hand-tighten.
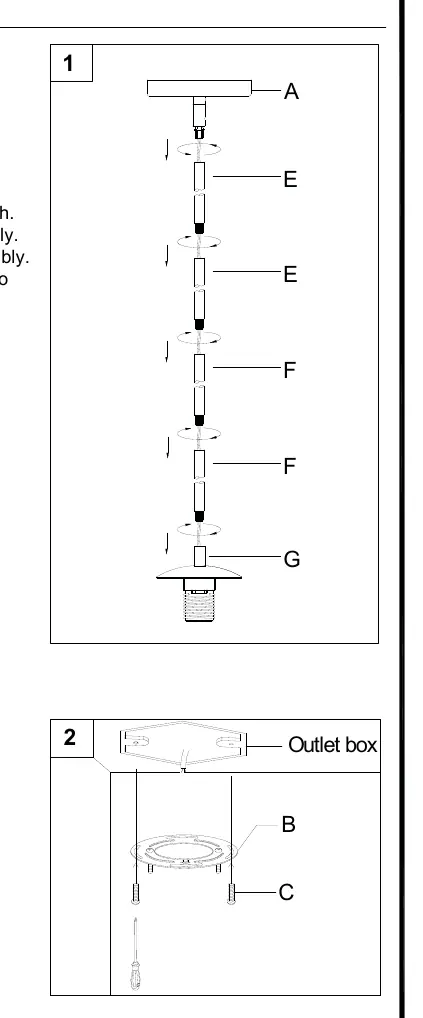
Step 2: Mounting bracketSecure the mounting bracket (B) to the outlet box using the outlet box screws (C).
Step 3: WiringConnect the fixture wires to the supply wires using the wire connectors (AA). Ensure the ground wire is connected according to local regulations (US or Canada instructions provided in the manual). Connect the Neutral (White) supply wire to the Neutral fixture wire and the Hot (Black) supply wire to the Hot fixture wire.
Step 4: Canopy attachmentAttach the canopy (A) to the mounting bracket (B) and secure it with the mounting balls (D).
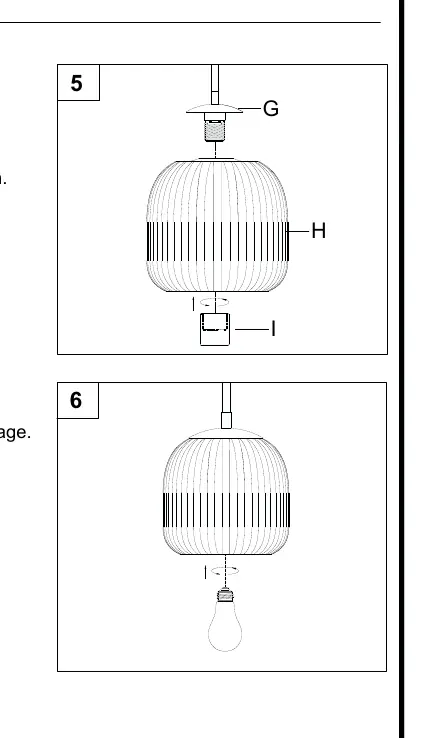
Step 5: Shade installationRemove the socket collar (I) from the socket. Place the shade (H) over the socket and secure it by threading the socket collar back onto the socket. Hand-tighten until snug.
Step 6: Bulb installationInstall the correct bulb (not included). Use one 100W maximum medium base (E26) type A or 16W maximum medium base (E26) self-ballasted LED bulb.
Care and maintenance
Always ensure the electric current is turned off before cleaning. Use a soft, moist cloth with mild non-abrasive soap to clean the fixture. Never use glass cleaner, as it will damage the metal finish. Glass shades may be washed in a towel-lined sink with warm water and mild soap; do not wash in an automatic dishwasher.
Troubleshooting
If the fixture does not light, check the wiring or replace the bulb.
Practical help
Common problems
Fixture does not light
Check the wiring connections or replace the bulb.
Before use
- Shut off power at the fuse or circuit breaker
- Verify all parts are present against the package contents list
- Ensure you have a Phillips screwdriver, wire strippers, electrical tape, and a ladder
- Read all safety information before starting
Show more Show less
Images and diagrams
- Assembly steps illustrate rod connection, mounting bracket installation, wiring, and shade attachment.
Model compatibility
- For use in US and Canada
- Requires standard outlet box

Manual page author
Michael Turner
Technical manual editor