Tools / Saws
MAX 55240 Rotary Hammer User Manual
Quick guide for the MAX 55240 rotary hammer. Includes setup, drilling depth adjustment, bit installation, function selection, lubrication, and maintenance instructions.
Table of contents
Manual images
Click an image to enlargeQuick guide from the manual
This manual provides essential instructions for the safe and efficient operation of the MAX 55240 rotary hammer. Before using the tool, ensure you have read all safety warnings, particularly those regarding electrical safety and personal protective equipment. The tool is designed for drilling, rotary hammering, and chiselling.
Components
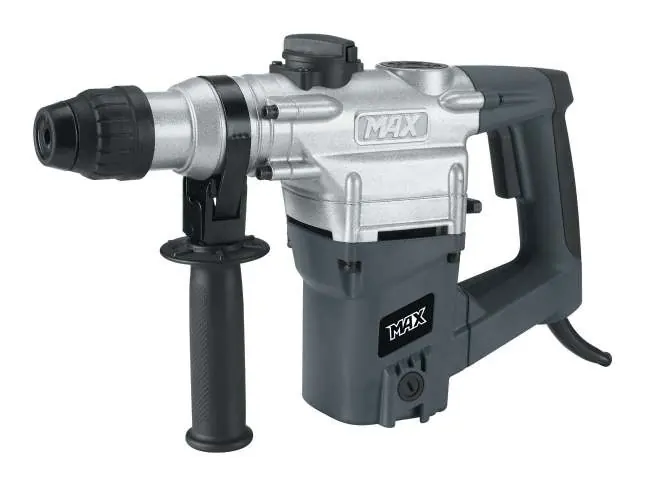
- SDS drill chuck
- Chiselling selector
- Lubricant cover
- Drill/rotary hammer selector
- Support grip
- Depth stop
Preparation
Attaching the support handle
The support grip can be rotated 360° around the flange at the front of the rotary hammer for optimal support. Undo the assembly collar by turning the support handle anticlockwise, push the collar past the SDS drill chuck and over the flange, then retighten the handle in the desired position.
Setting drilling depth
To drill multiple holes to the same depth, use the depth stop. Loosen the support handle, insert the straight end of the depth stop into the hole on the support handle, align the tip with the drill bit tip, and push the stop back to the required depth before retightening the handle.
Operation
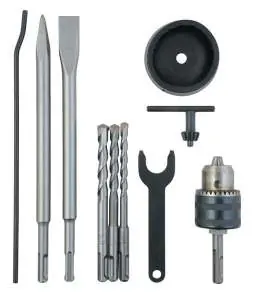
Fitting drill bits/chisels
The rotary hammer uses an SDS drill chuck. Clean the accessory and apply a small amount of engine grease to the shaft before fitting. Insert the shaft into the SDS chuck and turn it half a revolution anticlockwise to lock it in place. Ensure the tool is centered and secure.
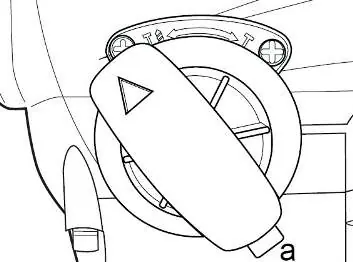
Selecting functions
Use the selectors to choose the operating mode:
- Selector (2): Choose between chiselling with or without rotation of the drill chuck. Press the safety button (a) to change the position.
- Selector (6): Choose between drilling (for wood and metal) and rotary hammering (for hard materials like brick and stone).
NB! Do not touch these selectors while the rotary hammer is in operation.
Maintenance
Lubrication
Position the rotary hammer horizontally. Unscrew the lubricant cover using the provided spanner. Top up with lubricating grease if necessary. Without sufficient grease, the tool may be permanently damaged. If the tool has been stored in freezing temperatures, run it unloaded for 5 minutes to warm up the grease before starting work.
Cleaning
Wipe the tool with a well-wrung cloth after use. Keep the surface and ventilation slots free of dirt. Do not use corrosive or abrasive cleaning agents.
Technical Data
- Voltage/frequency: 230-240 V ~ 50 Hz
- Power rating: 1050 W
- Speed: 950 rpm
- Impact frequency: 4250 impacts/min
- Drilling capacity: max. Ø26 mm
Practical help
Common problems
Chisel does not move forward or backward.
If the tool was stored in freezing temperatures, the grease may be too thick. Run the tool unloaded for 5 minutes to warm up the lubricant.
Excessive vibration during operation.
Ensure the correct function is selected and do not press too hard against the workpiece.
Before use
- Ensure the power supply matches the tool's voltage (230-240V).
- Check the lubrication level before each use.
- Ensure the support handle is securely tightened.
- Verify the correct bit or chisel is properly installed and locked in the SDS chuck.
- Wear appropriate personal protective equipment (ear protection, eye protection, dust mask).
Specs in practice
- Power rating
- 1050 W, indicating the motor's power consumption.
- Impact frequency
- 4250 impacts/min, the rate at which the hammer mechanism strikes.
- Drilling capacity
- Maximum diameter of Ø26 mm for drilling.
Images and diagrams
- The diagram identifies the main components: SDS drill chuck, chiselling selector, lubricant cover, handle, on/off button, drill/rotary hammer selector, cord, carbon brush holder, support grip, depth stop, and various accessories.
Model compatibility
- Equipped with an SDS drill chuck for SDS accessories.
- Includes an adapter for standard drill chucks with toothed rims.

Manual page author
David Miller
Documentation analyst
Organizes user manual content into clear summaries, with attention to model details, product context, and everyday usability.