Lighting / Stage Lighting
User Manual for Elation Pixel Driver 170IP
Quick guide for the Elation Pixel Driver 170IP. Learn about installation, DMX connections, pixel grouping, maintenance, and safety guidelines for this professional lighting controller.
Quick answers from the manual
Quick answer
- The Pixel Driver 170IP is a professional lighting controller for DMX-controlled LED fixtures. It supports pixel grouping, Hi Power modes, and is IP65 rated for temporary outdoor use. p. 1, 5, 27
Key actions
- Mounting the device p. 15, 16
- Connecting DMX and LED fixtures p. 10, 11
First start
- Connect power, link DMX controller, and configure pixel settings via the control panel. p. 10, 18, 19
Problems and fixes
Performance changes or damage
Check for damaged cables, liquid ingress, or loose connections.
p. 5, 8Maintenance and reset
- Torque cover screws to 11.3 lb-in (13.0 kg-cm) after opening. p. 26
Technical specifications
| Parameter | Value | Meaning | Pages |
|---|---|---|---|
| Power | 12-24VDC, 8.4A | Requires separate power supply | p. 27 |
| Max Power | 200W | Max Power Consumption | p. 27 |
| Weight | 1.2kg (2.64 lbs) | Device weight | p. 27 |
Where to find it in the PDF
- Installation p. 10, 11, 12, 13
- System Menu p. 19
- DMX Traits p. 20
- Pixel Groups p. 21, 22, 23, 24
- Specifications p. 27
Table of contents
Manual images
Click an image to enlargeQuick guide from the manual
The Elation Pixel Driver 170IP is a professional lighting controller designed for use by trained personnel only. It is IP65 rated for temporary outdoor use. Key safety requirements include proper grounding, avoiding flammable materials, and ensuring the device is installed by qualified professionals. Do not attempt to open or repair the unit yourself, as this voids the warranty.
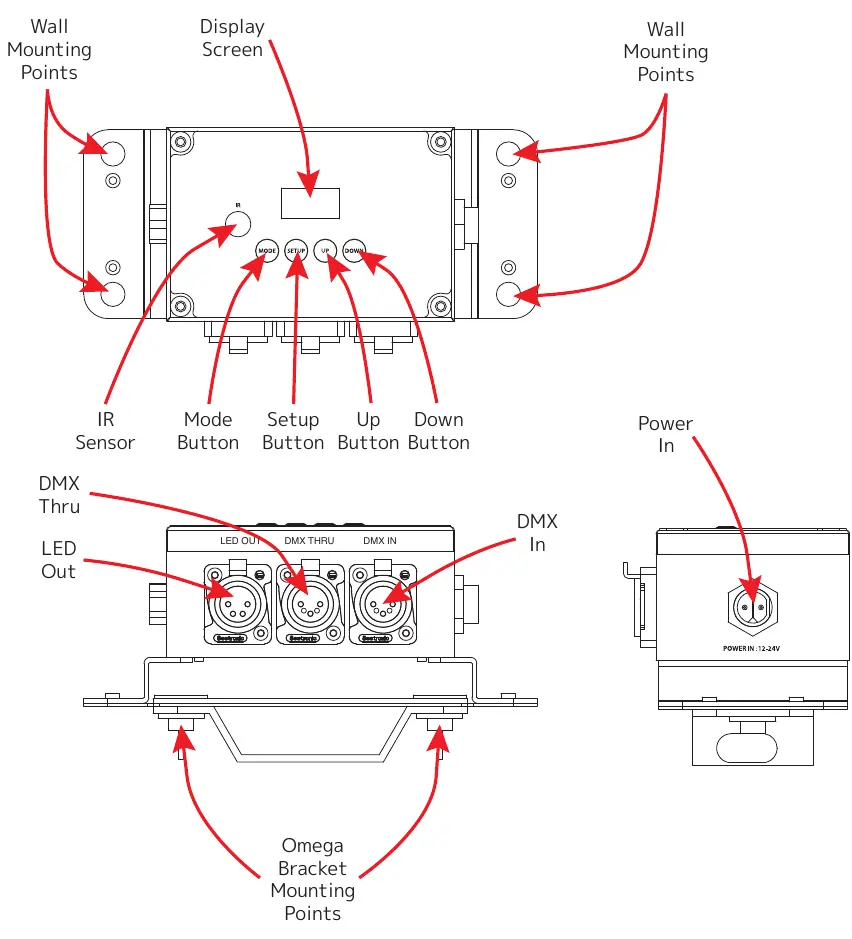
Device Overview
The unit features a display screen and a 4-button control pad (Mode, Setup, Up, Down) for navigation. Ports include DMX In, DMX Thru, LED Out, and Power In. Wall mounting points and an integrated mounting plate for an Omega bracket are provided.
Installation Instructions
Wall Mounting: Use four M6x25 self-tapping screws through the mounting flanges. Ensure the driver is mounted firmly.
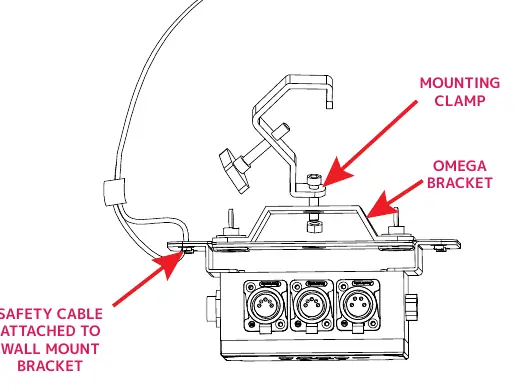
Clamp Mounting: Insert the Omega bracket's twist-lock fasteners into the mounting plate on the back. Secure the mounting clamp to the bracket and always attach a safety cable when installing in a suspended environment.
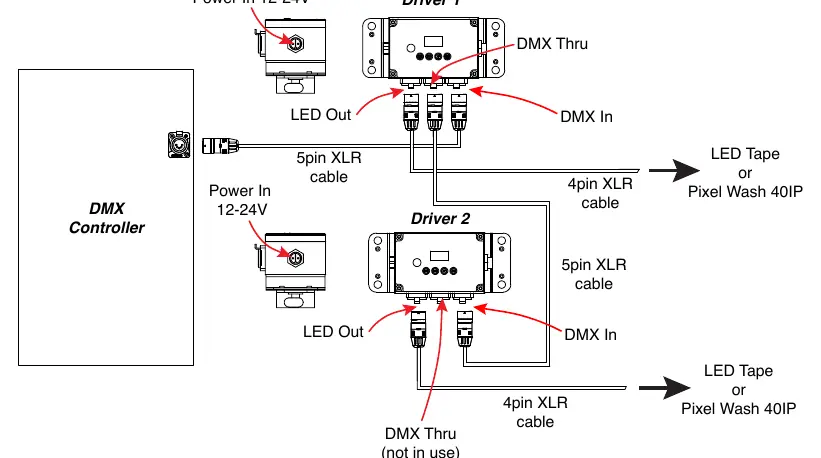
Connections: The driver supports series or parallel connections. Use 5-pin XLR cables for DMX and 4-pin XLR cables for LED fixtures. Ensure the DMX controller is connected to the DMX In port. If using multiple drivers, connect the DMX Thru port of the first driver to the DMX In port of the next.
Remote Control Operation
The included UC-IR24EL remote allows control of various functions. Aim the remote at the front of the fixture (max range 30 feet). Buttons allow control of strobe rates, color selection, program selection, and microphone sensitivity for sound-active modes.

System Menu and Settings
Use the control pad to navigate the menu. Key settings include:
- DMX Control Settings: Configure address, pixel count, pixel groups, and channel count.
- Personality: Adjust IR remote settings, display screen saver, and Hi Power Mode (affects max fixtures per driver).
- Manual Control: Adjust Red, Green, Blue, White, and Master Dimmer levels.
- Output Control: Select output type (Pixel Wash 40IP or LED Tape).
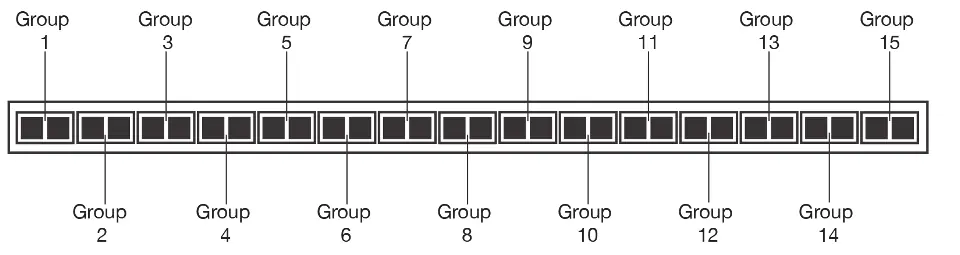
Pixel Grouping
The device allows users to adjust pixel grouping to reduce the number of required DMX channels. In standard configuration, pixels are controlled independently. Grouping multiple pixels under a common set of control channels reduces resolution but saves DMX channels. Refer to the pixel group tables in the manual for specific configurations based on your pixel count.
Maintenance Guidelines
Regular inspections are required to ensure proper function. Disconnect power before performing any maintenance. Inspect the chassis, optics, and rigging hardware every 30 days. If the cover is removed, all cover screws must be torqued to 11.3 lb-in (13.0 kg-cm) using a torque driver to maintain the IP rating.
Specifications
The unit features a 4-button OLED display, 1 DMX Universe (170 pixels), and supports LED Tape or Pixel Wash 40IP. It requires a 12-24VDC power supply. The device is CE, RoHS, cETL, and FCC compliant.
Practical help
Common problems
Unit not powering on
Check power source and connections.
DMX signal issues
Verify 5-pin XLR cable integrity and connections.
Corrosion or contamination
Inspect chassis and connectors every 30 days; reapply di-electric grease.
Before use
- Ensure installation is performed by qualified personnel.
- Verify power source voltage matches device requirements.
- Check that the mounting surface can support the device weight.
- Confirm all cables are properly connected and secured.
- Ensure the device is at least 1.5m away from flammable materials.
Specs in practice
- Hi Power Mode
- Limits max fixtures per driver (5 with mode ON, 8 with mode OFF).
Images and diagrams
- Wiring diagrams show series and parallel connection methods for DMX controllers and LED fixtures.
- Mounting diagrams illustrate wall and clamp installation using the Omega bracket.
Model compatibility
- Compatible with Pixel Wash 40IP and LED Tape.
- Requires separate power supply (12-24VDC).

Manual page author
Michael Turner
Technical manual editor
Reviews PDF manuals for structure, safety notes, and practical product details so readers can find the right information quickly.