Lighting / LED Drivers
User Manual for Elation KL Fresnel 6 CW LED Light
Quick guide for the Elation KL Fresnel 6 CW LED light. Includes installation, rigging, manual dimming, DMX channel settings, and maintenance instructions.
Table of contents
Manual images
Click an image to enlargeQuick Guide
The Elation KL Fresnel 6 CW is a professional LED lighting fixture. Before operation, ensure the unit is properly grounded and installed by qualified personnel. The fixture is designed for indoor, dry locations only. During initial operation, a light smoke or smell may occur; this is normal as excess paint burns off from the casing.
Safety Guidelines
- Protection Class 1: The fixture must be properly grounded.
- No User Serviceable Parts: Do not attempt repairs yourself, as this voids the warranty.
- Heat Warning: Never touch the fixture housing during operation. Allow 15 minutes to cool before servicing.
- Environment: Use in indoor, dry locations only. Keep flammable materials away.
- Ventilation: Do not block air ventilation slots. Maintain at least 6 inches (15cm) of clearance.
- Eye Safety: Never look directly into the light source.
Installation
The fixture must be installed following all local, national, and country commercial electrical and construction codes. When rigging in a suspended environment, always use a secondary safety cable.
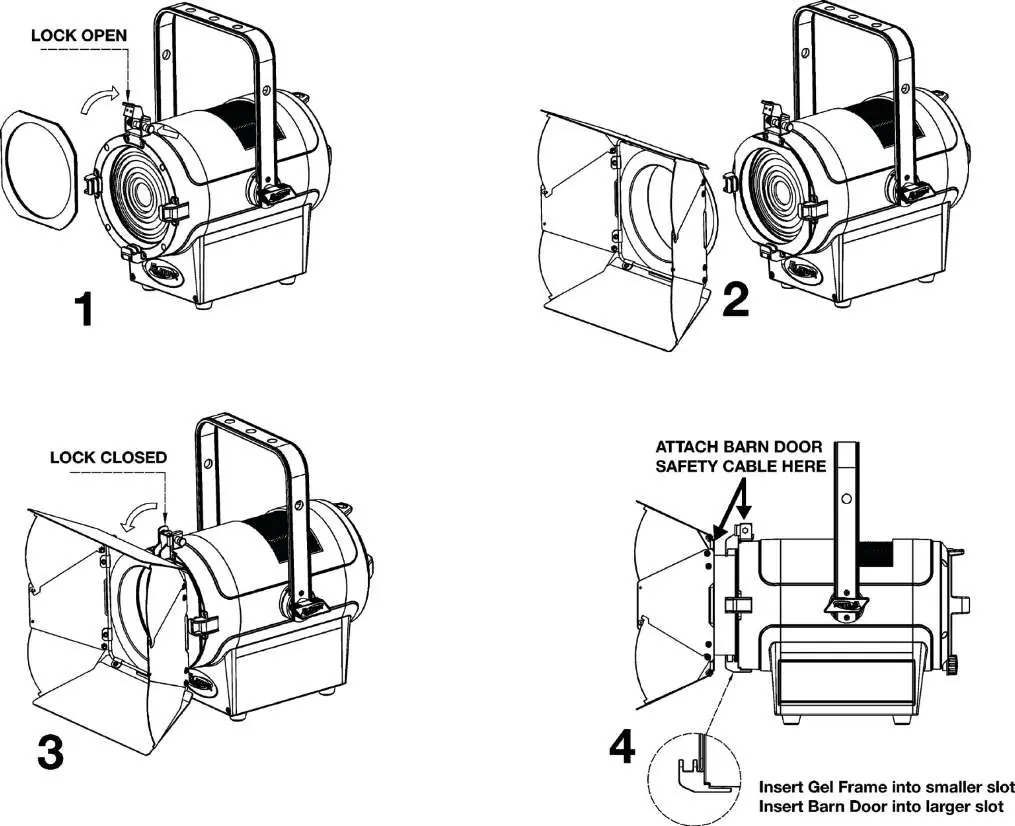
Gel Frame and Barn Door Installation
- Lift the lock on top of the fixture.
- Insert the Gel Frame into the first (smaller) slot.
- Insert the Barn Door into the second (larger) slot.
- Lower the lock to secure both accessories.
- Attach the included mini safety cable to the Barn Door and the top lock.
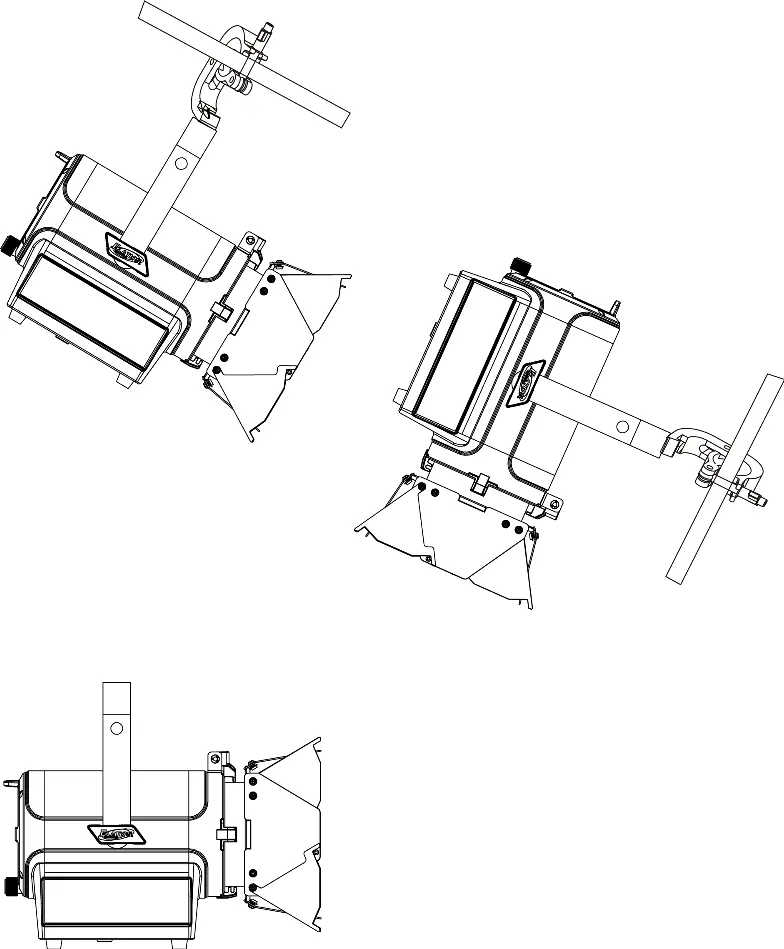
Rigging
Use an M10 screw fitted through one of the three holes on the yoke bracket to secure a professional-grade rigging clamp. Always use the designated rigging point for the safety cable; never secure it to a carrying handle.
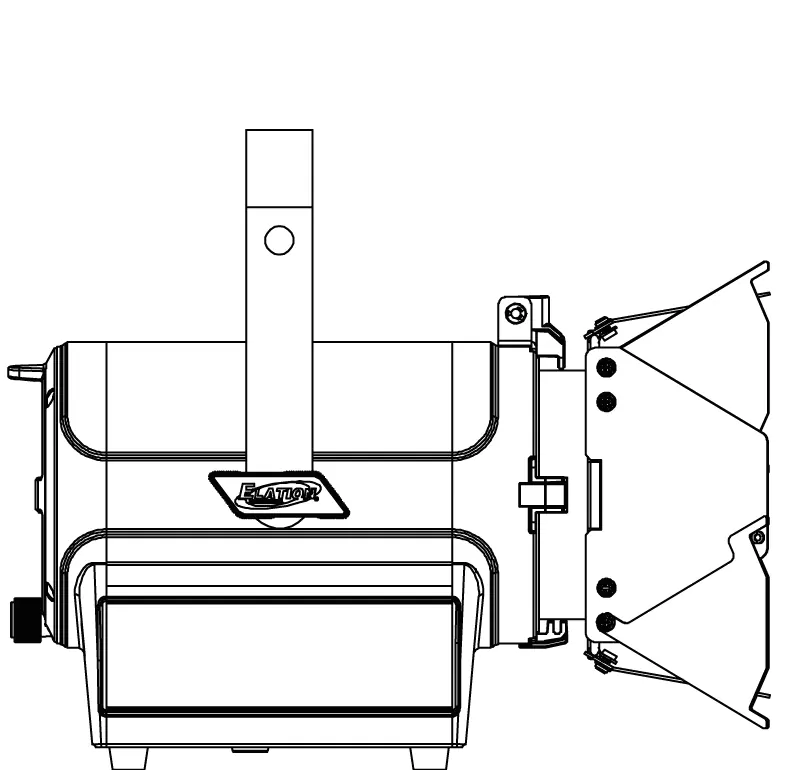
Fixture Overview
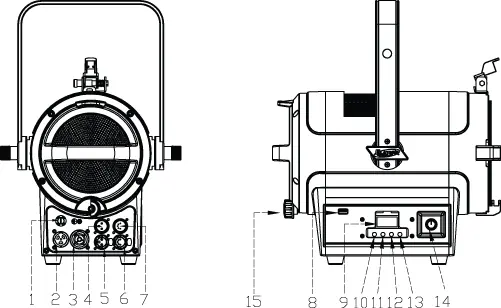
The fixture features a control panel on the side with an OLED display and four buttons (MODE, UP, DOWN, ENTER). Key ports include Power In/Out, 3-pin and 5-pin DMX In/Out, and a USB software update port. Manual controls include a Dimming knob and a Zoom Control knob.
System Menu
Access the main menu by pressing the MODE button. Use UP and DOWN to navigate and ENTER to select. To access the menu when locked, press and hold the MODE button for 3 seconds. The display will shut off automatically after 1 minute of inactivity.
Manual Dimming Control
To use the manual dimming knob, you must disconnect any DMX cables. Navigate to the Test menu, then the ManCtrl sub-menu. Set the Strobe value to 255 (LED ON). Push the DIMMING knob to unlock, rotate to the desired level, and push again to lock.
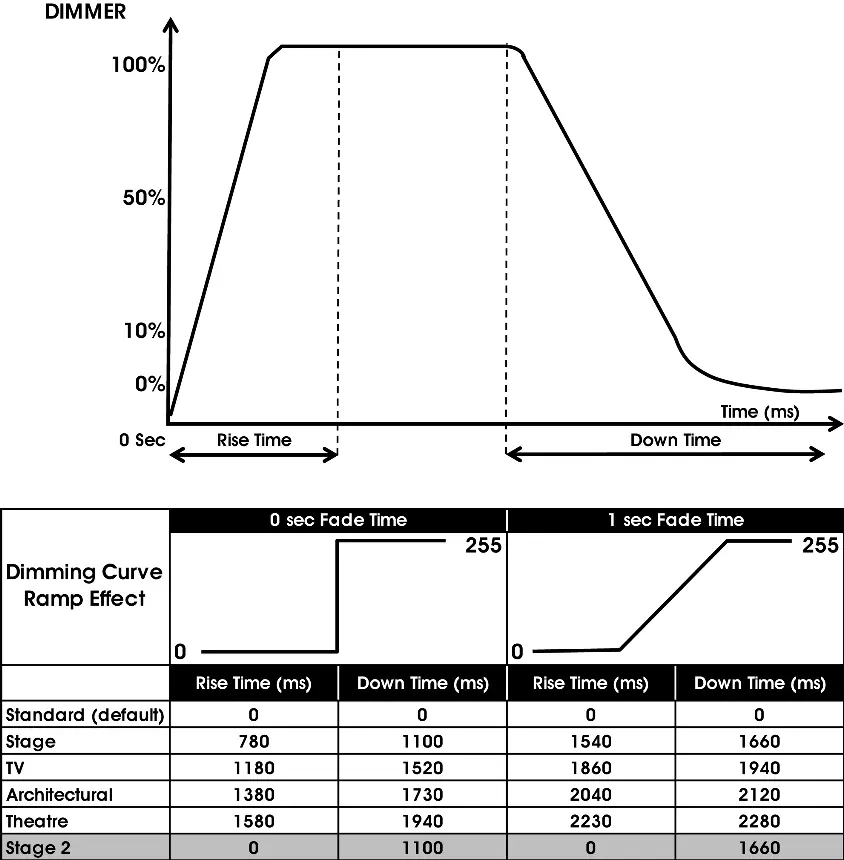
DMX Channel Functions
The fixture supports 5 DMX channel modes (1, 2, 3, 4, 5). Channels control Dimmer Intensity, Fine Dimming, Shutter/Strobe effects, Dimmer Modes/Delay Times, and LED Refresh Rate/Dimmer Curves.
Maintenance
- Cleaning: Clean the external lens surface at least every 20 days with a soft cloth. Never use alcohol, solvents, or ammonia-based cleaners.
- Routine Inspections: Have a detailed electric check performed by an approved electrical engineer every three months. Ensure all screws and fasteners are securely tightened.
Specifications

- Source: 150W Cool White LED Engine, 5,600K.
- Zoom Range: 16° - 39°.
- Power: AC 100-240V, 50/60Hz, 180W Max.
- Operating Temperature: 14°F to 113°F (-10°C to 45°C).
- Weight: 18.5 lbs (8.4kg).
Practical help
Common problems
Fixture does not dim manually
Ensure DMX cable is disconnected. Navigate to Test > ManCtrl, set Strobe to 255, then use the Dimming knob.
Light smoke or smell during initial use
This is normal; it is excess paint burning off from the casing due to heat.
LCD display locked
Press and hold the MODE button for 3 seconds.
Before use
- Check shipping carton for damage
- Ensure all accessories (Barn Door, Gel Frame) are present
- Verify power source is compatible (100-240V)
- Ensure proper rigging hardware (M10) is used for overhead installation
Specs in practice
- 150W Cool White LED
- Power consumption and light source type.
- Zoom Range 16° - 39°
- Adjustable beam angle for spot or flood lighting.
Images and diagrams
- Page 9 shows the layout of power/DMX ports and control buttons.
- Page 11 illustrates the installation of the gel frame and barn doors.
- Page 13 shows correct rigging positions.
Model compatibility
- Indoor/Dry locations only.
- Do not plug into a dimmer pack.
- Requires M10 x 25 mm hardware for rigging.

Manual page author
Michael Turner
Technical manual editor
Reviews PDF manuals for structure, safety notes, and practical product details so readers can find the right information quickly.