Electronics / Audio
Electro-Harmonix Octavix Octave Fuzz Pedal User Guide
Quick guide for the Electro-Harmonix Octavix pedal. Learn about controls, power requirements, 9V/24V voltage settings, and battery replacement.
Table of contents
Quick guide from the manual
The Electro-Harmonix Octavix is a fuzz pedal featuring a frequency doubling circuit. It is designed to produce a range of distortion from light drive to intense, torn speaker fuzz tones. The pedal can be powered by a 9V battery or an external power supply.
Controls
Boost Knob
Controls the amount of fuzz. Rolling down the guitar volume while using high boost settings can produce a slightly broken-up fuzz sound.
Octave Knob
Controls the volume of the octave above signal. Turning this knob fully counter-clockwise removes the octave signal from the path.
Volume Knob
Controls the overall output signal level of the effect.
9/24 Toggle Switch
This switch selects the internal rail voltage for the circuit. Setting it to 9V provides a classic, saggy fuzz tone reminiscent of the mid-70s. Setting it to 24V provides a tighter sound and a richer octave tone.
Operation
Connect the supplied power adaptor to the 9V power jack. Plug your instrument into the INPUT jack and your amplifier into the OUTPUT jack. Use the footswitch to engage the effect; the status LED will light up when the effect is active.
Maintenance
Changing the Battery
To replace the 9-volt battery, remove the 4 screws on the bottom of the pedal and take off the bottom plate. Do not touch the circuit board while the plate is removed to avoid damaging components. To extend battery life, always disconnect the INPUT jack when the pedal is not in use.
Power Supply Requirements
The pedal draws up to 62mA at 9VDC. Use a center negative plug. Using the wrong adaptor or incorrect polarity may damage the unit and void the warranty.
Practical help
Common problems
Volume drop when switching from 9V to 24V
This is normal behavior as it takes a second or two for the capacitors to charge up to 24V.
Chirping sound in 24V mode
This is normal feedback that occurs when all controls are set to maximum.
Before use
- Ensure the power supply is 9.6V DC 200mA with a center negative plug.
- Connect your instrument to the INPUT jack.
- Connect your amplifier to the OUTPUT jack.
- Disconnect the INPUT jack when not in use to preserve battery life.
- Ensure the bottom plate is securely screwed on before operation.
Specs in practice
- Current Draw (9V)
- 9mA.
- Current Draw (24V)
- 62mA.
Images and diagrams
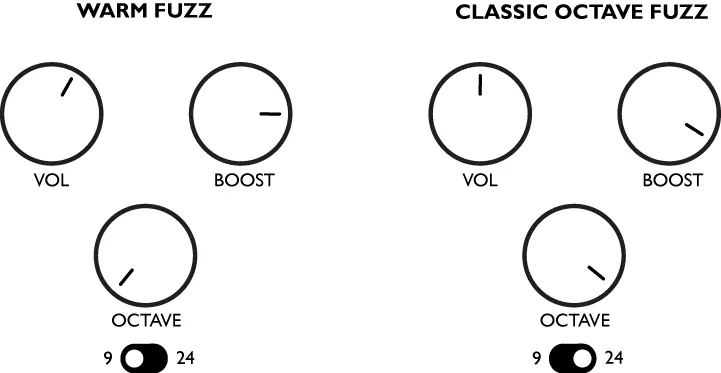
- The sample settings diagram illustrates two common configurations: Warm Fuzz and Classic Octave Fuzz.
- The diagram shows the relative positions of the Volume, Boost, and Octave knobs, as well as the 9/24 toggle switch position for each sound.
Model compatibility
- The pedal is compatible with 9V batteries or 9.6V DC 200mA power supplies.
- The input impedance is 1M Ohm.

Manual page author
Michael Turner
Technical manual editor
Reviews PDF manuals for structure, safety notes, and practical product details so readers can find the right information quickly.