Computers / Printer Consumables
Epson Self-Laminating Overwrap Label Tape Instructions
Quick guide for using Epson 224VSLPX and 236VSLPX self-laminating overwrap label tapes. Includes setup instructions for standalone printers, mobile apps, and PC/Mac software.
Quick answers from the manual
Quick answer
- These tapes are self-laminating overwrap labels. Print on the white area, apply to the cable, and wrap the clear tail over the printed surface to protect the label. p. 1
Key actions
- Standalone printer setup p. 1
- Mobile app setup p. 1
Problems and fixes
Mixed-length feature not working
Feature is not available with LW-PX700 and LW-PX750 with self-laminating tape.
p. 1Show 2 more answers Show less
Technical specifications
| Parameter | Value | Meaning | Pages |
|---|---|---|---|
| 224VSLPX Width | 1 inch (24 mm) | Total label width | p. 1 |
| 236VSLPX Width | 1.5 inches (36 mm) | Total label width | p. 1 |
Where to find it in the PDF
- English Instructions p. 1
- French Instructions p. 2
Table of contents
Quick guide from the manual
The 224VSLPX and 236VSLPX are self-laminating overwrap label tapes designed for labeling wires and cables. The label consists of two parts: a white printable area and a clear overwrap area. To use, print on the white area, apply it to the wire or cable in a visible location, and then wrap the clear tail around the wire and over the printed surface to protect the tape.
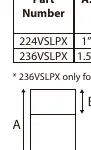
Product Specifications
224VSLPX:
- Overall Label Width: 1 inch (24 mm)
- White Print Area: 1/4 inch (7.9 mm)
- Cable OD Range: 2.5 mm - 5.1 mm
- Recommended Wire: 16-8 AWG
- Recommended Network Cable: Thin Cat5e
236VSLPX:
- Overall Label Width: 1.5 inches (36 mm)
- White Print Area: 1/2 inch (12.7 mm)
- Cable OD Range: 4.1 mm - 7.3 mm
- Recommended Wire: 10-6 AWG
- Recommended Network Cable: Cat5e, Cat6
Note: 236VSLPX is only for use with LW-Z5010PX, LW-Z5000PX, LW-PX900, LW-PX800, and PEARLabel 360.
Standalone Printer Setup
For models LW-Z5010PX, LW-PX900, LW-PX750, and LW-PX700:
- Insert the cartridge into the printer.
- Set the label length and press Enter (for LW-Z5010PX and LW-PX900, set the number of labels).
- Enter the label text.
Note: The mixed-length feature is not available with LW-PX700 and LW-PX750 when using self-laminating tape.
Label Editor Mobile App Setup
For models LW-Z5010PX, LW-Z5000PX, LW-PX800, LW-PX400, and LW-C610PX:
- Tap New Label on the home screen.
- Tap OK to erase previous data or Cancel to keep it.
- Set the label format by tapping the setting gear in the top right corner.
- Tap Tape Width and select the self-laminating tape from the drop-down.
- Double-tap the text icon in the bottom toolbar to enter data.
- Tap Done in the upper right corner when finished.
- Press the blue print button at the bottom of the screen.
Datacom App Setup
For models LW-Z5010PX, LW-Z5000PX, LW-PX800, and LW-PX400:
- Tap Create Label from the home screen.
- Tap the Self-lam option.
- Choose the TIA-606 format or a user-defined format.
- Follow the on-screen prompts to set label data, preview, and print or save the template.
PC and Mac Software Setup
Label Editor Software (PC/Mac):
- Select File > New.
- Read the tape width from the printer or select the self-laminating tape from the drop-down.
- Enter text in the printer area on the screen.
Label Editor Lite (Mac):
There are no specific formats for self-laminating tape in Label Editor Lite, but you can adjust the text manually:
- Open Label Editor Lite and select Read Tape.
- Set font size to small.
- Enter label text.
- Press Enter/Return 4 times, then enter a space to position the text.
- Press print.
Support
For older K-Sun models (2020LSTB, 2011LXB, 2011XLST, 2001XLB, 2001XLST), contact support by phone, email, or online chat at labelworks.epson.com.
Official resources from the manual
Manufacturer information
Epson
Practical help
Common problems
Mixed-length feature unavailable
This feature is not supported on LW-PX700 and LW-PX750 when using self-laminating tape.
Label Editor Lite formatting
There is no specific format for self-laminating tape in Label Editor Lite. Manually adjust text by setting font size to small and pressing Enter/Return 4 times followed by a space.
Before use
- Verify printer compatibility with the specific tape model (especially for 236VSLPX).
- Check cable outer diameter (OD) to ensure it falls within the tape's specified range.
- Ensure the correct tape width is selected in the software or printer settings.
- For mobile apps, ensure the 'Self-lam' or 'Self-laminating' tape option is selected.
Show more Show less
Specs in practice
- A. Overall Label width
- The total width of the tape strip.
- B. White Print Area
- The specific section of the label where text can be printed.
- Cable OD Min/Max
- The minimum and maximum outer diameter of the cable the label is designed to wrap around.
Images and diagrams
- The label is composed of a white printable area and a clear overwrap area.
- The clear tail is designed to wrap around the wire and over the printed surface to provide protection.
Model compatibility
- 236VSLPX is restricted to use with LW-Z5010PX, LW-Z5000PX, LW-PX900, LW-PX800, and PEARLabel 360.

Manual page author
David Miller
Documentation analyst