Electronics / Projectors
User Manual for Epson PowerLite 1970W/1975W/1980WU/1985WU Multimedia Projector
Quick setup guide for the Epson PowerLite 1970W, 1975W, 1980WU, and 1985WU projectors. Learn how to connect devices, adjust image settings, configure wired and wireless networks, and troubleshoot common display issues.
Quick answers from the manual
Quick answer
- This guide covers the setup, connection, and configuration of the Epson PowerLite 1970W/1975W/1980WU/1985WU projectors, including wireless and wired network setup. p. 1, 2, 3, 4
Key actions
- Connect devices p. 1
- Adjust image p. 2
- Configure wireless network p. 2, 3
First start
- Plug in the projector, turn on your source, and press the power button. p. 1, 2
Show 2 more answers Show less
Problems and fixes
Blank screen or No signal
Check A/V Mute slide, press Source Search, or toggle external display settings on your computer.
p. 4Where to find it in the PDF
- Quick Setup and Connections p. 1
- Image Adjustment and Remote Control p. 2
- Wireless Network Setup p. 2, 3
- Wired Network Setup and Troubleshooting p. 3, 4
Table of contents
Manual images
Click an image to enlargeQuick Setup and Connections
Before using the projector, ensure you have read the safety instructions in the online User's Guide. You can connect up to 5 video devices simultaneously and switch between them using the Source Search button on the projector or remote control.

- Computer: Connect via VGA, HDMI, or USB cable. For USB display, install the Epson USB Display software (EMP_UDSE.EXE) on the first connection.
- Video Devices: Connect using RCA composite video, component video to VGA, or HDMI cables.
- Mobile Devices: Use the HDMI1/MHL port for MHL-supported tablets and smartphones.
- Camera/USB Storage: Connect to the USB-A (flat) port to use the PC Free feature for projecting images.
To turn on the equipment, turn on your computer or video source first, then plug in the projector. The power light will turn blue.
Using the Remote Control
Ensure two AA batteries are installed. The remote allows you to turn the projector on and off, select the source, navigate menus, and access help. Use the A/V Mute slide to temporarily block the image and sound.
Adjusting the Image
If you do not see an image, press the Source Search button. To adjust the projection:
- Height: Press the foot release button and lift the front of the projector.
- Size: Turn the zoom ring to reduce or enlarge the image.
- Sharpness: Turn the focus ring to sharpen the image.
- Keystone: The projector automatically adjusts distorted images, but you can manually correct them using the keystone buttons on the projector.
Projecting Wirelessly
To connect wirelessly over an 802.11n, 802.11g, or 802.11b network:
- Open the air filter cover and install the optional wireless LAN module.
- Secure the module with the stopper and screw, then close the cover.
- Press the Menu button, navigate to the Network menu, and select Wireless LAN.
- Choose Connection Mode (Quick for direct connection or Advanced for router/access point).
- If using Advanced mode, enter your SSID and IP settings.
- Select Complete and choose Yes to save settings.
Projecting Over a Wired Network
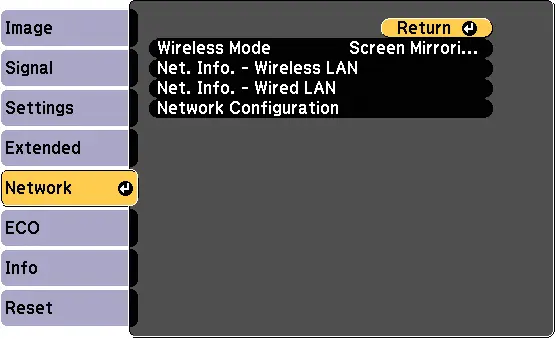
- Plug in and turn on the projector.
- Press the Menu button, go to the Network menu, and select Network Configuration.
- Select the Basic menu to set the Projector Name.
- Select the Wired LAN menu to configure IP settings (DHCP or manual).
- Select Complete and save your settings.
Troubleshooting
If you encounter a blank screen or No signal message:
- Ensure the power and Status lights are blue and not flashing.
- Verify the A/V Mute slide is open.
- Press the Source Search button to select the correct input.
- If using a laptop, ensure you have switched the display to external output (e.g., Fn+F7 on Windows or Mirror Displays on Mac).
Manufacturer information
Epson
Practical help
Common problems
Blank screen or No signal message
Check that the A/V Mute slide is open, the power light is solid blue, and the correct source is selected via the Source Search button. Ensure your computer is set to output to an external display.
Before use
- Read the safety instructions in the online User's Guide.
- Install two AA batteries in the remote control.
- Ensure your wireless network supports 802.11n, 802.11g, or 802.11b.
- Check if your mobile device supports MHL for direct connection.
Show more Show less
Specs in practice
- Source Search
- Button used to cycle through connected video inputs.
Images and diagrams
- Connection diagrams illustrate ports for Computer, HDMI, USB, and Video devices.
- Remote control diagram shows button functions for source selection, menu navigation, and power.
Model compatibility
- Wireless network requires 802.11n, 802.11g, or 802.11b.
- MHL connection is required for specific tablets and smartphones.

Manual page author
Emily Carter
User documentation editor