Electronics / Projectors
User's Guide for Epson PowerLite 1705c/1715c Multimedia Projector
Comprehensive user guide for the Epson PowerLite 1705c and 1715c multimedia projectors. Includes setup, wireless networking, image adjustment, maintenance, and troubleshooting.
Quick answers from the manual
Quick answer
- To start the projector, open the A/V Mute slide, plug in the power, and press the red Power button. p. 18, 19
Key actions
- Replace the lamp p. 148, 149
- Connect to a wireless network p. 47, 50
First start
- Open the A/V Mute slide, connect power, and press the Power button. p. 18, 19
Problems and fixes
No image
Check power, A/V Mute slide, and source selection.
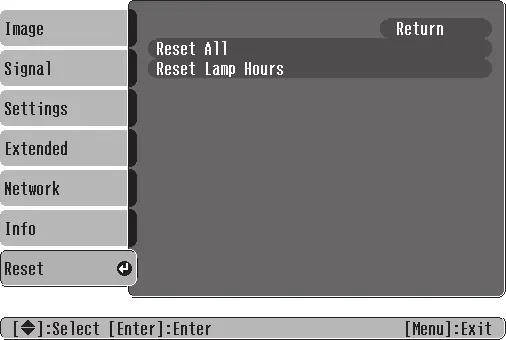
p. 158Maintenance and reset
- Reset lamp timer after replacement. p. 151
Technical specifications
| Parameter | Value | Meaning | Pages |
|---|---|---|---|
| Brightness | 2200/2700 lumens | Brightness output based on model. | p. 177 |
Where to find it in the PDF
- Maintenance p. 145, 148
Table of contents
Manual images
Click an image to enlargeQuick guide from the manual
This guide provides essential information for setting up and operating your Epson PowerLite 1705c/1715c projector. For detailed instructions, please refer to the full manual.
Unpacking and Setup
Ensure you have all components: the projector, remote control with batteries, power cable, VGA cable, USB cable, audio adapter, and software CDs. Place the projector on a sturdy, level surface, ensuring adequate ventilation around the vents. The projector should be within 10 feet of a grounded electrical outlet.
Turning the Projector On and Off
To turn on: Open the A/V Mute slide (lens cover), plug in the power cable, and press the red Power button on the projector or remote control. The Power light will flash green while warming up.
To turn off: Press the red Power button. A confirmation message appears; press the Power button again. Wait for the projector to cool down (if ceiling-mounted) before unplugging.
Adjusting the Image
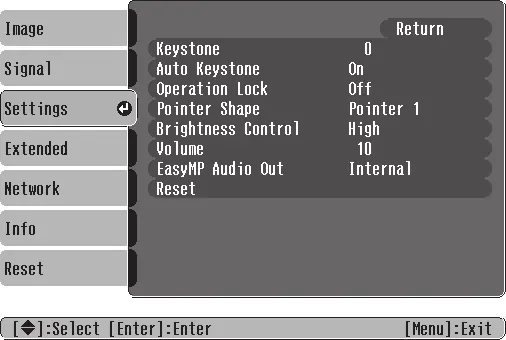
Use the focus and zoom rings on the projector to sharpen and resize the image. If the image is distorted, use the Keystone buttons on the control panel or the Setting menu to square the image. The projector features automatic keystone correction for vertical tilt.
Connecting Equipment
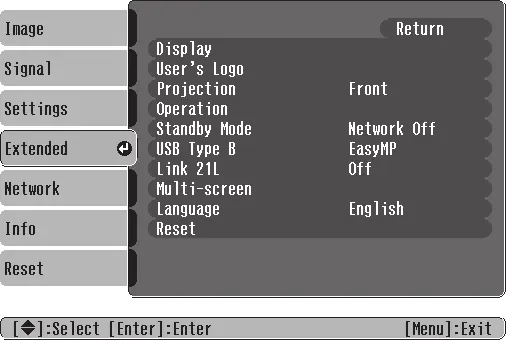
You can connect computers via the blue Computer/Component Video port (VGA) or the USB Type B port. Video equipment can be connected using Composite (yellow RCA), S-Video, or Component video cables. Audio can be played through the projector's internal speaker or external speakers.
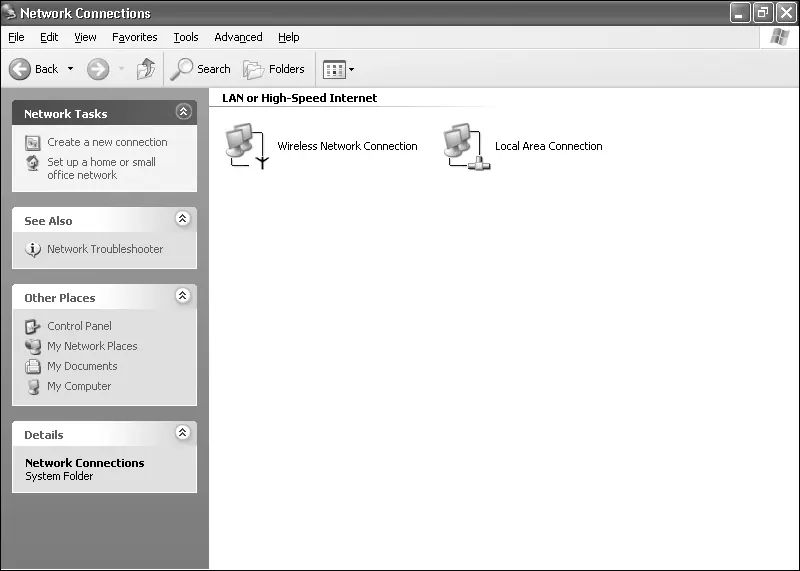
Wireless Network Presentation
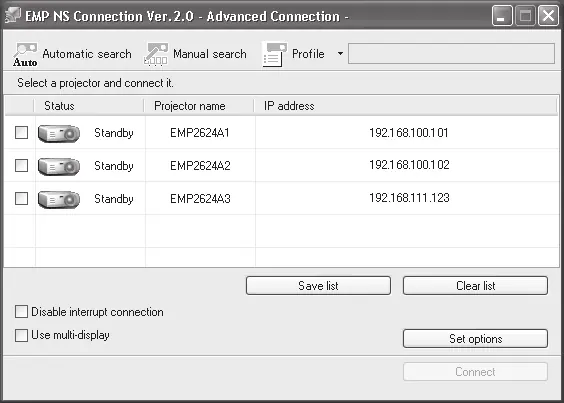
The projector supports wireless presentation via EasyMP. You can connect in Ad Hoc (computer-to-computer) mode or Access Point (infrastructure) mode. Ensure the Epson 802.11g/b/a wireless module is installed. Use the EMP NS Connection software on your computer to manage the connection.

Presenting from USB or Digital Camera
You can project images directly from a USB drive or digital camera. Connect the device to the projector's USB port, select EasyMP as the source, and use the remote control to navigate and play slideshows or scenarios created with EMP SlideMaker 2.
Maintenance
Clean the lens with a soft cloth or compressed air. Clean the air filter and vent periodically using a small vacuum or soft brush. Replace the lamp when the image darkens or the lamp warning light flashes orange. Always let the lamp cool for at least an hour before replacement.
Troubleshooting
If you encounter issues, check the status lights on the projector. A red light indicates a problem. Use the on-screen Help button for guidance on image or sound issues. If the projector does not respond, ensure the remote control batteries are fresh and you are within 20 feet of the projector.
Manufacturer information
Epson
Practical help
Common problems
No image appears on the screen
Check that the Power light is green, the A/V Mute slide is open, and the correct source is selected.
Image is keystone-shaped (distorted)
Use the Keystone buttons on the projector or the Setting menu to square the image.
Projector overheating
Clean the air filter and vent; ensure there is plenty of space around the projector for ventilation.
Remote control not responding
Check batteries, ensure you are within 20 feet, and remove any obstructions between the remote and the projector.
Before use
- Ensure the projector is on a sturdy, level surface.
- Check that the A/V Mute slide is open.
- Verify all cables are securely connected.
- Ensure the projector is within 10 feet of a power outlet.
- Check that the air filter and vents are not blocked.
Specs in practice
- Contrast ratio
- 400:1 ratio for image depth.
- Projection distance
- 3.2 to 39.7 feet (1.0 to 12.1 meters).
Images and diagrams
- The projector has a focus ring and zoom ring on top for image adjustment.
- The rear panel contains ports for Computer/Component Video, S-Video, Video, and Audio.
- The air filter is located on the bottom of the projector.
Model compatibility
- Supports 802.11g/b/a wireless networks.
- Compatible with Windows 2000/XP and Mac OS X 10.3+ for wireless projection.
- Supports MPEG2 video files for PC Free projection.

Manual page author
David Miller
Documentation analyst
Organizes user manual content into clear summaries, with attention to model details, product context, and everyday usability.