Electronics / Projectors
User Manual for Epson 16XL Ink Cartridge
Quick guide for installing and troubleshooting Epson 16XL compatible ink cartridges. Learn how to replace cartridges, handle non-original warnings, and resolve print quality issues.
Quick answers from the manual
Quick answer
- To replace the ink cartridge, switch on the printer, open the cover, remove the empty cartridge, remove the coloured tape from the new one, insert it until it clicks, and close the lid. p. 1, 2
Key actions
- Replace ink cartridges p. 1, 2
Problems and fixes
White streaks on printouts
Let cartridges sit for 15 minutes to settle, then perform print head cleaning.
p. 2Maintenance and reset
- Print head cleaning p. 1, 2
Where to find it in the PDF
- Compatibility and Replacement Instructions p. 1
- Installation Steps and Troubleshooting p. 2
Table of contents
Manual images
Click an image to enlargeQuick guide from the manual
This guide provides instructions for replacing compatible ink cartridges in Epson printers. Key steps include removing the empty cartridge, preparing the new one by removing the coloured tape, and inserting it until it clicks into place. If you encounter non-original cartridge warnings or print quality issues, follow the troubleshooting steps provided below.
Compatibility
These ink cartridges are compatible with the following Epson printer models:
- 16XL, 18XL, 29, 128x, 129, 130x, 136x, 181x, 502XL, 603XL
Notes on ink cartridges
- Replacement: If an ink cartridge is removed, replace it immediately with a new one.
- Quantity: Only replace one cartridge at a time. If multiple are empty, replace them in separate passes.
- Condition: Only use new cartridges. Inserting used cartridges may clog nozzles.
- Software Updates: Never perform a software update on the printer, as this may cause compatible cartridges to no longer be recognized.
- Initial Setup: Before printing for the first time, you may need to run cleaning operations via the printer's maintenance menu to ensure a clean print image.
Instructions for replacing the ink cartridges
- Switch on the printer.
- Open the cover of your printer.
- Remove the empty ink cartridge by holding the indentation and pulling it out.
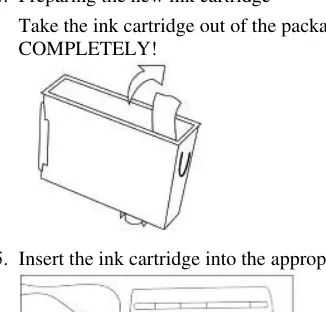
- Take the new ink cartridge out of the packaging and remove the coloured tape completely (if present).
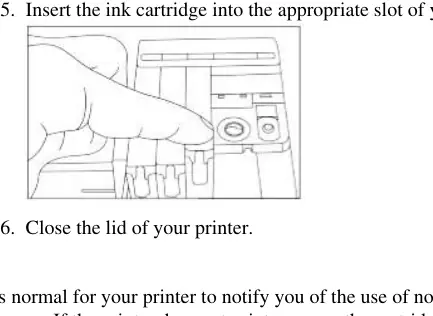
- Insert the ink cartridge into the appropriate slot until it clicks into place.
- Close the lid of your printer.
Troubleshooting
If the printer notifies you about the use of non-original cartridges, you must acknowledge the message. If the printer does not print:
- Remove the cartridges and reinsert them.
- If that fails, disconnect the printer from the power supply for a few minutes and try again.
- If printouts show white streaks, let the cartridges sit in the printer for 15 minutes to allow the ink to settle, then perform a print head cleaning.
- If the printer has not been used for a long time, perform printhead cleaning several times.
Manufacturer information
Epson
Practical help
Common problems
Printer shows non-original cartridge warning
Acknowledge the message on the printer screen to proceed.
Printer does not print
Remove and reinsert the cartridges. If this fails, disconnect the printer from the power supply for a few minutes and try again.
White streaks on printouts
Let the cartridges sit in the printer for 15 minutes to allow ink to settle, then perform a print head cleaning.
Before use
- Ensure the printer is switched on.
- Remove the coloured tape from the new cartridge completely.
- Only replace one cartridge at a time.
- Ensure you are using new cartridges, not used ones.
Images and diagrams
- Removing the empty cartridge by holding the indentation.
- Removing the coloured tape from the new cartridge.
- Inserting the cartridge into the slot until it clicks.
Model compatibility
- Compatible with Epson 16XL, 18XL, 29, 128x, 129, 130x, 136x, 181x, 502XL, 603XL.

Manual page author
Michael Turner
Technical manual editor
Reviews PDF manuals for structure, safety notes, and practical product details so readers can find the right information quickly.