HVAC / Air Conditioners
Instruction Manual for Equation Local Air Conditioner 2022R08P03-0032
Quick guide for the Equation local air conditioner. Includes installation steps, operating modes (Cool, Fan, Dry, Auto), maintenance, and troubleshooting.
Quick answers from the manual
Quick answer
- This manual provides instructions for the Equation local air conditioner, covering installation, operation modes (Cool, Fan, Dry, Auto), maintenance, and troubleshooting. p. 43, 45
Key actions
- Install exhaust duct p. 43
- Empty water tank p. 46
First start
- Choose a flat, stable location with 50cm clearance, connect the exhaust duct, and plug into an accessible outlet. p. 43
Show 4 more answers Show less
Problems and fixes
Device does not work
Check power supply and fuse.
p. 47
Room not cooled
Check 'Cool' mode, filter cleanliness, air circulation, and window/door closure.
p. 47Error codes
| Code | Meaning | Action | Pages |
|---|---|---|---|
| P1 | Internal water tank is full | Empty the water tank | p. 46 |
Maintenance and reset
- Clean dust filter every 250 hours and press 'Filter Reset' button. p. 46
Where to find it in the PDF
- Installation p. 43
- Maintenance p. 46
Table of contents
Manual images
Click an image to enlargeQuick guide from the manual
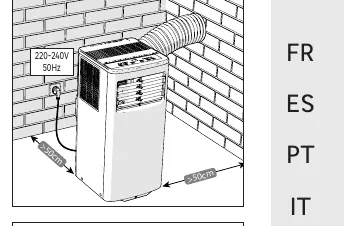
This guide provides essential information for operating your Equation local air conditioner. Ensure the unit is placed on a flat, stable surface with at least 50 cm of clearance from walls. The exhaust duct must be connected for Cooling and Dehumidification modes.
Installation
Proper installation is required for the unit to function correctly:
- Exhaust Duct: Connect adaptor A to the pipe, then clip it onto the device. Connect adaptor B to the window kit if necessary.
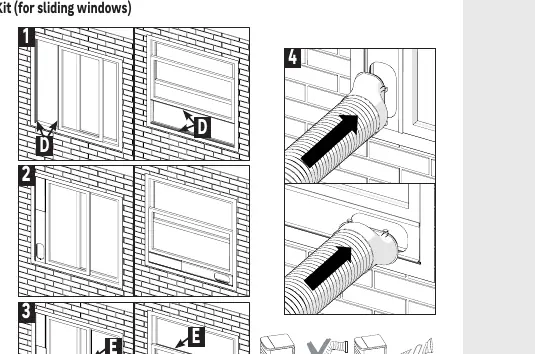
- Window Kit: For sliding windows, cut the adhesive foam seal to size, attach it to the window frame, adjust the kit length (67.5 cm to 120 cm), and secure it. Use foam gasket E to seal gaps.
Operating Modes
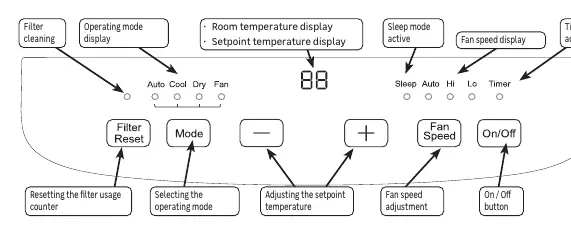
- Cooling Mode: Requires the exhaust duct to be connected to the outside. Set the desired temperature and fan speed (Hi, Lo, or Auto).
- Fan Mode: Provides ventilation without cooling. Temperature and Auto speed settings are unavailable.
- Dehumidification (Dry) Mode: Requires a continuous drainage pipe to be connected to a container or drain. Fan speed and temperature settings are unavailable.
- Automatic Mode: The device automatically determines settings to reach the target temperature.
Maintenance
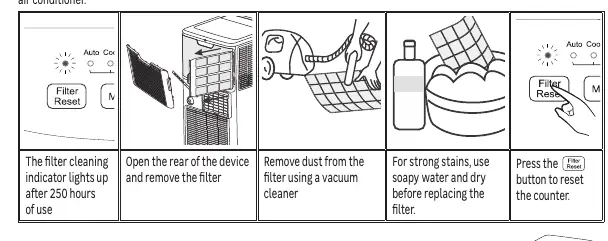
- Filter Cleaning: Clean the dust filter every 250 hours of use. Use a vacuum cleaner or soapy water for stubborn stains. Press the 'Filter Reset' button after cleaning.
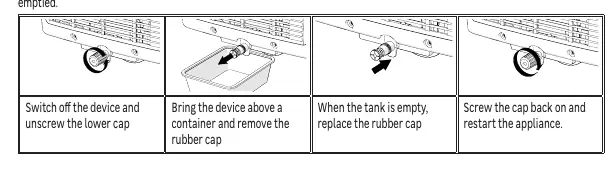
- Water Tank Drainage: In Cooling mode, the internal tank must be emptied regularly. If the display shows 'P1', the tank must be emptied immediately.
Troubleshooting
If the device does not work, check the power supply and fuse. If the room is not cooling, ensure 'Cool' mode is active, the filter is clean, and windows/doors are closed. If the device vibrates abnormally, ensure it is on a level surface.
Practical help
Common problems
Device does not work
Check the power supply and the fuse.
Room is not cooled
Ensure 'Cool' mode is active, the filter is clean, air circulation is unobstructed, and doors/windows are closed.
Device vibrates abnormally
Ensure the device is installed on a level and stable surface.
Before use
- Ensure the floor is flat and stable.
- Maintain a 50 cm distance between the unit and walls.
- Ensure the power outlet is accessible.
- Connect the exhaust duct for Cooling or Dehumidification modes.
Show more Show less
Specs in practice
- Cooling Mode
- Requires exhaust duct connection to the outside.
- Dehumidification (Dry) Mode
- Requires continuous drainage pipe connection.
Images and diagrams
- Exhaust duct installation: Connect adaptor A to the pipe, then to the device. Connect adaptor B to the window kit if needed.
- Window kit installation: Cut foam seal, attach to window frame, adjust length, and secure.
Model compatibility
- Window kit is adjustable from 67.5 cm to 120 cm.

Manual page author
Emily Carter
User documentation editor