HVAC / Air Conditioners
ACiQ Split Horizontal-Vertical Duct Air Conditioner Indoor Unit Manual
Comprehensive installation and owner's manual for ACiQ split horizontal-vertical duct air conditioner indoor units. Includes detailed procedures for upflow, downflow, and horizontal installation, refrigerant line connection, condensate...
Quick answers from the manual
Quick answer
- This manual provides installation and maintenance instructions for ACiQ split horizontal-vertical duct air conditioner indoor units, covering upflow, downflow, and horizontal mounting, refrigerant line brazing, and condensate drainage. p. 1, 7, 8, 9
Key actions
- Install coil level for proper condensate drainage p. 8
- Brazing refrigerant lines p. 10
- Install condensate trap p. 11
First start
- Ensure the unit is level, refrigerant lines are evacuated, and the condensate drain is properly trapped before operation. p. 8, 10, 11
Show 3 more answers Show less
Maintenance and reset
- Perform annual professional maintenance and monthly filter cleaning. p. 13
Technical specifications
| Parameter | Value | Meaning | Pages |
|---|---|---|---|
| Refrigerant | R-410A | Required refrigerant type | p. 11 |
| Condensate Trap Depth | 3 inches (76 mm) | Minimum depth for condensate trap | p. 11 |
| Condensate Connection | 3/4 inch | Female threaded pipe connection size | p. 11 |
| Factory Nitrogen Charge | 15 psi | Pressure inside the coil during storage | p. 10 |
Where to find it in the PDF
- Safety Precautions p. 4, 5, 6
- Installation p. 7, 8, 9, 10
- Care and Maintenance p. 13
Table of contents
Quick guide from the manual
This manual provides essential installation and maintenance instructions for ACiQ split horizontal-vertical duct air conditioner indoor units. The unit is designed for use with R-410A refrigerant and is compatible with multipoise furnaces. Proper installation is critical to prevent water leakage, electrical shock, or fire. Always ensure the unit is level for proper condensate drainage and that all electrical work complies with local and national standards.
Safety Precautions
- Installation: Must be performed by a licensed professional HVAC installer.
- Electrical: Ensure the unit is properly grounded. Use an all-pole disconnection device with at least 3mm clearance if connecting to fixed wiring.
- Handling: Use two or more people to move the unit. Wear protective clothing and gloves to avoid injury from sharp sheet metal edges.
- Environment: Do not install in locations exposed to combustible gas leaks. If installed above a living space, a secondary condensate pan is required.
Installation
The unit supports multiple configurations:
- Upflow: Set the coil on the furnace discharge air opening. Ensure it is level. If the coil is wider than the furnace, use a field-fabricated adapter.
- Downflow: If rotating the coil 90 degrees, use a 4-inch minimum field-supplied adapter to ensure even airflow distribution and prevent water blow-off or coil freeze-up.
- Horizontal: Can be installed on a work platform, secured to roof trusses, or suspended from floor joists. Ensure the cabinet is level side-to-side and front-to-back.
Refrigerant Line Connections
The coil is factory-charged with 15 psi nitrogen. Always remove the suction line plug first to depressurize the coil before removing the liquid line plug. Use field-supplied refrigerant-grade tubing. When brazing, wrap the TXV and nearby tubing with a wet cloth to act as a heat sink. Use a Sil-Fos or Phos-copper alloy; do not use soft solder. Leak check all connections before insulating the suction line.
Condensate Drain Line Connection
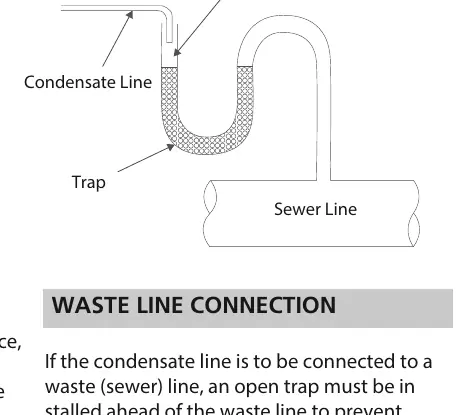
The unit features built-in condensate drain fittings. Use PVC fittings and do not over-tighten (finger tighten plus 1-1/2 turns). If local codes require a trap, install one as close to the coil as possible, at least 3 inches (76 mm) deep. Pitch the condensate line 1 inch for every 10 feet of length. If connecting to a waste/sewer line, an open trap must be installed to prevent sewer gas escape.
Care and Maintenance
Periodic maintenance should be performed at least annually by a professional. The only consumer-required maintenance is monthly filter replacement or cleaning. Before final disposal, ensure all components (oil, refrigerant) are removed and recycled.
Manufacturer information
ACiQ
Practical help
Common problems
Water blow-off or coil freeze-up in downflow applications
Ensure airflow is not concentrated on one slab. Use a 4-inch minimum field-supplied adapter between the coil and furnace to distribute air evenly.
Condensate overflow
Ensure the unit is level. If installed above a living space, install a secondary condensate pan and a float switch to shut off the unit if water levels get too high.
Refrigerant slugging at start-up
Do not bury more than 36 inches of refrigerant tubing in the ground. If buried, ensure a 6-inch vertical rise to the valve connections on the outdoor unit.
Before use
- Verify the unit is level for proper condensate drainage.
- Ensure the TXV bulb is securely fastened with a hose clamp and has full contact with the vapor line.
- Confirm all electrical connections are tight and the unit is properly grounded.
- Check that the control board cover is closed properly to prevent corrosion.
- Ensure the condensate trap is primed and tested for leaks.
Show more Show less
Specs in practice
- TXV (Thermal Expansion Valve)
- Factory-installed hard shut-off valve designed for R-410A. It has preset superheat settings and is field non-adjustable.
- Condensate Trap Depth
- Must be at least 3 inches (76 mm) deep to ensure proper drainage and prevent overflow.
- Fuse Specifications
- The PCB includes overcurrent protection; examples include T5A/250VAC or T10A/250VAC.
Images and diagrams
- Typical Coil Installation: Shows supply and return airflow paths for horizontal, upflow, and downflow configurations.
- Condensate Trap: Illustrates the required trap depth and air gap when connecting to a sewer line.
Model compatibility
- Designed for use with R-410A refrigerant only.
- Compatible with multipoise furnaces.
- Requires field-supplied adapters if the coil is wider than the furnace.

Manual page author
Michael Turner
Technical manual editor