Accessories / Mounts & Stands
Installation Manual for Equip 17-32 Inch Articulating Dual Monitor Desk Mount 650157
Step-by-step installation guide for the Equip 650157 dual monitor desk mount. Includes instructions for clamp and grommet mounting, VESA plate attachment, and tension adjustments for 17-32 inch monitors.
Table of contents
Manual images
Click an image to enlargeQuick Guide from the Manual
This document provides installation instructions for the Equip 650157 dual monitor desk mount. Before beginning, ensure your desk surface is sturdy enough to support the weight of the mount and monitors. The mount is designed for monitors between 17 and 32 inches with VESA patterns of 75x75mm or 100x100mm. Do not exceed the weight capacity of 9kg per arm.
Parts List
Before starting, verify you have all components:
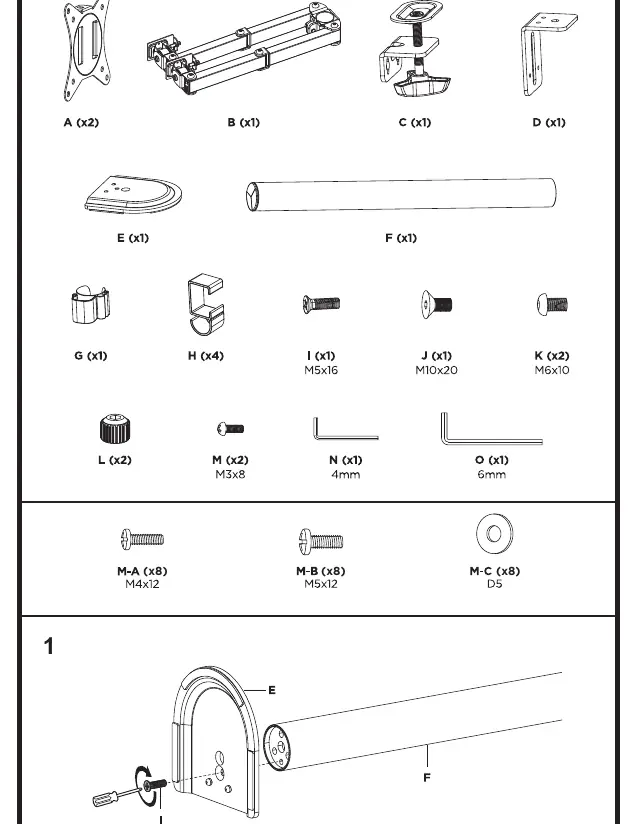
- A (x2): VESA plates
- B (x1): Arm assembly
- C (x1): Clamp base
- D (x1): Grommet base plate
- E (x1): Base cover
- F (x1): Pole
- G (x1): Cable clip
- H (x4): Cable management clips
- I, J, K, L, M: Various screws and tools (M5x16, M10x20, M6x10, M3x8)
- N, O: Hex keys (4mm, 6mm)
- M-A, M-B, M-C: VESA mounting screws and washers
Installation
Choose between Clamp Mounting or Grommet Mounting based on your desk setup:
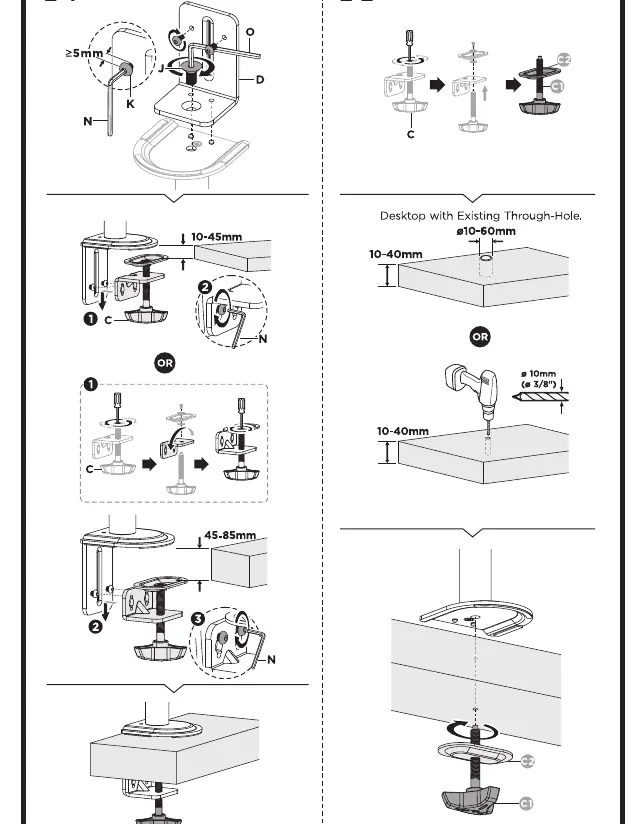
- Clamp Mounting: Attach the clamp base (C) to the edge of your desk. Ensure the desk thickness is between 10mm and 85mm. Tighten the clamp securely using the provided hex key.
- Grommet Mounting: If your desk has a through-hole, use the grommet base plate (D). Ensure the desk thickness is between 10mm and 40mm. Secure the assembly through the hole using the provided bolt and plate.
- Pole Assembly: Attach the pole (F) to the base (C or D) using the provided screws.
Monitor Mounting
Follow these steps to attach your monitors:
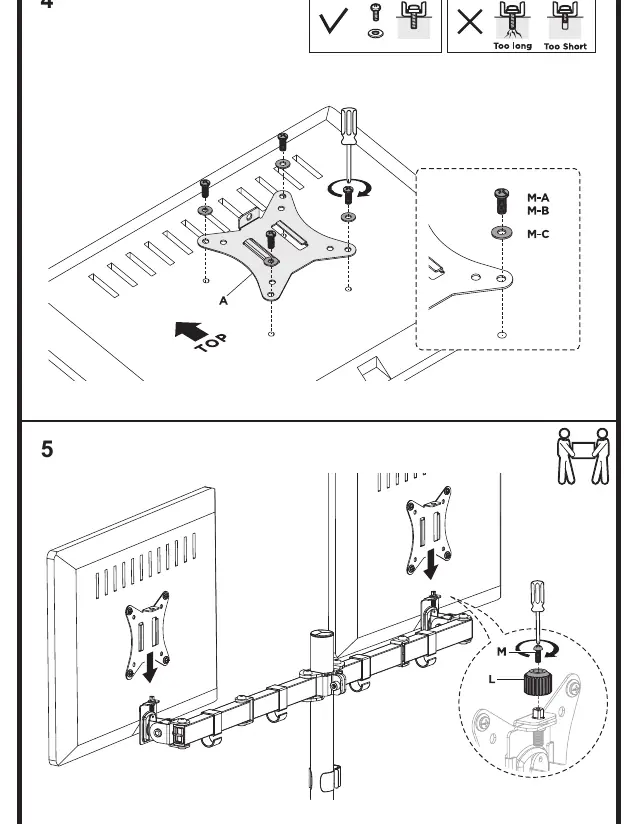
- Attach the VESA plates (A) to the back of your monitors using the appropriate screws (M-A or M-B) and washers (M-C). Ensure the "TOP" indicator on the plate is facing upward.
- Slide the monitor with the VESA plate onto the arm assembly (B).
- Secure the monitor in place using the locking screw (L) and M3x8 screw (M).
- Use the cable management clips (H) to route your monitor cables along the arms and pole for a clean setup.
Adjustments
Once installed, you can adjust the position of your monitors:
- Tilt and Height: If the display does not stay in the desired position, use the 6mm hex key (O) to tighten the screws on the VESA mount joint.
- Rotation: The mount allows for screen rotation. Do not force the display beyond the indicated range to avoid tipping.
- Maintenance: Check all screws and connections at least every three months to ensure stability.
Manufacturer information
Equip
Practical help
Common problems
Monitor does not stay in the desired position (tilts or drops)
Use the 6mm hex key to tighten the tension screws on the VESA mount joint.
Mount feels unstable
Ensure the clamp or grommet base is fully tightened to the desk surface and that the desk thickness is within the specified range (10-85mm for clamp, 10-40mm for grommet).
Before use
- Verify desk thickness is between 10-85mm for clamp mount or 10-40mm for grommet mount.
- Ensure monitor VESA pattern is 75x75mm or 100x100mm.
- Confirm monitor weight does not exceed 9kg per arm.
- Check that all parts (A-O) are present before starting installation.
- Ensure the desk surface can support the combined weight of the mount and monitors.
Specs in practice
- VESA Compatibility
- Supports 75x75mm and 100x100mm mounting hole patterns.
- Monitor Size
- Designed for screens between 17 and 32 inches.
- Weight Capacity
- Maximum load is 9kg per arm (19.8lbs).
Images and diagrams
- Clamp Mounting: Shows how to attach the base to the edge of the desk.
- Grommet Mounting: Shows how to secure the mount through a desk hole.
- VESA Attachment: Illustrates the correct orientation of the VESA plate with the 'TOP' label.
Model compatibility
- Not suitable for glass desks without proper reinforcement.
- Ensure the desk surface is flat and sturdy.

Manual page author
Michael Turner
Technical manual editor
Reviews PDF manuals for structure, safety notes, and practical product details so readers can find the right information quickly.