Tools / Welding Equipment
Quick Start Guide for ESAB Rogue ET 180i and ET 200iP PRO
Get started quickly with your ESAB Rogue ET 180i or ET 200iP PRO welding machine. This guide covers essential setup steps for MMA and TIG welding, including connections, grounding, and power activation.
Table of contents
Manual images
Click an image to enlargeQuick Start Guide
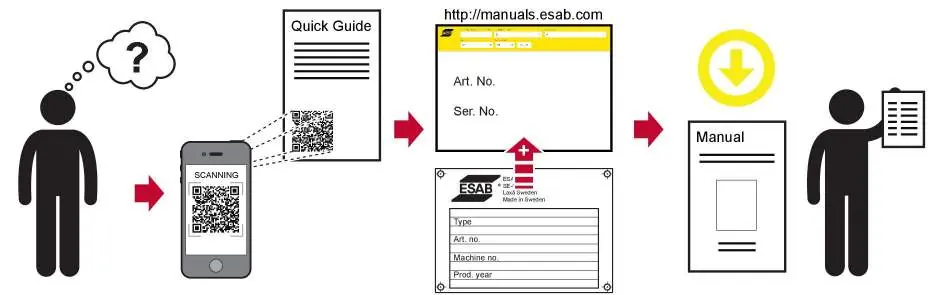
This guide provides the essential steps to set up your ESAB Rogue ET 180i or ET 200iP PRO welding machine. For detailed operating instructions, safety information, and technical specifications, please visit the official ESAB website at http://manuals.esab.com.
Safety Precautions
Before operating the welding machine, ensure you are wearing appropriate protective gear, including a welding helmet, gloves, and protective clothing. Work in a well-ventilated area and keep away from flammable materials.
Setup and Operation
Follow these steps to prepare your machine for welding:
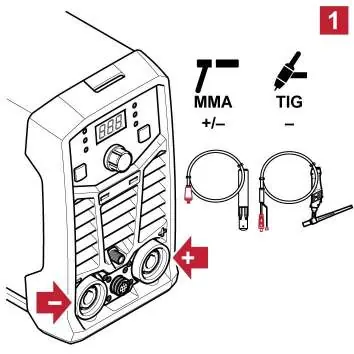

- MMA Welding Setup: Connect the electrode holder and earth clamp to the front panel terminals. Ensure the polarity (+/-) matches the requirements of your electrode.
- TIG Welding Setup: Connect the TIG torch and earth clamp. Ensure the TIG torch is connected to the negative (-) terminal.
- Grounding: Securely attach the earth clamp to the workpiece to ensure a proper electrical circuit.
- Gas Connection (TIG): Connect the gas supply hose to the rear of the machine.
- Power Connection: Connect the machine to a suitable 1-phase power supply.
- Powering On: Turn the power switch to the ON position.
- Mode Selection: Use the mode selection button on the front panel to toggle between MMA and TIG modes.
- Current Adjustment: Use the control knob to set the desired welding current (Amperage).
- Welding: Begin the welding process while maintaining proper safety distance and technique.
Official resources from the manual
Manufacturer information
ESAB
Practical help
Before use
- Ensure proper protective gear (helmet, gloves) is worn.
- Verify power supply matches machine requirements.
- Check that all cable connections (electrode/torch, earth clamp) are secure.
- Ensure gas supply is connected for TIG welding.
- Confirm the workpiece is clean and the earth clamp has a good connection.
Images and diagrams
- The front panel features a digital display, mode selection button, and current adjustment knob.
- Terminals are clearly marked for positive (+) and negative (-) connections.
Model compatibility
- Compatible with both MMA and TIG welding processes.

Manual page author
Emily Carter
User documentation editor
Prepares concise manual descriptions and highlights the most useful setup, operation, and maintenance information for readers.