Home Appliances / Vacuum Cleaners
User Manual for ETA Dasty 2-in-1/3-in-1 Stick Vacuum Cleaner
Quick guide and user manual for the ETA Dasty 2-in-1/3-in-1 stick vacuum cleaner. Includes assembly, charging, cleaning, and maintenance instructions.
PDF source: polski · summary: English
Quick answers from the manual
Quick answer
- The ETA Dasty is a 2-in-1/3-in-1 stick vacuum. Charge it in the base G for 8 hours initially, then 6 hours for subsequent charges. It features a removable handheld unit and a mop attachment. p. 10, 27
Key actions
- Charging p. 10, 27
- Cleaning the HEPA filter p. 13, 30
First start
- Charge for at least 8 hours before first use. p. 10, 27
Show 4 more answers Show less
Problems and fixes
Rotary brush blocked
Turn off, remove obstruction, restart.
p. 11, 28Maintenance and reset
- Empty dust container and clean HEPA filter after each use. p. 13, 30
Technical specifications
| Parameter | Value | Meaning | Pages |
|---|---|---|---|
| Battery | 21.6 V / 14.4 V Li-Ion | Power source | p. 14, 31 |
Where to find it in the PDF
- Equipment p. 10, 27
- Cleaning p. 13, 30
Table of contents
Manual images
Click an image to enlargeQuick guide from the manual
The ETA Dasty is a versatile 2-in-1/3-in-1 stick vacuum cleaner. Before first use, ensure the battery is charged for at least 8 hours. The vacuum features a removable handheld unit and a mop attachment for hard floors. Always turn off the vacuum before charging or performing maintenance.
Equipment and accessories
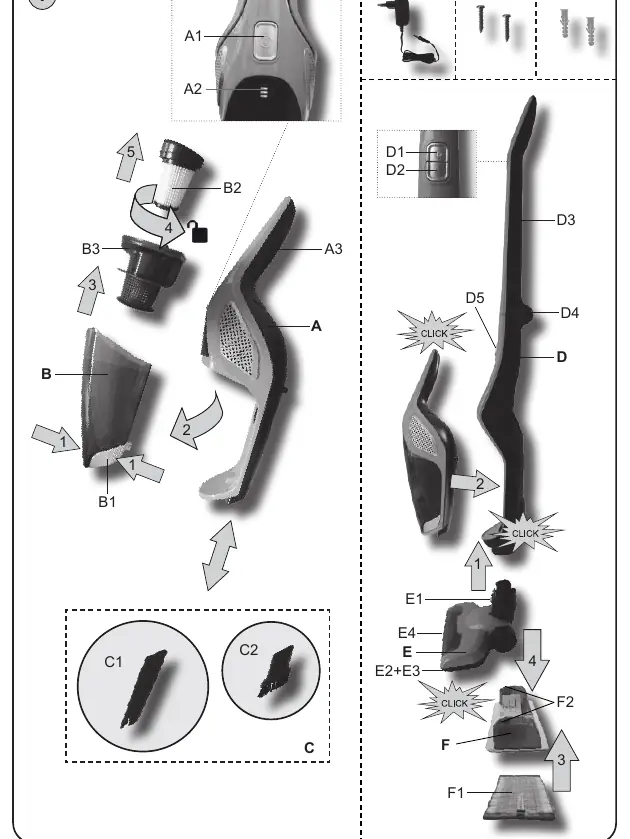
- A: Vacuum cleaner (ON/OFF button, signal lights, handle)
- B: Dust container (HEPA filter, separator)
- C: Accessories (crevice nozzle, brush)
- D: Extension adapter (foldable handle, suction control)
- E: Floor nozzle with rotary brush (LED lights)
- F: Mop attachment (universal mop pad)
- G: Charging stand
Preparation and assembly
Follow the diagrams in the manual to assemble the vacuum. Choose the appropriate configuration (handheld or stick) based on your cleaning needs. To charge, place the vacuum in the extension adapter and then into the charging stand G. Connect the adapter to the charging port G4 and plug it into the mains.
Operation
The vacuum always starts on high suction power. To adjust suction power, the vacuum must be placed in the extension adapter D. To use the mop attachment, fill it with water (max 150 ml), attach the mop pad F1, and fit it to the floor nozzle E. Mop with smooth movements.
Cleaning and maintenance
- Dust container: Empty and clean after each use.
- HEPA filter: Shake out or blow out gently. If very dirty, rinse under lukewarm water and let dry completely. Do not wash more than 3 times. Replace twice a year.
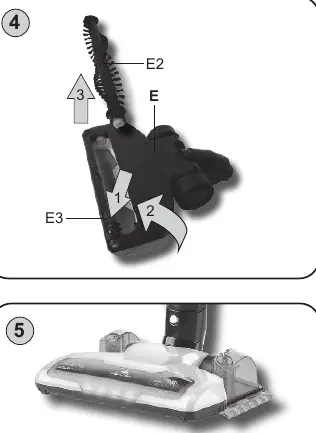
- Rotary brush: Remove hair and debris regularly. The brush can be removed for easier cleaning.
- Surface: Clean with a soft, damp cloth. Do not use aggressive detergents.
Safety warnings
- Do not vacuum construction dust (cement, plaster, fine sand).
- Do not vacuum sharp objects, hot ashes, or flammable liquids.
- Do not immerse the motor unit or battery in water.
- Keep away from heat sources and flammable objects.
Practical help
Common problems
Vacuum not charging
Ensure it is correctly placed in the charging base G and the adapter is connected to the mains.
Rotary brush stopped
Turn off the vacuum, remove the obstruction from the brush, and restart.
Weak suction
Empty the dust container and clean the HEPA filter.
Before use
- Charge the battery for at least 8 hours before first use.
- Remove all packaging and adhesive foils.
- Ensure the HEPA filter is correctly installed.
- Check that the charging base is securely mounted.
Show more Show less
Specs in practice
- Charging time
- Approx. 6 hours (after initial 8h charge)
Images and diagrams
- Fig 1: Parts identification
- Fig 2-3: Assembly and storage
- Fig 4: Brush cleaning
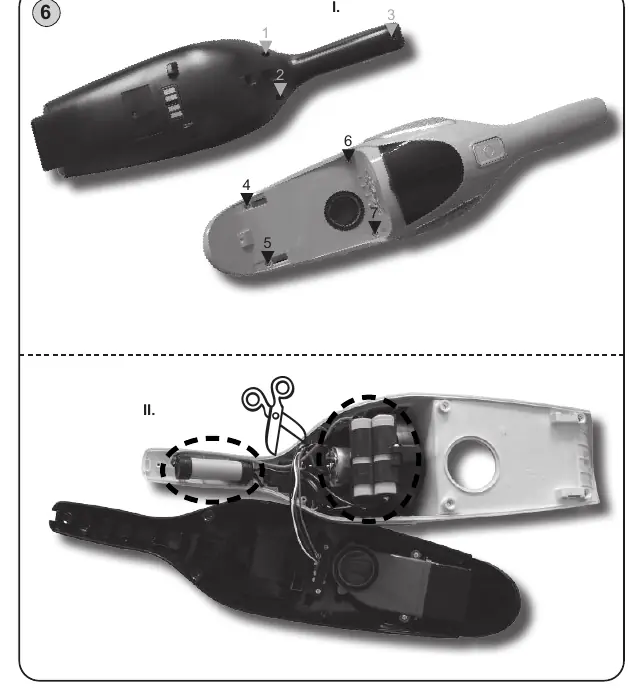
- Fig 6: Battery removal
Model compatibility
- Use only original ETA filters.
- Not for commercial use.
- Do not vacuum construction dust (cement, plaster).

Manual page author
Emily Carter
User documentation editor