Home Appliances / Vacuum Cleaners
User Manual for ETA Super Sonic 2-in-1 Stick Vacuum Cleaner
Comprehensive user guide for the ETA Super Sonic 2-in-1 stick vacuum cleaner. Includes assembly instructions, charging procedures, maintenance tips, and troubleshooting for models ETA0231 and ETA1231.
PDF source: CS · summary: English
Quick answers from the manual
Quick answer
- The ETA Super Sonic is a 2-in-1 stick vacuum. Charge it for 8 hours before first use. Empty the dust container and clean filters regularly for optimal performance. Do not wash the dust container under water. p. 9, 11
Key actions
- Charging the battery p. 9
- Cleaning the dust container and filters p. 11
First start
- Charge the battery for at least 8 hours before the first use. p. 9
Show 4 more answers Show less
Problems and fixes
5x red flashes
Battery is empty.
p. 10
Flashing red
Blocked brush.
p. 10Maintenance and reset
- Clean filters and empty dust container after each use. p. 11
Technical specifications
| Parameter | Value | Meaning | Pages |
|---|---|---|---|
| Battery | 21.6 V Li-Ion | Battery type and voltage. | p. 12 |
| Charging time | 4 hours | Standard charging time. | p. 9 |
Where to find it in the PDF
- Parts and Accessories p. 2
- Maintenance p. 3, 11
Table of contents
Manual images
Click an image to enlargeImportant Information from the Manual
This manual provides instructions for the ETA Super Sonic 2-in-1 stick vacuum cleaner (models ETA0231 and ETA1231). Before first use, ensure the battery is charged for at least 8 hours. Always turn off the vacuum before charging or performing maintenance. Do not wash the dust container (B) under running water, as it contains electronic components for the floor nozzle.
Product Description
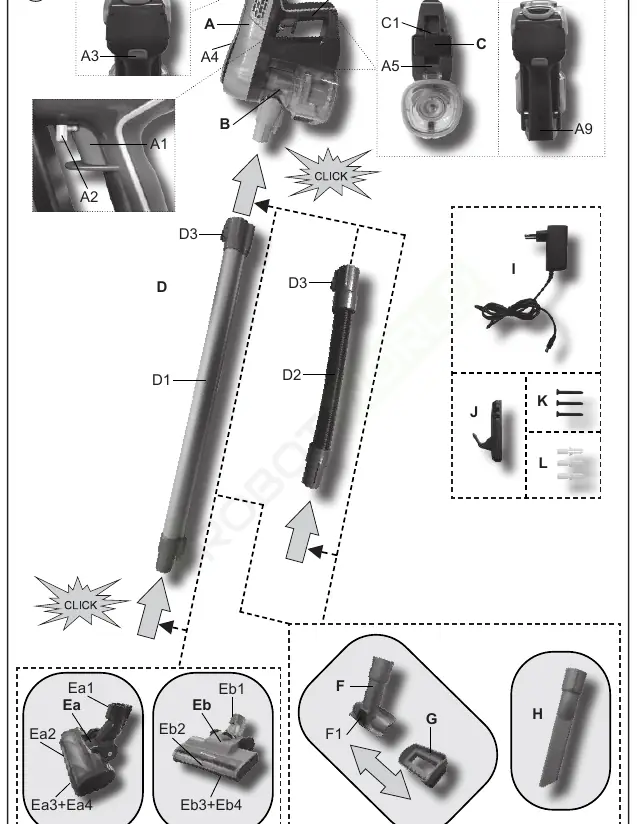
The vacuum consists of the main unit (A), dust container (B), battery (C), extension tubes (D), and various floor nozzles (Ea/Eb) and accessories (F, G, H). Refer to the parts diagram for specific component identification.
Assembly
Assemble the vacuum according to the desired configuration (handheld or stick vacuum) using the provided tubes and nozzles. Ensure all locking mechanisms click into place. The wall mount (J) can be installed to store the vacuum.
Charging
Connect the adapter to the charging port (A9) and then to the mains. The battery requires at least 8 hours of charging before the first use. Standard charging time is approximately 4 hours. The LED indicator (A4) shows the charging status: flashing blue indicates charging, and solid blue indicates a full charge.
Operation
Use the On/Off button (A1) to operate the vacuum. A continuous run switch (A2) is available for extended cleaning. The max power button (A3) increases suction power. If the floor nozzle brush gets blocked, turn off the vacuum immediately, clear the obstruction, and resume cleaning.
Maintenance and Cleaning
- Dust Container: Empty after each use. Clean the interior with a damp cloth. Do not submerge the container in water.
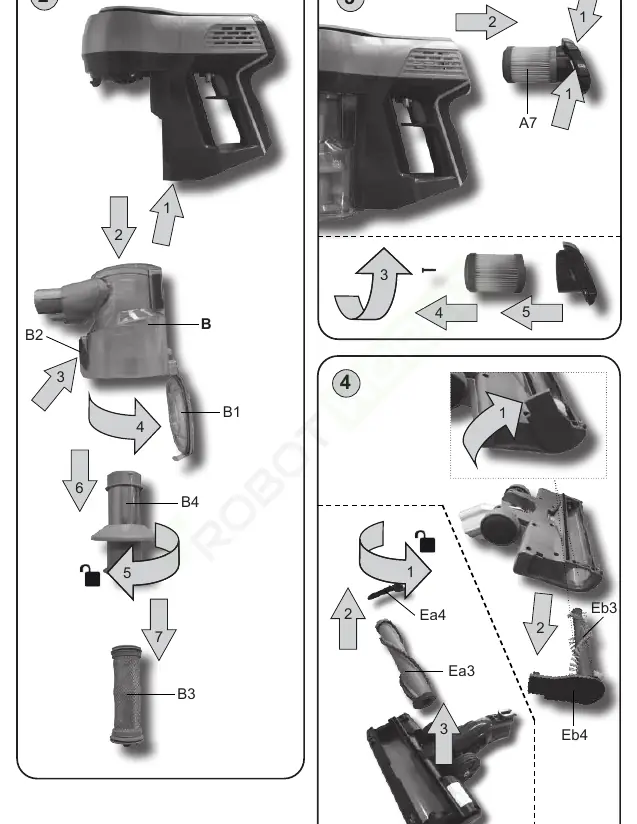
- Filters: Clean the textile filter (B3) and HEPA filter (A7) regularly. The HEPA filter can be gently tapped or rinsed with lukewarm water if heavily soiled; let it dry completely before reinstallation.
- Brush: Remove hair and debris from the floor nozzle brush regularly. The brush can be removed for easier cleaning.
Troubleshooting
The LED indicator (A4) provides status updates: 5 red flashes indicate an empty battery; flashing red indicates a blocked brush; flashing blue indicates charging; solid blue indicates a full charge.
Practical help
Common problems
Brush not rotating
Turn off the vacuum, remove the floor nozzle, and clear any hair or debris blocking the brush.
Weak suction
Empty the dust container and clean the textile and HEPA filters. Ensure there are no blockages in the tubes.
Battery not charging
Ensure the adapter is properly connected. If the battery is hot after heavy use, let it cool down before charging.
Before use
- Remove all packaging materials and stickers from the vacuum.
- Charge the battery for at least 8 hours before the first use.
- Ensure all filters are correctly installed.
- Check that the floor nozzle brush is free of debris.
- Verify the wall mount is securely attached if using for storage.
Show more Show less
Specs in practice
- Charging Time
- Approximately 4 hours (after initial 8-hour charge).
Images and diagrams
- Fig 1: Overview of all parts and accessories.
- Fig 2: Steps for removing the dust container and textile filter.
- Fig 3: Steps for removing the HEPA filter.
- Fig 4: Steps for removing the floor nozzle brush for cleaning.
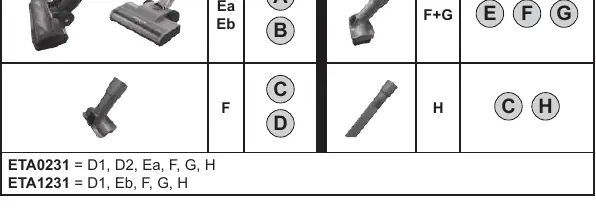
- Fig 7: Assembly configurations for different cleaning needs.
Model compatibility
- ETA0231 includes: D1, D2, Ea, F, G, H.
- ETA1231 includes: D1, Eb, F, G, H.
- Do not use the floor nozzle on high-pile carpets.

Manual page author
Michael Turner
Technical manual editor