Electronics / Speakers & Soundbars
User Manual for FBT 2025R08P08-00 Series Vertical Electric Water Heater
Comprehensive user guide for the FBT 2025R08P08-00 Series vertical electric water heater. Includes installation steps, hydraulic and electrical connection instructions, temperature settings, maintenance procedures, and warranty information.
Quick answers from the manual
Quick answer
- This manual provides installation, operation, and maintenance instructions for the FBT 2025R08P08-00 Series vertical electric water heater. p. 1
Key actions
- Installation p. 6, 12, 18, 24
- Commissioning p. 7, 13, 19, 25
- Maintenance p. 8, 14, 20, 26
First start
- Open water supply, open hot water tap to purge air, fill until cold water flows, check for leaks, connect power. p. 7, 13, 19, 25
Problems and fixes
Dripping from safety device
Normal due to water expansion.
p. 7, 13, 19, 25Maintenance and reset
- Operate safety device monthly; replace magnesium anode every two years. p. 8, 14, 20, 26
Technical specifications
| Parameter | Value | Meaning | Pages |
|---|---|---|---|
| Capacity | 30L - 200L | Available tank sizes. | p. 1, 3 |
Where to find it in the PDF
- Installation p. 6, 12, 18, 24
- Maintenance p. 8, 14, 20, 26
Table of contents
Manual images
Click an image to enlargeImportant Information
This manual provides essential instructions for the safe installation, operation, and maintenance of the FBT 2025R08P08-00 Series vertical electric water heater. Always read the manual carefully before use. Ensure the appliance is installed in a frost-free room (minimum 4°C to 5°C). The wall must be capable of supporting the weight of the heater when filled with water. If the ambient temperature exceeds 35°C, the room must be ventilated.
Installation
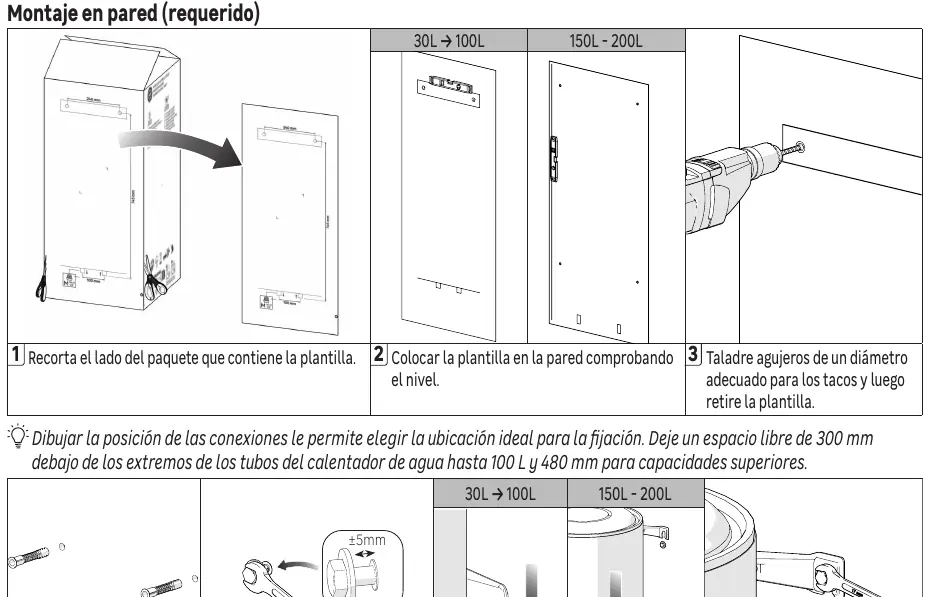
The heater must be mounted on a wall. For models 150L and 200L, if the wall is not load-bearing, the use of a tripod is mandatory. Use the template provided on the packaging to mark the drilling positions. Ensure there is a clear space of 300 mm below the pipes for models up to 100L, and 480 mm for larger capacities to allow for future heating element replacement.
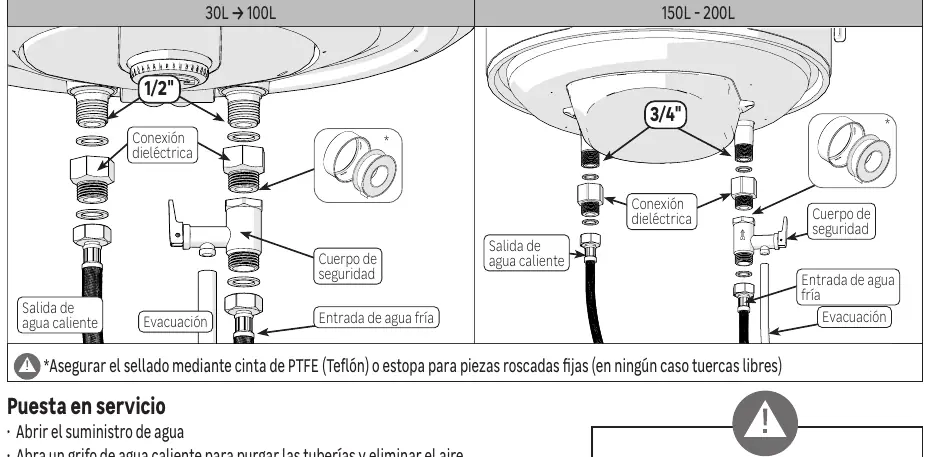
Hydraulic Connection
A new safety device conforming to EN 1487 (0.7 or 0.8 MPa pressure) must be installed at the water inlet. Connect the safety valve to a discharge pipe, kept in a frost-free environment, with a continuous downward slope to drain water during heating or emptying. Use PTFE tape or hemp for fixed threaded parts.
Electrical Connection
The electrical installation must include an all-pole cut-off device (circuit breaker or fuse) upstream of the device. Earthing is mandatory. Connect the plug to a 220-240V 50/60Hz wall socket.
Commissioning
Open the water supply and a hot water tap to purge air from the pipes. The heater is full when cold water flows from the hot water tap. Check all connections for leaks before powering on. Never turn on the heater without water, as this will damage the heating element and void the warranty.
Usage
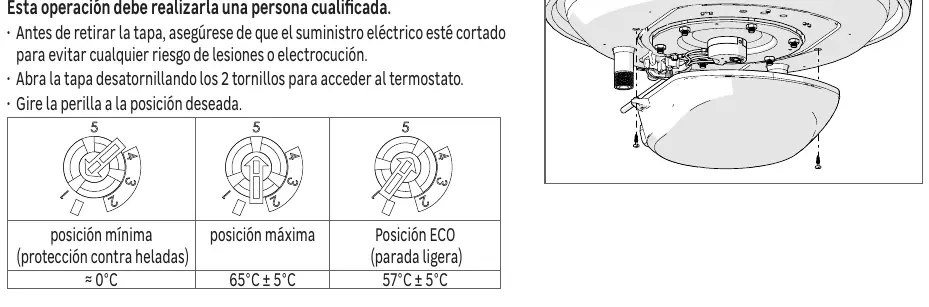
The water heater is factory-set to an optimal temperature. You can adjust the temperature using the knob. For models 30L to 100L, turn the knob towards '+' to increase or '-' to decrease the temperature. Wait several days between adjustments for the temperature to stabilize.
Maintenance
User maintenance includes cleaning the exterior with a soft, dry cloth and operating the safety device monthly to prevent scaling. Maintenance by a qualified person includes replacing the magnesium anode every two years or when depleted, and replacing the heating element or gasket if necessary. Always disconnect the power supply before performing any maintenance.
Manufacturer information
FBT Elettronica SpA
Practical help
Common problems
Water dripping from safety device
This is normal during heating due to water expansion.
Bubbling noise in the tank
This is normal during heating depending on water quality.
No hot water
Check power supply, thermostat setting, or ensure the tank is full.
Before use
- Ensure the wall can support the weight of the full tank.
- Install in a frost-free room.
- Ensure proper electrical grounding.
- Check that the heater is full of water before turning on.
- Verify all hydraulic connections for leaks.
Specs in practice
- ECO position
- Energy-saving temperature setting.
Images and diagrams
- Wall mounting template: Use the packaging side as a guide for drilling.
- Safety valve: Must be installed at the water inlet.
Model compatibility
- Tripod is mandatory for 150L/200L models on non-load-bearing walls.

Manual page author
David Miller
Documentation analyst
Organizes user manual content into clear summaries, with attention to model details, product context, and everyday usability.