Tools / Power Tools
Operating Instructions for Festool PLANEX LHS 2-M 225 EQ Long-reach Sander
Quick guide and operating instructions for the Festool PLANEX LHS 2-M 225 EQ long-reach sander. Includes setup, sanding techniques, maintenance, and troubleshooting.
PDF source: polski · summary: English
Quick answers from the manual
Quick answer
- The Festool PLANEX LHS 2-M 225 EQ is a long-reach sander designed for sanding drywall, ceilings, and walls indoors. p. 19
Key actions
- Connect to dust extractor p. 14, 21
- Adjust suction power p. 14, 21
First start
- Connect power cable and lock bayonet fitting, connect suction hose, and switch on. p. 13, 20
Show 3 more answers Show less
Problems and fixes
Tool stops and beeps three times
Overheating protection activated; switch off and let cool.
p. 17, 23Technical specifications
| Parameter | Value | Meaning | Pages |
|---|---|---|---|
| Power | 400 W | Motor power | p. 13, 19 |
Where to find it in the PDF
- Device components p. 3
- Troubleshooting p. 16, 17, 22, 23
Table of contents
Manual images
Click an image to enlargeQuick guide from the manual
The Festool PLANEX LHS 2-M 225 EQ is a long-reach sander designed for sanding primed drywall, ceilings, and walls indoors, as well as removing wallpaper residue and paint. Always use a suitable dust extractor with this tool to ensure health and safety.
Device components
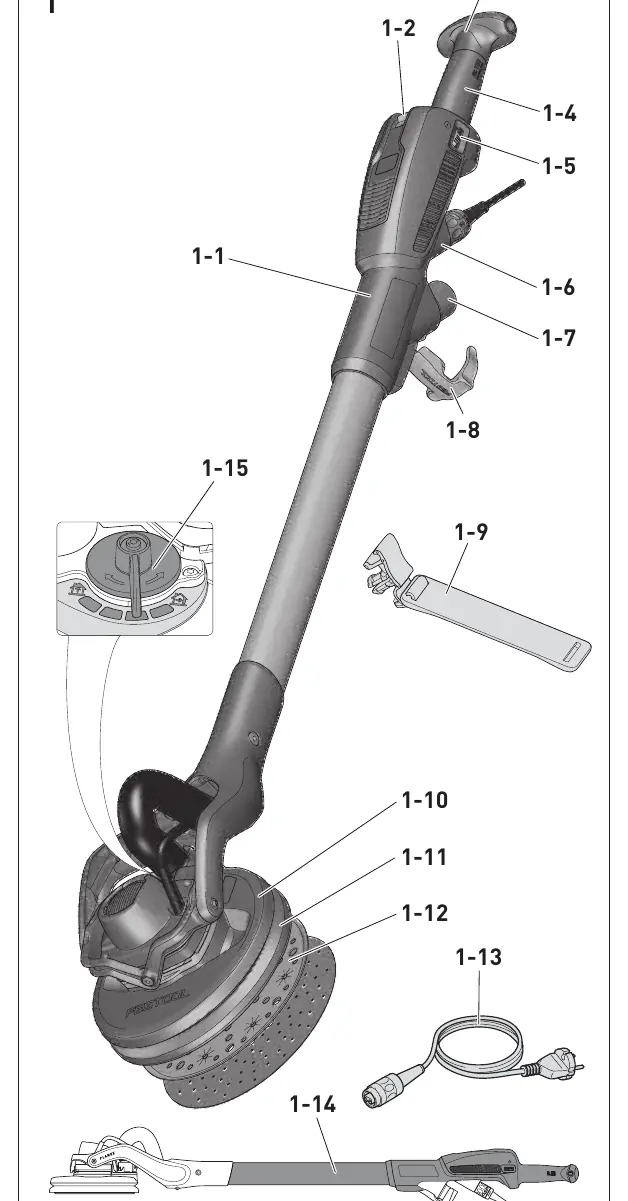
The tool features a handle, T-handle, speed control, plug-it connection, suction regulator, and a sanding head with a backing pad and interface pad. Refer to the diagram on page 3 for specific part identification.
Commissioning
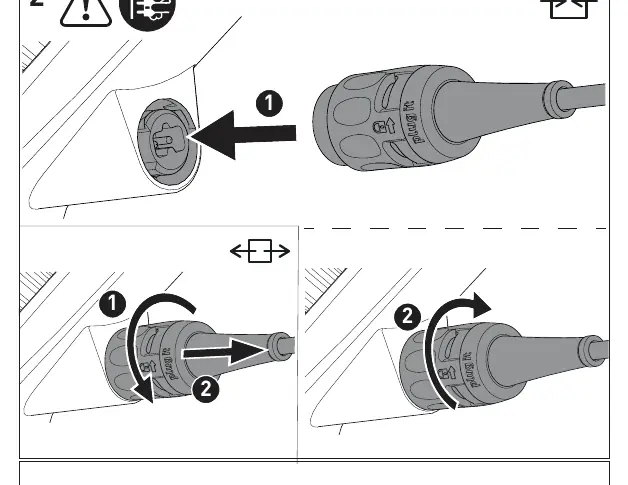
Before starting, ensure the mains voltage matches the tool's specifications. Connect the plug-it mains cable and ensure the bayonet fitting is fully locked to prevent overheating. Connect a Festool mobile dust extractor (36 mm or 27 mm hose) to the extractor connector.
Settings
- Speed control: Adjust the speed using the adjusting wheel [1-5] to suit the material.
- Suction power: Use the suction regulator [1-15] to adjust the suction power based on the surface (ceiling vs. wall).
Operation
Hold the tool with both hands using the designated gripping surfaces. Switch on the tool before placing it on the surface. When working on ceilings, use the hose clip to prevent the cable and hose from interfering with your movement.
Maintenance and care
- Cleaning: Keep air vents clean and vacuum the backing pad regularly. Do not use compressed air.
- Backing pad brake: If braking effect decreases, check the backing pad for wear and replace if necessary.
- Repairs: Only have the housing opened by an authorized service workshop.
Troubleshooting
If the tool stops and beeps three times, the overheating protection is active. Switch off the tool, let it cool down, and clean the housing openings. If the tool does not stick to the ceiling, increase the suction power or use a finer grit abrasive.
Manufacturer information
Festool
Practical help
Common problems
Tool runs unsteadily or heavily
Adjust suction power or replace damaged interface pad.
Tool does not stick to ceiling
Increase suction power or use finer grit abrasive.
Excessive material removal
Reduce suction power or speed.
Tool stops and beeps three times
Overheating protection activated; let it cool down.
Before use
- Check mains voltage and frequency
- Ensure bayonet fitting is locked
- Connect suitable dust extractor
- Check abrasive and interface pad condition
Show more Show less
Specs in practice
- Speed (no-load)
- 5000-8500 rpm
Images and diagrams
- Page 3 shows device components
- Page 4 shows connecting power and suction
- Page 5 shows changing interface pad
- Page 6 shows changing backing pad
- Page 7 shows hose clip attachment
Model compatibility
- Use only original Festool abrasives and backing pads
- Use Festool mobile dust extractors (CTL/M 36 E AC-LHS or PLANEX)

Manual page author
Michael Turner
Technical manual editor