Automotive / RV Caravan Accessories
Fiamma Motor Kit Compact F65L User Manual
Quick guide for the Fiamma Motor Kit Compact F65L. Includes installation steps, electrical wiring, operation, safety warnings, and troubleshooting for your awning motor kit.
Table of contents
Manual images
Click an image to enlargeQuick guide from the manual
The Fiamma Motor Kit Compact F65L is designed to motorize your awning. This kit operates on 12V DC. Key safety requirements include disconnecting the vehicle battery during installation, ensuring the correct fuse (T 6,3A L 250V) is used, and never placing hands or objects in the mechanical parts while the awning is in motion. If the motor fails, a manual crank handle is provided.
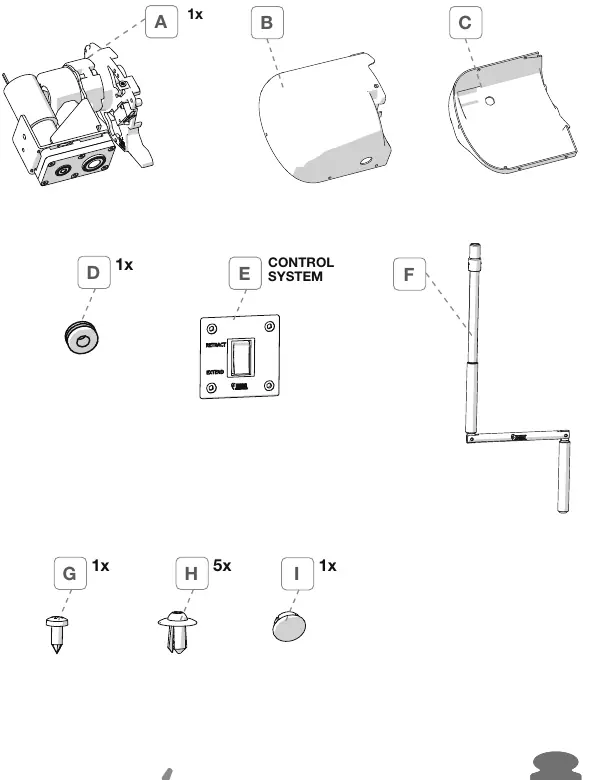
Package contents
The kit includes the motor unit, cover, control system, manual crank handle, and necessary mounting hardware (rivets, screws). Ensure all parts are present and undamaged before starting installation.
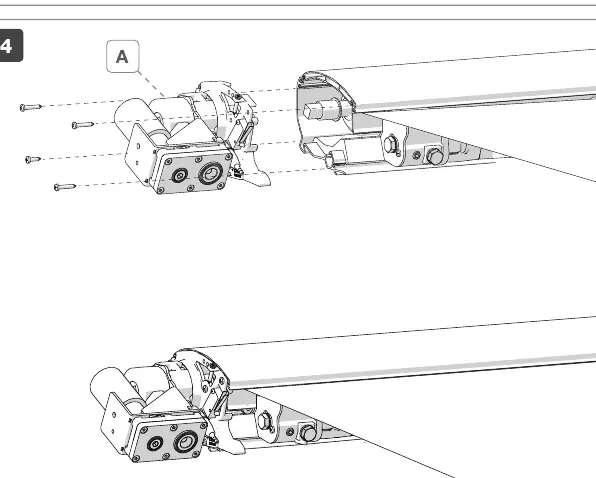
Installation
Installation should be carried out by qualified personnel in compliance with local regulations. The process involves mounting the motor unit to the awning, securing the cover with the provided rivets, and connecting the electrical system.
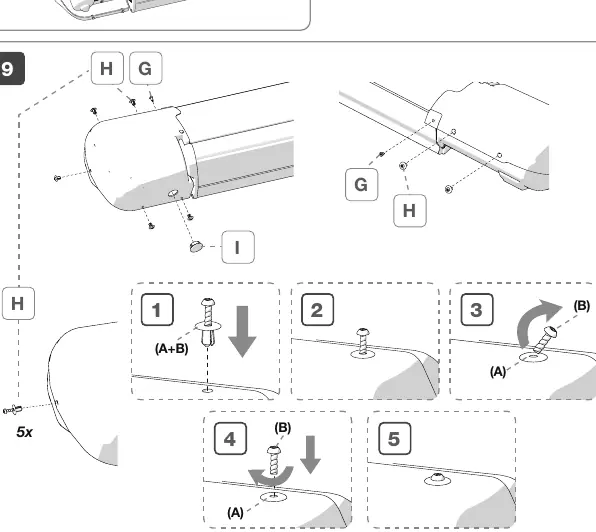
Rivet installation
To secure the cover: insert the rivet (A+B) into the holes, detach screw B from its support, and tighten screw B fully. To remove the cover later (e.g., for fuse replacement), loosen the screws and pull out the rivet body.
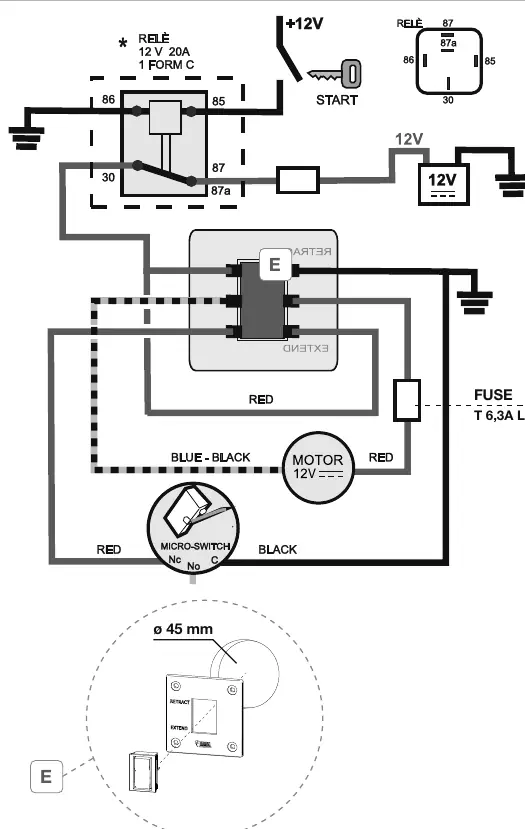
Electrical connection
The system operates at 12V. Choose the shortest and safest route for the power cable. Use appropriate cable clamps. It is recommended to connect the system to a relay (not supplied) that cuts off power when the ignition key is turned, preventing accidental opening while driving. The motor is protected by a T 6,3A L 250V fuse. Never operate the product without this fuse.
General test
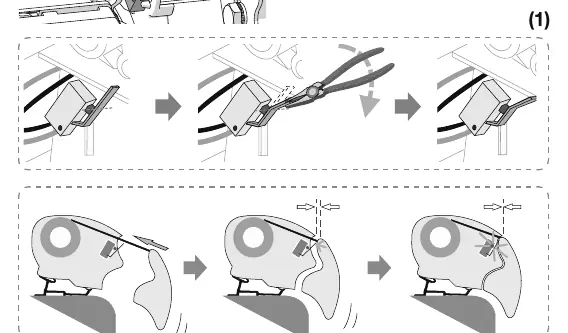
After installation, perform a test: ensure the awning opens when the switch is in EXTEND and closes in RETRACT. If reversed, invert the polarity. Test the microswitch by opening the awning completely and closing it; the microswitch should interrupt movement if pressed. If not, adjust the microswitch using a clamp.
Operation
Standard Operation: Use the control system button to open or close the awning. Releasing the button stops the movement. If the awning does not stop, the microswitch may be defective or disconnected; the lead bar will close until it hits the end, triggering the protection fuse.
Manual Operation: If the motor fails, you can close the awning by bypassing the electrical system using the provided crank handle F.
Safety and maintenance
Always check that the awning is correctly closed before driving. Periodically check the fixing status, especially after long journeys. Do not wash the outer covering with aggressive products that could damage the surface finish. If the awning extends more than 100 mm from the vehicle profile, it must be recorded in the vehicle registration documents.
Troubleshooting
If the motor fails to operate, check the fuse. If the awning does not stop at the end of its travel, check the microswitch connection and adjustment. For further issues, contact your local dealer and provide the data from the nameplate.
Manufacturer information
Fiamma SpA
Practical help
Common problems
Awning does not stop at the end of travel
Check if the microswitch is connected or defective. Adjust the microswitch with a clamp if necessary.
Fuse blows
Check for obstacles preventing movement. Replace with an identical T 6,3A L 250V fuse. Never use a different value.
Awning opens/closes in reverse
Invert the polarity at the motor input.
Before use
- Check for transport damage.
- Ensure 12V power supply is available.
- Disconnect vehicle battery during installation.
- Verify the T 6,3A L 250V fuse is installed.
- Ensure no obstacles (e.g., branches) are present before operating.
- Verify the awning is fully closed before driving.
Specs in practice
- Power Supply
- 12V DC
- Absorbed power max
- 144W
- Motor protection fuse
- T 6,3A L 250V
- Operating temperature
- +5°C to +50°C
Images and diagrams
- Wiring diagram shows relay connection to ignition to prevent accidental opening.
- Microswitch adjustment procedure using a clamp.
- Rivet installation sequence for the cover.
Model compatibility
- Designed for F65L awnings.
- Must be installed by qualified personnel.
- If extending >100mm from vehicle, must be recorded in vehicle registration.

Manual page author
Michael Turner
Technical manual editor
Reviews PDF manuals for structure, safety notes, and practical product details so readers can find the right information quickly.