Documents / Warranty Safety
Installation and User Guide for Fiamma Caravanstore ZIP XL
Complete installation and user guide for the Fiamma Caravanstore ZIP XL awning. Includes step-by-step mounting instructions, partial opening procedures, maintenance tips, and safety guidelines.
Table of contents
Manual images
Jump to the sectionQuick guide from the manual
The Fiamma Caravanstore ZIP XL is a manual awning designed for vehicles. This guide provides essential information for installation, operation, and maintenance. Always ensure the vehicle wall or rear door is sufficiently solid to support the awning's anchoring points. If the awning extends more than 100 mm from the vehicle profile, it must be recorded in the vehicle's registration documents according to DIN 75303 - 2019.
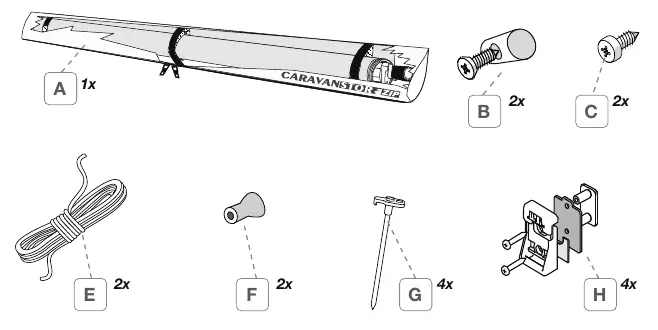
Package Contents
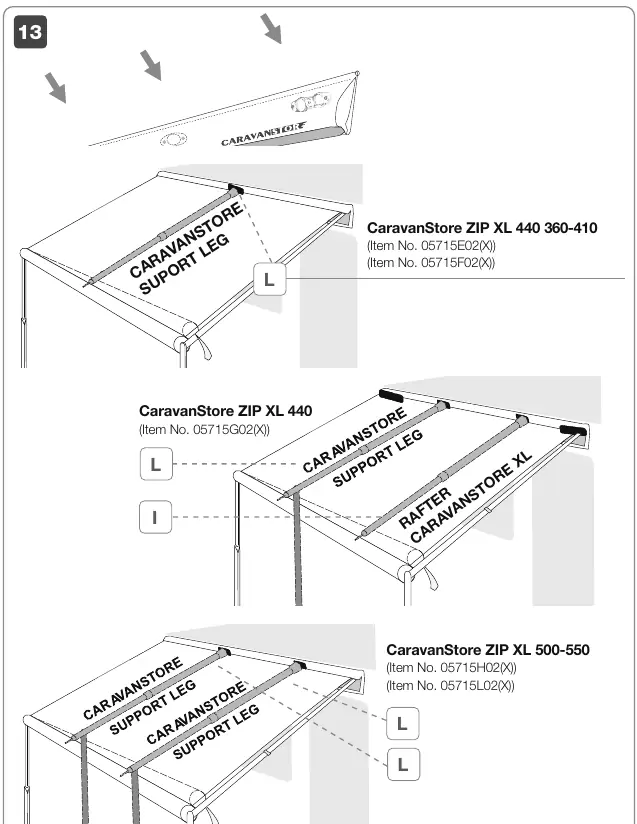
Before beginning installation, verify that all components are present and undamaged. The package includes the awning (A), screws (B, C), ropes (E), pegs (F, G), and brackets (H). Specific models may include additional support legs (L) or rafters (I) depending on the size (280-550 cm).
Installation
Installation should be carried out by qualified personnel. Steps:
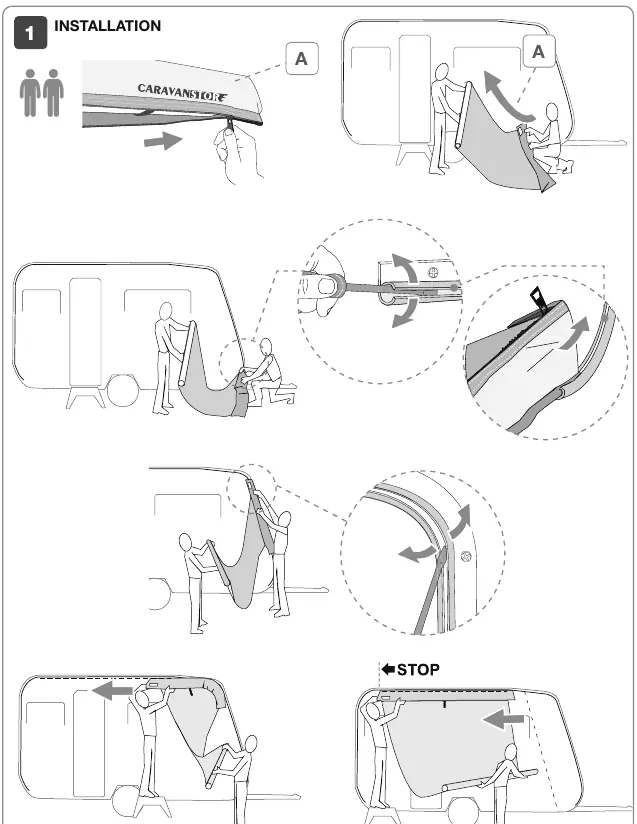
- Ensure the bag is well laid out and there are no obstacles at the vehicle's opening.
- Slide the awning into the vehicle rail.
- Secure the awning using the provided hardware.
- For models 360-550cm, ensure the support legs are properly positioned.
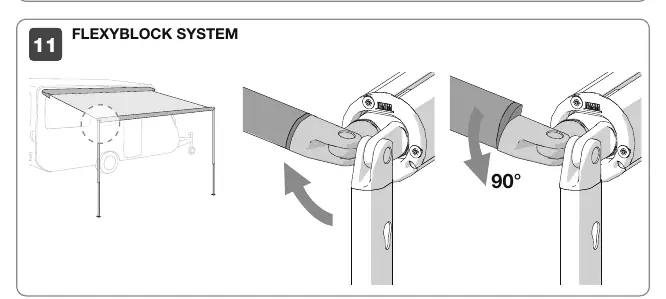
- Use the Flexyblock system to secure the support legs.
- If necessary, pre-drill holes (3mm or 6mm as specified in diagrams) for secure mounting.
- Secure the legs to the ground using the provided pegs to prevent wind damage.
Partial Opening
Partial opening is only possible for model sizes 360-550cm. Requirements:
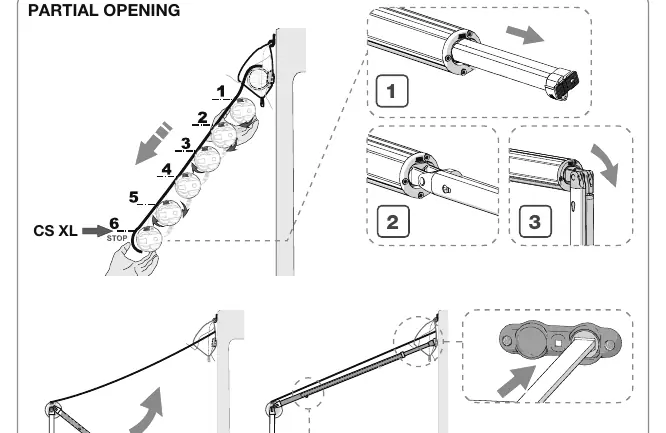
- Wall Fixing Brackets must be mounted to the vehicle wall.
- The canopy must always be rolled from the top.
- Unroll the roller tube 6 turns, keeping the Fiamma logo horizontal.
Usage and Safety
The awning is designed for sun protection. Important safety precautions:
- Close the awning in case of rain, wind, or snow.
- If you must keep it open during light rain, lower one side to allow water to flow away and install the tension rafter.
- Never travel with the awning open.
- Ensure the awning is correctly closed before driving.
- Do not use the awning if the fabric is damaged.
- Do not use the awning at temperatures below 0°C.
Maintenance
Proper maintenance ensures longevity:
- Only close the awning when it is dry and clean.
- If you must close it while wet, open it again within 12 hours to dry.
- Clean with water and a soft cloth or brush. For stubborn dirt, use a neutral detergent (Marseille soap).
- Do not use aggressive chemicals or high-pressure cleaners.
- Do not wash the outer casing with aggressive products or rough cloths.
Accessories
Various accessories are available to enhance your awning, including Patio-Mats, Rafters, LED kits, Awning Hangers, Pegs, Plates, Tie Down S kits, and Repair Plus kits. Refer to page 33 for item numbers.
Manufacturer information
Fiamma SpA
Practical help
Common problems
Awning does not close properly
Ensure the fabric is dry and legs are correctly stowed in the roller tube. Excess volume can block the zip.
Water pooling on the canopy
Lower one side of the awning to allow water to flow away and install the tension rafter.
Partial opening not working
Partial opening is only available on models 360-550cm and requires Wall Fixing Brackets to be installed.
Before use
- Check that the bag is well laid out.
- Ensure there are no obstacles at the hole in the vehicle.
- Verify the wall/rear door is sufficiently solid for anchoring.
- Check that the awning is correctly closed before traveling.
- Ensure the fabric is not damaged.
Specs in practice
- Partial Opening
- Feature for 360-550cm models; requires wall brackets.
- DIN 75303 - 2019
- Standard for vehicle registration if awning extends >100mm.
Images and diagrams
- Installation steps: Sequence for mounting the awning to the vehicle rail.
- Flexyblock System: Mechanism for securing the support legs.
- Partial Opening: Step-by-step guide for partial deployment.
Model compatibility
- Partial opening is only possible for model sizes 360-550cm.
- Wall Fixing Brackets must be mounted for partial opening.

Manual page author
Michael Turner
Technical manual editor
Reviews PDF manuals for structure, safety notes, and practical product details so readers can find the right information quickly.