Automotive / RV Caravan Accessories
Installation and User Manual for Fiamma Vent Rooflight
Comprehensive installation and usage guide for the Fiamma Vent rooflight. Includes step-by-step mounting instructions, roof thickness requirements, maintenance tips, and safety warnings for your RV or camper van.
Table of contents
Manual images
Click an image to enlargeImportant Information
This manual provides installation and usage instructions for the Fiamma Vent rooflight. Before installation, ensure the roof thickness is compatible with the product. The standard installation is suitable for roofs between 3 cm and 5 cm thick. For roofs between 5 cm and 8.5 cm, the optional Extension Vent kit must be used.
Installation
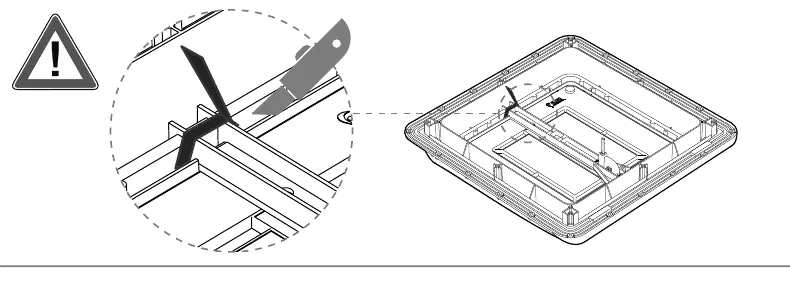
- Preparation: Decide on the installation location and cut a 39 cm square hole in the roof. Ensure the internal and external surfaces are flat and free from obstructions like cables or reinforcements.
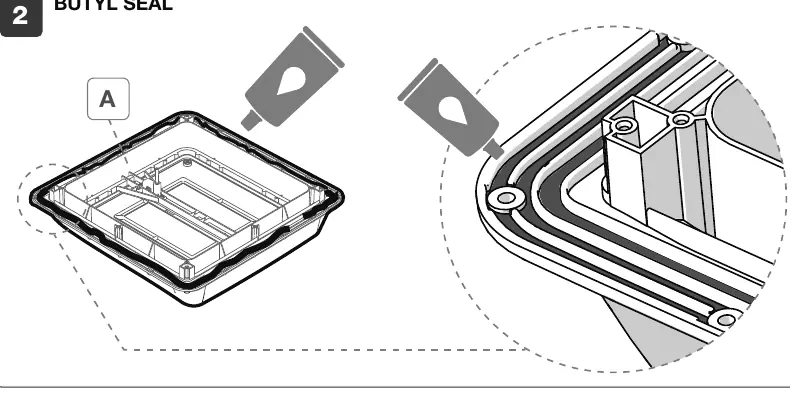
- Sealant Application: Apply a waterproof sealant (butyl sealant is recommended) to the lower part of the external frame. Clean the roof area thoroughly before application.
- External Frame: Insert the external frame into the opening, ensuring the hinges are oriented in the direction of travel. Press lightly to distribute the sealant evenly.
- Fixing: Secure the external frame using 20 screws (Ø4.2x30mm UNI EN ISO 7049, not supplied).
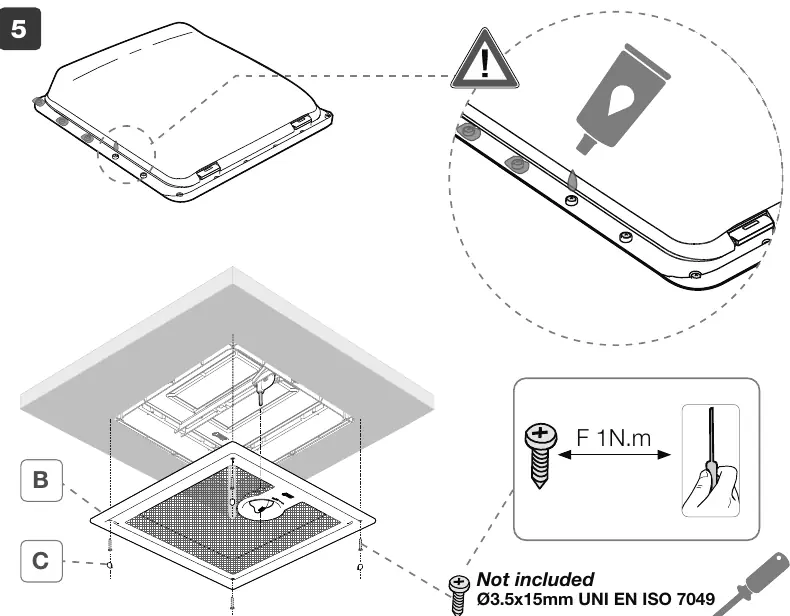
- Sealing and Internal Frame: Siliconate the perimeter of the external frame, filling any gaps between the roof and frame, and cover the screw heads. Insert the internal frame and secure it with 4 self-tapping screws (Ø3.5x15mm UNI EN ISO 7049, not supplied).
Usage and Safety
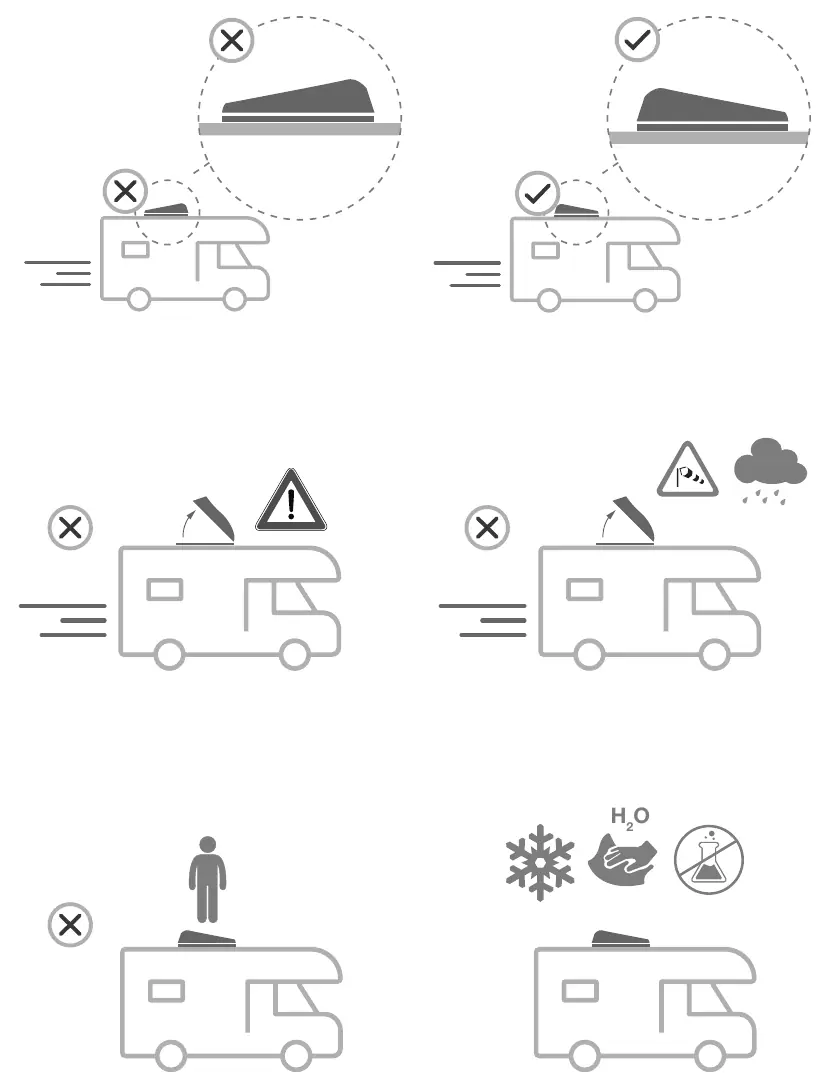
- Driving: Always ensure the rooflight is properly closed before starting the vehicle. Do not open the rooflight while the vehicle is in motion.
- Weather Conditions: Do not open the rooflight during strong wind or rain. Remove any accumulated snow or ice.
- Restrictions: It is strictly forbidden to walk on the product's cover.
- Accidents: In the event of an accident, inspect the product for damage before moving the vehicle.
Care and Maintenance
Regular maintenance ensures the longevity of your rooflight:
- Cleaning: Use only neutral, non-aggressive detergents for both internal and external cleaning. For the Crystal cover, use an acrylic glass cleaner with a soft cloth to avoid scratching. Never use alcohol-based cleaners, solvents, or abrasive products.
- Lubrication: If the opening/closing device becomes hard to operate, apply a few drops of grease to the mechanism.
- Mosquito Net: The mosquito net can be cleaned with water and a neutral detergent after removing the frame and fixing screws.
- Inspection: Periodically check the tightness of all screws, especially after the first few kilometers following installation and before/after long journeys.
Manufacturer information
Fiamma SpA
Practical help
Common problems
Opening/closing device is hard to operate
Lubricate the lid opening device with a few drops of grease.
Roof thickness is greater than 5 cm
You must use the optional Extension Vent kit (compatible up to 8.5 cm).
Water leakage
Ensure butyl sealant is applied correctly to the external frame and that all screw heads are sealed with silicone.
Before use
- Verify roof thickness is between 3-5 cm (or 5-8.5 cm with extension kit).
- Ensure the roof surface is flat.
- Check for interference with internal cabinets, cables, or external accessories.
- Ensure hinges are oriented in the direction of travel.
- Verify all 20 external screws and 4 internal screws are tightened.
Specs in practice
- External screws
- 20 screws (Ø4.2x30mm UNI EN ISO 7049) required (not supplied).
- Internal screws
- 4 screws (Ø3.5x15mm UNI EN ISO 7049) required (not supplied).
Images and diagrams
- Page 4: Overview of installation steps and hole dimensions.
- Page 7: Detailed view of butyl sealant application to the external frame.
- Page 8: Internal frame installation and screw tightening points.
- Page 9: Safety icons illustrating prohibited actions like walking on the cover or driving with the vent open.
Model compatibility
- Standard installation: 3 cm to 5 cm roof thickness.
- Extended installation: 5 cm to 8.5 cm roof thickness (requires Extension Vent kit).

Manual page author
Emily Carter
User documentation editor
Prepares concise manual descriptions and highlights the most useful setup, operation, and maintenance information for readers.