Home / Security
Operation and Installation Guide for First Alert Fire Protector Chest
A comprehensive guide for the First Alert Fire Protector Chest. Learn how to operate your safe, assemble wheels, maintain the unit, and find important identification numbers for warranty and support.
Quick answers from the manual
Quick answer
- This manual provides instructions for operating, maintaining, and identifying your First Alert Fire Protector Chest, including warranty information and how to order replacement keys. p. 1, 2
Key actions
- Opening the safe p. 1
- Closing the safe p. 1
Problems and fixes
Lost keys
Contact Consumer Affairs with your Key Number.
p. 2Show 2 more answers Show less
Technical specifications
| Parameter | Value | Meaning | Pages |
|---|---|---|---|
| Fire Rating | 350°F (177°C) for 30 mins | Internal temperature limit during fire | p. 2 |
Where to find it in the PDF
- Operation and Maintenance p. 1
- Identification and Support p. 2
Table of contents
Manual images
Click an image to enlargeQuick guide from the manual
This document provides essential instructions for the operation and maintenance of your First Alert Fire Protector Chest. It covers the correct procedures for opening and closing the unit, important safety warnings regarding storage, and how to locate identification numbers required for support.
Opening and closing your safe
Opening:
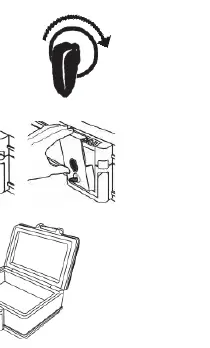
- Insert the provided key into the lock.
- Turn the key clockwise to the right.
- Push the large button; the locking latch will open and spring forward.
- Once the latch clears the lip, you can open the lid.
Closing:
- Close the lid, ensuring no contents obstruct the seal.
- Push the latch back and down onto the lid clasp until it snaps into the closed position.
- Turn the key counter-clockwise to the left and remove it.
Proper use and maintenance
To ensure your safe functions correctly during a fire, follow these guidelines:
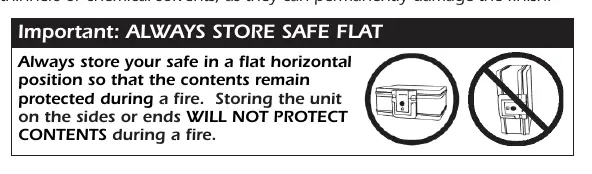
- Storage: Always store the safe in a flat, horizontal position. Storing it on its sides or ends will not protect the contents during a fire.
- Moisture: Avoid areas of high humidity. For delicate items like pictures or jewelry, use an air-tight container inside the safe.
- Air circulation: Open and air out the safe for at least 20 minutes every two weeks.
- Cleaning: Use a damp cloth to clean the safe. Never use paint thinners or chemical solvents, as they can damage the finish.
Assembling wheels (Model 2037WF only)
If your safe includes Easy Roller™ Wheels, follow the assembly instructions included in the box. Ensure the instructions on the wheel cart are upright and facing outward. After assembly, place the safe carefully onto the cart. Do not sit or stand on the wheels. The maximum weight supported is 85 lbs (38.6 kg).
Identification numbers
It is strongly recommended that you record your Model Number and Key Number. These are essential for contacting Consumer Affairs for assistance or ordering replacement keys. The Key Number is engraved on the keys and around the lock cylinder.
Important safety warnings
- Keys: Always store keys away from the safe. Never keep them inside.
- Manual: Keep this manual in a safe place outside of the unit.
- Support: If you have questions, do not return the safe to the store. Contact Consumer Affairs at 1-800-223-8566 (USA & Canada).
Manufacturer information
First Alert
Practical help
Common problems
Lost keys
Use the Key Number engraved on the lock cylinder to order replacements from Consumer Affairs.
Safe won't open
Ensure the key is turned fully clockwise and the latch button is pushed.
Moisture inside the safe
Open and air out the safe for at least 20 minutes every two weeks.
Before use
- Record your Model Number and Key Number in a safe place.
- Store keys in a secure location outside the safe.
- Ensure the safe is placed on a flat, horizontal surface.
- If storing delicate items, use an air-tight container.
Show more Show less
Specs in practice
- Fire Protection
- Interior temperature remains below 350°F (177°C) for 30 minutes during a fire up to 1550°F (843°C).
- Weight Limit (Wheels)
- Maximum weight supported by the Easy Roller™ Wheels is 85 lbs (38.6 kg).
Images and diagrams
- The manual includes diagrams for the opening and closing sequence of the latch.
- A warning diagram illustrates the requirement to store the safe flat.
Model compatibility
- Wheel assembly instructions apply only to Model 2037WF.

Manual page author
Emily Carter
User documentation editor