Home Appliances / Commercial Kitchen Equipment
Installation Guide for Frymaster 1814G Gas Fryer Pre-Filter Kit
Step-by-step installation guide for the Frymaster 1814G Gas Fryer pre-filter kit, including drilling instructions, hose connections, leak testing, and staff training procedures.
Quick answers from the manual
Quick answer
- This document provides instructions for installing a pre-filter kit on 1814G gas fryers, including drilling, hose connection, leak testing, and reset rod installation. p. 1, 2, 3
Key actions
- Install pre-filter p. 1, 2
- Test for leaks p. 2
Problems and fixes
Leaks
Check all flexline oil connections while oil is circulating.
p. 2Maintenance and reset
- Reset rod installation p. 2, 3
Technical specifications
| Parameter | Value | Meaning | Pages |
|---|---|---|---|
| Drill bit size | 5/32" | Required for pilot holes | p. 2, 3 |
Where to find it in the PDF
- Pre-Filter Installation p. 1, 2
- Test for leaks p. 2
- Reset Rod Installation p. 2, 3
Table of contents
Manual images
Click an image to enlargeQuick guide from the manual
This document provides instructions for installing a pre-filter kit on 1814G gas fryers. The installation involves removing existing components, drilling pilot holes, connecting hoses, and testing for leaks. Staff training on the new components is also required.
Pre-Filter Installation
Follow these steps to install the pre-filter kit:
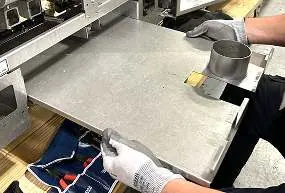
- Remove the filter pan.
- Remove the two filter pan lid screws and pull the lid off the tabs at the rear of the fryer.
- Remove the two screws attaching the filter motor reset rod and set the rod with bracket aside.
- Disconnect the flexible hose from the rear of the female suction assembly.
- Position the pre-filter as low and left as possible on the vertical support above the female receptacle.
- Drill two pilot holes smaller than 5/32 inch in the vertical support to match the pre-filter mount base.
- Drill out the pilot holes using a 5/32 inch drill bit.
- Attach the flexible hose to the output of the pre-filter.
- Attach the input flexible hose from the pre-filter to the female pick-up receptacle.
- Secure the pre-filter to the vertical frame using the provided screws and tighten the hose connections.
Test for leaks
After installation, verify the system integrity:

- Ensure the filter pan is set up correctly and in place.
- Turn OFF the fryer.
- Open the return valve by rotating the yellow handle to the left. Ensure the pump motor runs and air bubbles are visible in the frypot.
- Open the drain valve by pushing the red handle to the right.
- Check for leaks on all flexline oil connections while the oil is circulating.
- Close the drain valve, fill the frypot, and allow the oil to bubble for approximately 30 seconds.
- Verify the filter pan is empty of oil and repair any leaks found.
Install Filter Motor Reset Rod with Bracket
Reinstall the reset rod with the new bracket:
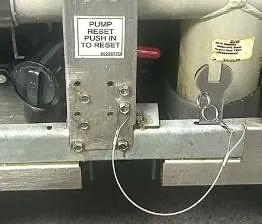
- Remove the existing clevis clip and bracket from the reset rod.
- Attach the provided bracket and clevis clip to the reset rod with the handle positioned to the right.
- Position the reset rod in the guide hole bracket in front of the motor reset button.
- Ensure the rod tip contacts the reset on the motor when pushed in.
- Drill pilot holes through the vertical frame and bracket, then drill them out to 5/32 inch.
- Secure the reset bracket to the vertical frame using the provided screws.
- Ensure the wrench lanyard is behind the lower screw and mount the wrench in the provided slot.
Staff Training
Ensure all staff are trained on the following:
- The purpose of the pre-filter and the location of the wrench and reset rod.
- The pre-filter will be as hot as the oil; use safety gloves when handling.
- Tightening procedure: Finger tighten first, then use the wrench to snug a little tighter than finger tight.
- Do not overtighten the pre-filter, as it will be difficult to remove later.
Manufacturer information
Frymaster
Practical help
Common problems
Leaks after installation
Check all flexline oil connections, whether they were touched or not, while the oil is circulating.
Pre-filter difficult to remove
Do not overtighten the pre-filter; finger tighten first, then use the wrench to snug a little tighter than finger tight.
Before use
- Ensure the filter pan is set up correctly and in place.
- Turn OFF the fryer before starting the filter process.
- Wear safety gloves when handling the pre-filter as it will be hot.
- Verify the pre-filter is not overtightened.
Specs in practice
- 5/32 inch drill bit
- Required size for drilling pilot holes in the vertical support and bracket.
Images and diagrams
- Figures 1-7: Removal of filter pan and initial pre-filter positioning.
- Figures 8-11: Drilling pilot holes and securing the pre-filter.
- Figures 12-16: Reset rod and bracket installation.
Model compatibility
- Designed specifically for 1814G Gas Fryers.

Manual page author
David Miller
Documentation analyst
Organizes user manual content into clear summaries, with attention to model details, product context, and everyday usability.