Home Appliances / Commercial Kitchen Equipment
Waring Commercial 2-Speed Drink Mixer WDM20 User Manual
Comprehensive user manual for the Waring Commercial 2-Speed Drink Mixer (WDM20). Includes safety instructions, operating procedures, detailed cleaning and sanitizing guidelines, and maintenance tips.
Quick answers from the manual
Quick answer
- The Waring Commercial Drink Mixer operates automatically via an actuator behind the upper cup support. Place the cup so the bottom rests on the upper step and the rim is behind the front tab to start the motor. p. 3
Key actions
- Clean and sanitize the mixer after every use or if it will not be used for more than one hour. p. 5
- Change agitators by holding the spindle shaft and turning the agitator clockwise to loosen the screw. p. 4
First start
- Clean the mixer thoroughly before initial use. p. 7
Problems and fixes
Motor not starting
Check that the cup is positioned correctly on the cup support steps and activating the actuator.
p. 3Maintenance and reset
- Reassemble cup actuator and supports by reversing the removal steps. p. 5
Technical specifications
| Parameter | Value | Meaning | Pages |
|---|---|---|---|
| Motor | 1 peak HP | Independent motor per spindle. | p. 3 |
Where to find it in the PDF
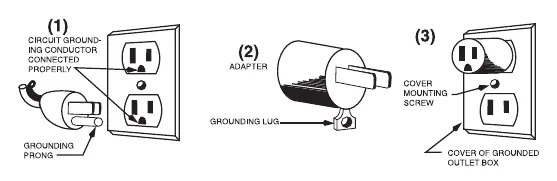
- Safety and Grounding p. 2, 3
- Operation and Maintenance p. 3, 4
- Warranty and Service p. 7, 8
Table of contents
Manual images
Click an image to enlargeQuick guide from the manual
The Waring Commercial 2-Speed Drink Mixer (WDM20) is designed for commercial use. Key operational requirements include ensuring the unit is properly grounded, using only standard metal mixing cups, and following strict cleaning and sanitizing procedures after every use to prevent bacteria buildup. The unit features an automatic ON/OFF actuator that starts the motor when the cup is placed in the correct position.
Product Overview
The mixer features a spindle with an independent 1 peak HP motor. It includes an automatic ON/OFF button (actuator) located behind the front tab of the upper cup support. The unit is equipped with a 2-speed toggle switch on the side for selecting LO (I) or HI (III) speeds.
Operation
To operate the mixer:
- Cup Placement: The bottom of the mixing cup must rest securely on the upper step of the cup support. The top rim of the cup must go behind the front tab of the upper cup support.
- Automatic Start: The motor starts automatically when the cup is placed in the proper position and shuts off when the cup is removed.
- Speed Selection: Use the toggle switch on the side. Use LO (I) for light drinks with more liquid. Use HI (III) for heavy drinks.
Cleaning and Sanitizing
Important: Do not put the unit in a dishwasher. Always turn the unit off or unplug it before cleaning.
Washing and Sanitizing Procedure:
- Add 12 ounces of washing solution to the mixing cup and place it on the mixer.
- Run on LO speed for at least 2 minutes.
- Empty the cup and repeat the 2-minute run with 12 ounces of water (rinsing).
- Empty the cup and repeat the 2-minute run with 12 ounces of sanitizing solution.
- Empty the cup and run the motor for a few seconds to spin off excess moisture. Do not rinse after sanitizing.
Sanitizing Solution: Use regular, unscented bleach diluted with water (50°F–120°F). Do not exceed 200 ppm total available chlorine. For 5.25% hypochlorite bleach, use 3 teaspoons per gallon of water. For 8.25% hypochlorite bleach, use 2 teaspoons per gallon of water.
Maintenance
Changing Agitators: The mixer comes with 1 standard and 1 "butterfly" agitator. To change, hold the spindle shaft with one hand and turn the agitator clockwise to loosen the screw. Remove, insert the replacement, and screw back in.
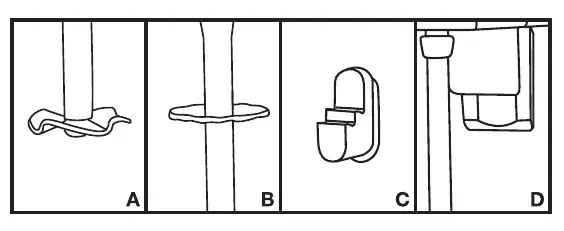
Removing Supports: To remove bottom cup supports, push up and pull toward you. To remove upper cup supports, hold the notches on both sides and pull directly out from the base.
Helpful Hints
- Always turn the unit off or unplug it before disassembling or assembling parts.
- Use only crushed ice or small cubes.
- Ensure all detachable parts are fastened tightly before operation.
- Operate only when fully assembled.
- If the mixer will not be used for more than one hour, wash, rinse, and sanitize it to avoid bacteria buildup.
Practical help
Common problems
Motor does not start
Ensure the mixing cup is positioned correctly: the bottom must rest on the upper step of the cup support, and the rim must be behind the front tab.
Splashing during mixing
Use the LO speed setting for drinks with thin consistency.
Unit needs cleaning
Do not use a dishwasher. Follow the specific 3-step process: wash, rinse, and sanitize using the recommended bleach dilutions.
Before use
- Clean the mixer thoroughly before initial use.
- Ensure the unit is plugged into a properly connected grounding-type outlet.
- Verify all detachable parts are fastened tightly.
- Ensure the unit is fully assembled before operation.
Images and diagrams
- Figure 1, 2, 3: Illustrates proper grounding of the 3-conductor cord set and use of a grounding adapter.
- Figure A, B, C, D: Shows the agitator types and the removal process for cup supports.
Model compatibility
- Use only standard metal mixing cups.
- Use only crushed ice or small cubes.
- Not for use with Direct Current (DC).

Manual page author
Emily Carter
User documentation editor
Prepares concise manual descriptions and highlights the most useful setup, operation, and maintenance information for readers.