Home Appliances / Commercial Kitchen Equipment
Frymaster 17/8SMS, 17/8BC, 17/8C Electric Pasta Cooker Installation and Operation Guide
A comprehensive guide for the Frymaster 17/8SMS, 17/8BC, and 17/8C electric pasta cookers. Includes essential installation requirements, controller operation, daily maintenance procedures, and troubleshooting steps.
Quick answers from the manual
Quick answer
- The Frymaster 17/8SMS, 17/8BC, and 17/8C are electric pasta cookers. This manual provides instructions for installation, operation of the Spaghetti Magic III controller, daily maintenance, and troubleshooting. p. 1, 3
Key actions
- Perform Boil Out procedure before first use p. 14
- Daily preventive maintenance p. 15
First start
- Boil Out procedure p. 14
Problems and fixes
Controller does not activate
Check circuit breakers, Master Power switch, and controller power switch.
p. 17
Basket Lift does not function
Adjust roller, check lifter rod for free movement/lubricate, or check microswitch.
p. 17Maintenance and reset
- Daily cleaning of sensors and elements p. 15
Technical specifications
| Parameter | Value | Meaning | Pages |
|---|---|---|---|
| Water Pressure | 40 PSI (2.8 kg/cm²) | Recommended incoming water pressure. | p. 8 |
| Max Water Pressure | 80 PSI (5.62 kg/cm²) | Maximum allowable incoming water pressure. | p. 8 |
Where to find it in the PDF
- Installation Instructions p. 7, 8, 9
- Operating Instructions p. 11, 12, 13, 14
- Troubleshooting p. 16, 17
Table of contents
Manual images
Click an image to enlargeQuick guide from the manual
This document provides installation, operation, and maintenance instructions for the Frymaster 17/8SMS, 17/8BC, and 17/8C electric pasta cookers. Important: All installation and service must be performed by qualified, certified, and licensed personnel. The equipment is for indoor use only. Never use water jets to clean the unit.
Equipment Description
The models differ by configuration:
- 17/8SMS: Cooker with separate rinse tank and automatic timed basket lift.
- 17/8BC: Cooker with automatic timed basket lift.
- 17/8C: Cooker only.
Installation Instructions
Proper installation is essential for safe operation. Ensure the following before connecting to power:

- Stabilization: Install restraining chains for units with casters or anchor straps for units with legs.
- Leveling: Level the unit; for units with legs, screw them out approximately 1 inch.
- Water Connection: Incoming water pressure should be approximately 40 PSI (2.8 kg/cm²). Maximum allowable pressure is 80 PSI (5.62 kg/cm²). Use a vacuum breaker or air gap to prevent back flushing.
- Electrical Connection: Connect to the voltage and phase specified on the rating plate. Use copper wire only, suitable for at least 170°F (75°C). Refer to the power requirements chart in the manual for specific wire sizes.
Operating Instructions
The Spaghetti Magic III controller manages cooking cycles:
- Boil Mode: Used for cooking pasta.
- Simmer Mode: Maintains water temperature at approximately 195°F (90.6°C) for standby.
- Skim Feature: Adds water for 3 seconds once a minute to overflow starch into the drain.
- Boil Out Procedure: Must be performed before first use. Fill with water and 1 cup of detergent, simmer for at least 1 hour, then drain and rinse thoroughly. Do not use deliming solution.
Preventive Maintenance
Daily maintenance is required to maintain efficiency:
- Inspection: Check for loose wires, leaks, or foreign material.
- Cleaning: Clean the cabinet inside and out. Clean water-level sensors and heating elements using a bottlebrush or abrasive pad with detergent.
- Warning: Never clean the equipment while it is in the cooking process or filled with hot water.
Troubleshooting
If issues arise, follow a process of elimination:
- Controller not activating: Check circuit breakers, power switch, and connections.
- Autofill issues: Check water supply and clean water level sensors.
- Water not heating: Clean low water level sensors or add baking soda if mineral content is insufficient.
- Basket lift issues: Check for jammed rollers or rods and lubricate if necessary.
Manufacturer information
Frymaster
Practical help
Common problems
Controller does not activate
Check circuit breakers, ensure the Master Power switch is ON, and press the power switch on the controller.
Autofill does not shut off when full
Clean the upper water level sensor or add 1/8-cup of baking soda to the cookpot if water mineral content is low.
Water will not heat
Clean the low water level sensor or add 1/8-cup of baking soda to the cookpot.
Basket lift does not function
Check for jammed rollers or lifter rods; lubricate with white grease or check microswitch adjustment.
Before use
- Verify the unit is connected to the water supply and the supply is turned on.
- Ensure the unit is plugged into an appropriate outlet.
- Verify the electrical power supply is turned on.
- Perform the 'Boil Out' procedure before the first use.
- Ensure all covers and access panels are in place and secured.
Specs in practice
- Skim Feature
- Automatically adds water to overflow starch into the drain.
- Transition Temperature
- Programmable boil intensity (0-9) to prevent boilover.
Images and diagrams
- Wiring diagrams for various electrical configurations (Single Phase, 3-Phase Delta, 3-Phase Wye) are provided on page 10.
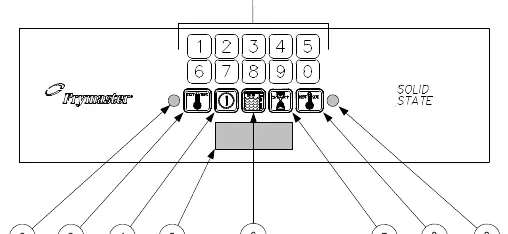
- The controller panel layout (page 11) identifies the numeric keypad, boil/simmer switches, and indicators.
Model compatibility
- Requires water supply pressure of approximately 40 PSI.
- Use copper wire only for electrical connections.
- Do not use purified, deionized, or highly filtered water; sensors require mineral content.

Manual page author
David Miller
Documentation analyst
Organizes user manual content into clear summaries, with attention to model details, product context, and everyday usability.