Home Appliances / Commercial Kitchen Equipment
User Manual for Winco 2-Door Warmer/Merchandiser 51040/51048
Quick guide for the Winco 2-Door Warmer/Merchandiser (models 51040/51048). Includes assembly instructions, cleaning procedures, safety warnings, and parts diagrams.
Quick answers from the manual
Quick answer
- The Winco 2-Door Warmer/Merchandiser (51040/51048) is a food warming unit requiring a 120V grounded outlet. It features adjustable shelving (flat or sloping) and requires regular cleaning of shelves and glass panels. p. 1, 2
Key actions
- Positioning shelves p. 2
- Cleaning the unit p. 2
First start
- Plug into a grounded 120V outlet, turn on the front switch, and adjust the thermostat. p. 2
Maintenance and reset
- Regular cleaning of shelves and base is required. p. 2
Technical specifications
| Parameter | Value | Meaning | Pages |
|---|---|---|---|
| Voltage | 120V~60Hz | Electrical supply requirement | p. 1 |
| Power | 600W | Power consumption | p. 1 |
| Amperage | 5A | Current rating | p. 1 |
Where to find it in the PDF
- Safety Instructions p. 1
- Assembly and Cleaning p. 2
- Parts Diagram and List p. 3
- Wiring Diagram p. 4
Table of contents
Manual images
Click an image to enlargeQuick guide from the manual
This manual provides essential instructions for the safe operation and maintenance of the Winco 2-Door Warmer/Merchandiser (models 51040 and 51048). The unit is designed for commercial food warming. Always ensure the appliance is plugged into a properly grounded 120V outlet and never use it in wet locations.
Safety Instructions
- Electrical Safety: The appliance requires a grounded outlet. Do not modify the plug or use extension cords.
- Hot Surfaces: The equipment becomes hot during use and remains hot for a short time after turning off. Avoid touching hot surfaces with bare skin.
- Environment: Do not use in wet locations or near water containers. Keep combustible materials away from the appliance.
- Supervision: Use extreme caution when operating near children or when the unit is left unattended.
Assembly Instructions
The warmer features an operator side (with controls) and a customer side.
- Remove all nylon packing ties and tape from shelves and brackets.
- Shelf Positioning: For front counter applications, shelves can be set in a flat or sloping format.
- Flat: Use corresponding height slots on both sides.
- Sloping: Position shelves on higher slots on the operator side.
- Plug the machine into a grounded 120V outlet.
- Turn on the warming element using the front switch.
- Adjust the thermostat to the desired temperature. The light will remain on until the set temperature is reached.
Cleaning and Maintenance
- Turn off the machine and unplug it from the power source.
- Remove any remaining food product.
- Remove shelves and clean them in a sink or dishwasher using mild detergent.
- Clean the base of the unit with a damp cloth and mild detergent.
- Clean glass panels and covers with standard glass cleaner.
- Re-assemble the machine and plug it back in.
Parts and Wiring
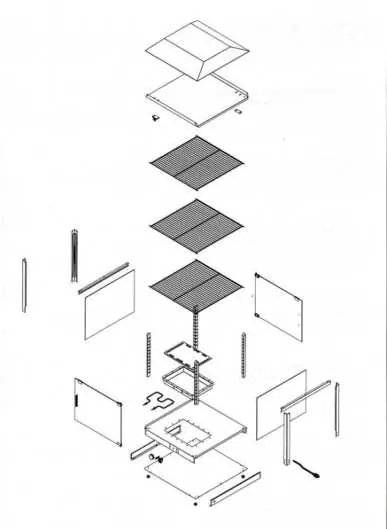
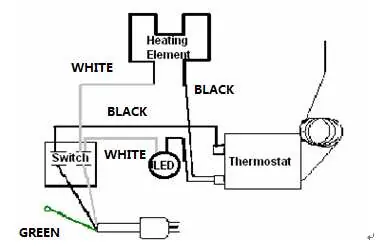
The manual includes an exploded view diagram and a parts list (Part # 5401-5420) for identifying components such as the thermostat, heating element, and glass doors. A wiring diagram is provided to illustrate the connections between the switch, thermostat, heating element, and LED indicator.
Practical help
Common problems
Appliance does not heat
Ensure the unit is plugged into a grounded 120V outlet and the front switch is turned on. Check that the thermostat is set to the desired temperature.
Unit is not properly grounded
Do not modify the power cord plug. Consult a qualified electrician to install a proper grounded outlet.
Before use
- Ensure the outlet is properly grounded (120V).
- Remove all nylon packing ties and tape from shelves and brackets.
- Determine if shelves should be flat or sloping based on counter application.
- Verify the area is dry and free of combustible materials.
Images and diagrams
- The exploded view diagram illustrates the assembly of the canopy, shelves, glass doors, and base components.
- The wiring diagram shows the electrical path between the power cord, switch, LED, thermostat, and heating element.
Model compatibility
- Not intended for use in wet locations.
- Do not use extension cords with this appliance.

Manual page author
Michael Turner
Technical manual editor
Reviews PDF manuals for structure, safety notes, and practical product details so readers can find the right information quickly.