Home / Pet Supplies
Assembly Manual for Fudajo Cat Tree 64245
Complete assembly guide for the Fudajo Cat Tree 64245. Includes a detailed parts list and step-by-step visual instructions to build your cat scratching post.
Table of contents
Manual images
Click an image to enlargeQuick guide from the manual
This document provides the necessary parts list and assembly instructions for the Fudajo Cat Tree. Before beginning assembly, ensure you have a clear workspace and verify that all components listed in the parts list are present. Do not fully tighten screws until the structure is aligned.
Parts List
Ensure all parts are present before starting assembly:
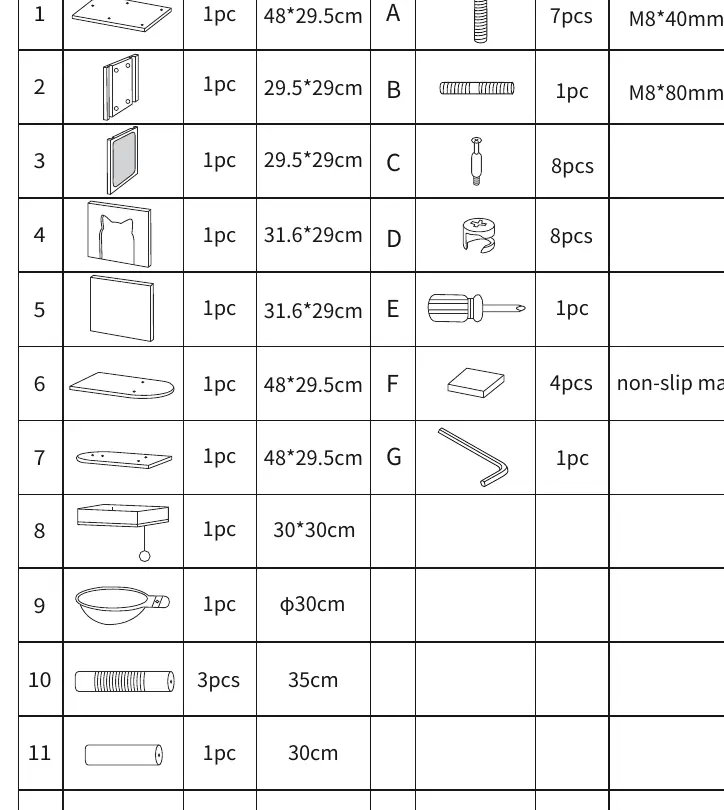
- Wooden Panels: 1 (Base), 2, 3, 4, 5, 6, 7, 8 (Top platform)
- Components: 9 (Hammock), 10 (3x Posts 35cm), 11 (Post 30cm), 12 (Post 30cm)
- Hardware: A (7x M8*40mm screws), B (1x M8*80mm screw), C (8x screws), D (8x nuts), E (1x screwdriver), F (4x non-slip mats), G (1x Allen key)
Assembly Instructions
Follow these steps to assemble the cat tree:

- Base Preparation: Attach the four non-slip mats (F) to the bottom of the base panel (1).
- Lower Structure: Attach the scratching post (10) to the base (1) using screws (A) and (C).
- Walls: Connect the side walls (2) and (3) to the base (1) using the provided screws (D) and (E).
- Upper Panels: Secure panels (4) and (5) onto the walls.
- Platform Installation: Attach the middle platform (6) to the top of the walls using screws (C), (D), and (E).
- Upper Posts and Hammock: Install the hammock (9) and the remaining posts (10, 11) onto the structure.
- Top Platform: Attach the top platform (7) and the final post (12) with the top platform (8) using screw (A).
Maintenance and Safety
Regularly check the stability of the cat tree. Ensure all screws are tightened periodically, as the structure may loosen over time due to cat activity. If any parts are damaged, discontinue use to prevent injury to your pet.
Practical help
Common problems
Unstable structure
Ensure all screws are fully tightened and the base is placed on a flat, level surface.
Missing hardware
Verify all parts against the parts list on page 1 before starting. If parts are missing, contact the retailer.
Before use
- Clear a large, flat area for assembly.
- Verify all 12 wooden parts and hardware A-G are present.
- Ensure you have the provided screwdriver (E) and Allen key (G) ready.
- Check that the non-slip mats are attached to the base.
Specs in practice
- M8*40mm / M8*80mm
- Standard metric screws used for structural assembly; ensure the correct length is used for each step as indicated in the diagrams.
Images and diagrams
- The assembly relies on visual cues. Match the part numbers (1-12) and hardware letters (A-G) shown in the diagrams to the physical components.
Model compatibility
- Designed for indoor use only.

Manual page author
Michael Turner
Technical manual editor
Reviews PDF manuals for structure, safety notes, and practical product details so readers can find the right information quickly.