Garden / Brushcutters & Trimmers
Operator's Manual for GARDENA EasyCut 23/18V P4A and ComfortCut 23/18V P4A Battery Trimmer
Quick guide for GARDENA EasyCut 23/18V P4A and ComfortCut 23/18V P4A battery trimmers. Includes assembly, operation, maintenance, troubleshooting, and technical specifications.
Quick answers from the manual
Quick answer
- This manual covers the assembly, operation, and maintenance of the GARDENA EasyCut 23/18V P4A (Art. 14700) and ComfortCut 23/18V P4A (Art. 14701) battery trimmers. p. 1, 4
Key actions
- Assemble protective cover and plant guard p. 5
- Charge the battery p. 6
- Replace plastic blade p. 7
First start
- Charge battery fully before first use p. 5
Show 3 more answers Show less
Problems and fixes
Trimmer does not start, LED flashing green
Battery is empty, charge the battery.
p. 7Technical specifications
| Parameter | Value | Meaning | Pages |
|---|---|---|---|
| Rated voltage | 18 V (DC) | Battery voltage | p. 8 |
| Cutting width | 23 cm | Width of cut | p. 8 |
| Rpm of blade carrier | 9500 | Rotational speed | p. 8 |
Where to find it in the PDF
- Assembly p. 5
- Operation p. 6
- Maintenance p. 7
- Troubleshooting p. 7
- Technical Data p. 8
Table of contents
Manual images
Click an image to enlargeQuick guide from the manual
This manual provides instructions for the GARDENA EasyCut 23/18V P4A (Art. 14700) and ComfortCut 23/18V P4A (Art. 14701) battery trimmers. These tools are intended for trimming and cutting lawn and grass areas in private gardens. They are not intended for long-term use or for cutting hedges.
Safety
Important: Read the operator's manual carefully before use. Always wear approved eye and hearing protection. Keep bystanders away. Remove the battery before cleaning or maintenance. Do not expose the charger to rain or wet conditions. Ensure the product is supplied through a residual current device (RCD) with a rated residual operating current not exceeding 30 mA.
Assembly
Protective cover and plant guard:
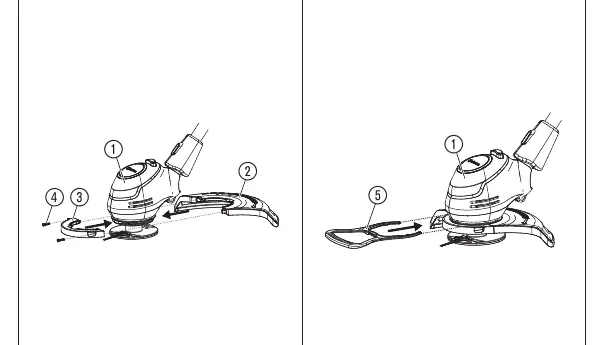
- Slide the front part of the protective cover onto the trimmer head until it engages.
- Slide the rear part of the protective cover onto the trimmer head until it stops.
- Tighten both screws carefully.
- Slide the plant guard onto the trimmer head until it engages.
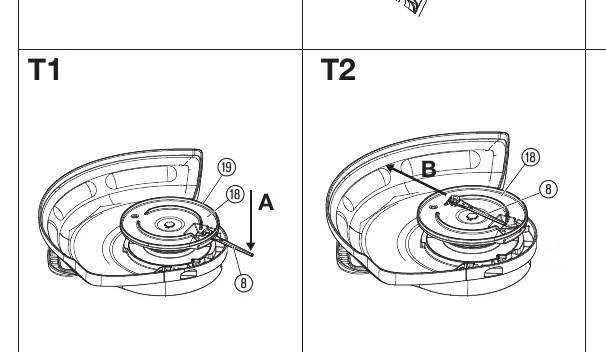
Plastic blade: The scope of delivery includes 5 plastic blades. Spare blades are stored in the openings on the handle.
Operation
Charging the battery:
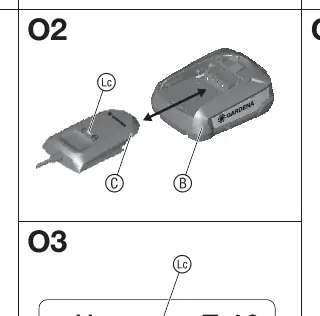
- Remove the battery from the holder.
- Connect the charger to a mains socket.
- Slide the charger onto the battery. A flashing green light indicates charging; a continuous green light indicates the battery is fully charged.
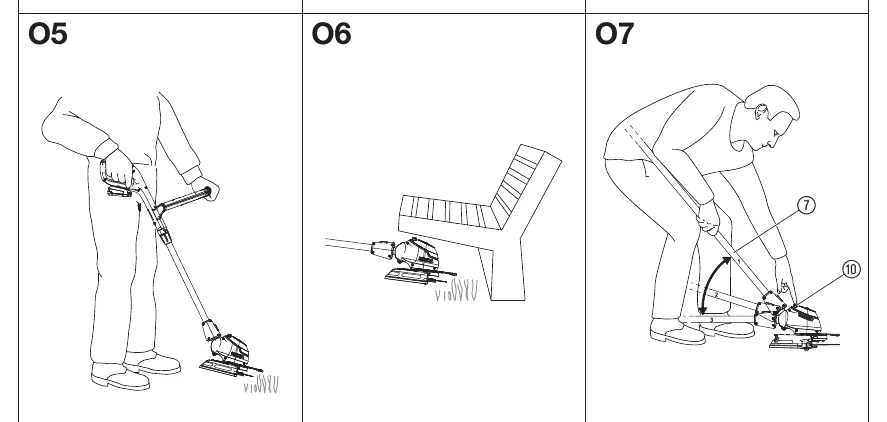
Working positions:
- Position 1: Standard trimming.
- Position 2: Trimming beneath obstacles (tube lowered).
- Position 3 (Art. 14701 only): Cutting at lawn edges (trimmer head rotated to 90°).
Starting/Stopping: To start, hold the additional handle, slide the starting lockout forward, and pull the start lever. To stop, release the start lever and remove the battery.
Maintenance and Storage
Cleaning: Keep airflow slots clean. Clean the trimmer, battery, and charger with a soft, dry cloth. Do not use water or high-pressure jets. Blade replacement: If the wear rib is no longer visible, the blade carrier must be replaced. Replace plastic blades if they are worn or broken.
Troubleshooting
If the trimmer does not start, check if the battery is empty, if the battery is fully inserted, or if the engine is blocked. If the error LED is illuminated, check for moisture on contacts or battery temperature issues. For persistent issues, contact GARDENA Service.
Technical Data
Both models operate at 18V DC with a cutting width of 23 cm and a blade carrier speed of 9500 rpm.
Manufacturer information
GARDENA
Practical help
Common problems
Trimmer is not cutting cleanly or at all
Plastic blade is worn or broken; replace the plastic blade.
Trimmer vibrates severely
Plastic blade is excessively worn or blade carrier is worn; replace the blade or carrier.
Trimmer does not start
Battery is empty, not fully inserted, or engine is blocked; check battery charge and insertion, or remove obstacles.
Charging is not possible
Battery contacts are dirty, battery is not connected correctly, or battery temperature is outside the permissible range.
Before use
- Check supply/extension cord for damage (if applicable)
- Visually inspect machine for damaged or missing guards
- Ensure battery is fully charged
- Wear eye protection and stout shoes
- Ensure bystanders are at a safe distance
Show more Show less
Specs in practice
- Rated voltage
- 18V DC system voltage
- Cutting width
- 23 cm cutting path
- Rpm of blade carrier
- 9500 rotations per minute
Images and diagrams
- A1-A3: Assembly of protective cover and plant guard
- O1-O3: Battery charging procedure
- O5-O9: Adjusting working positions and tube length
- T1-T2: Replacing the plastic blade
Model compatibility
- Compatible with POWER FOR ALL system batteries (PBA 18V)
- Use only original GARDENA spare blades (Art. 5368)

Manual page author
Michael Turner
Technical manual editor