Garden / Brushcutters & Trimmers
Gardena SmallCut 23/18V P4A Battery Trimmer User Manual
Quick guide for the Gardena SmallCut 23/18V P4A battery trimmer. Includes assembly, operation, maintenance, troubleshooting, and technical specifications.
PDF source: polski · summary: English
Quick answers from the manual
Quick answer
- The Gardena SmallCut 23/18V P4A is a battery-powered grass trimmer. To start, insert the battery, hold the additional handle, slide the starting lockout forward, and pull the start lever. p. 6, 11
Key actions
- Replace plastic blade p. 7, 11
- Charge battery p. 6, 10
First start
- Assemble the trimmer before first use, including the additional handle and protective cover. p. 5, 10
Show 3 more answers Show less
Problems and fixes
Trimmer vibrates heavily
Replace the plastic blade or the blade carrier.
p. 7, 11Technical specifications
| Parameter | Value | Meaning | Pages |
|---|---|---|---|
| Cutting width | 23 cm | Width of the cutting area | p. 7, 12 |
| Rated voltage | 18 V | Operating voltage | p. 7, 12 |
Where to find it in the PDF
- Assembly p. 5, 10
- Operation p. 6, 10
- Maintenance p. 6, 11
- Troubleshooting p. 7, 11
Table of contents
Manual images
Click an image to enlargeQuick guide from the manual
The Gardena SmallCut 23/18V P4A is a battery-powered grass trimmer designed for trimming and cutting lawn edges in private gardens. This manual provides essential instructions for safe operation, assembly, and maintenance.
Safety Information
- Always wear approved eye and hearing protection.
- Keep bystanders away from the working area.
- Do not use the trimmer to cut hedges, chop material, or for composting.
- Remove the battery before any cleaning or maintenance.
- Do not expose the product to rain.
Assembly
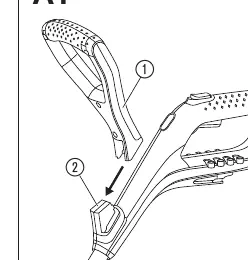
Additional Handle: Slide the additional handle onto the top part of the handle until it audibly engages.
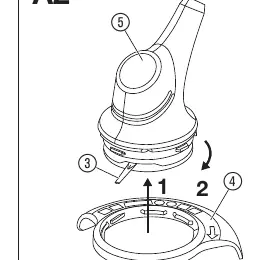
Protective Cover: Place the protective cover onto the trimmer head. Feed the plastic blade through the opening in the cover. Rotate the cover until it can be fully pushed on, then rotate anti-clockwise until it clicks into place.
Operation
Charging the Battery: The battery is charged using the intelligent charging process. Connect the charger to a mains socket and slide the charger onto the battery. A flashing green light indicates charging; a permanent green light indicates the battery is fully charged.
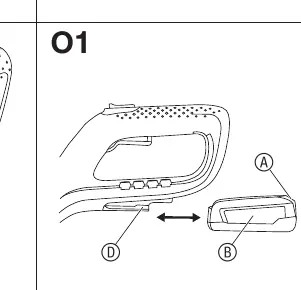
Starting the Trimmer: Insert the battery into the holder until it engages. Hold the additional handle with one hand and the main handle with the other. Slide the starting lockout forward and pull the start lever. The trimmer will start.
Maintenance
Cleaning: Clean the airflow slots with a soft brush. Remove grass and dirt from the protective cover after each use. Do not use water or high-pressure jets.
Replacing the Plastic Blade: If the trimmer does not cut cleanly, the plastic blade may be worn. To replace, turn the trimmer over, push the end of the blade down slightly, slide it through the blade carrier, and pull it out. Insert the new blade through the metal slot until it clicks.
Storage
Store the trimmer, battery, and charger in a dry, enclosed, and frost-free place, out of the reach of children.
Manufacturer information
GARDENA
Practical help
Common problems
Trimmer is not cutting cleanly or not at all
The plastic blade is worn or too short. Replace the plastic blade.
Trimmer vibrates heavily
The plastic blade is excessively worn, causing an unbalance. Replace the blade or the blade carrier.
Trimmer does not start or stops
Check if the battery is empty, if the battery temperature is outside the permissible range, or if the battery is not fully inserted.
Before use
- Check battery charge level
- Inspect plastic blade for wear
- Ensure protective cover is correctly installed
- Clear the area of debris
- Wear eye and hearing protection
Show more Show less
Specs in practice
- Cutting width
- 23 cm
- Battery voltage
- 18 V DC
- Weight (without battery)
- 1630 g
- Blade carrier speed
- 9500 rpm
Images and diagrams
- A1: Additional handle assembly
- A2/A3: Protective cover installation
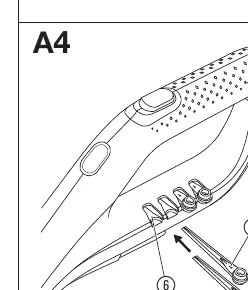
- A4: Plastic blade storage
- O1/O2: Battery insertion and charging
- T1/T2: Plastic blade replacement
Model compatibility
- Compatible with POWER FOR ALL system batteries (PBA 18V).

Manual page author
David Miller
Documentation analyst