Electronics / Marine Navigation
Garmin 1.2L and 2.0L Pump Check Valve Installation Instructions
Quick installation guide for Garmin 1.2L and 2.0L Pump Check Valves. Learn about hose connections, fitting requirements, and the necessary power purge procedure to prime your hydraulic system.
Table of contents
Important Installation Information
This document provides installation instructions for the Garmin 1.2L and 2.0L Pump Check Valve. Proper installation is critical to ensure the hydraulic system functions correctly and the pump can prime effectively.
Installation Requirements
- Fittings: The pump and check valve require ORB-5 fittings. These are not included with the pump or check valve.
- Hoses: Hydraulic hoses connecting the pump to the check valve must not exceed 2 ft. (60 cm). These hoses are not provided.
Connection Guide
Refer to the system diagram for proper hose routing:
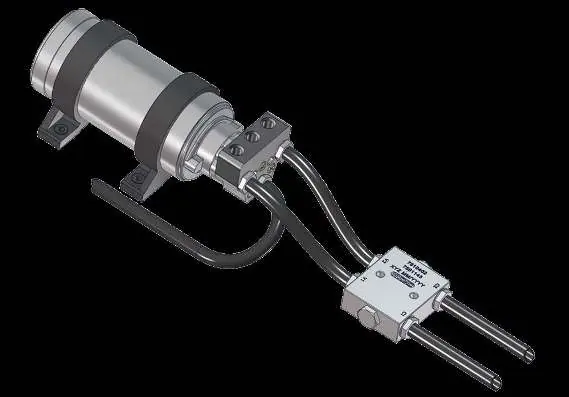
- V1/V2 Ports: Connect these to the pump hoses.
- C1/C2 Ports: Connect these to the steering cylinder hoses.
- Return Hose: The return hose from the pump to the helm does not connect to the check valve.
- Steering Lines: Hoses from the C1/C2 ports on the check valve should connect to the port and starboard steering lines using T-connectors.
Completing the Installation
Because the check valve prevents fluid from flowing back into the pump, the pump may have difficulty self-priming after installation. A power purge is required.
- Use the appropriate tools for your steering system to perform a power purge. This fills the pump and check valve with hydraulic fluid and pushes fluid into the pump to prime it.
- Follow the instructions provided with your Garmin autopilot system to bleed the hydraulic system.
Manufacturer information
Garmin Ltd.
Practical help
Common problems
Pump has difficulty self-priming after installation.
Perform a power purge to fill the pump and check valve with hydraulic fluid, which pushes fluid into the pump to prime it.
Air in hydraulic hoses.
Follow the instructions provided with your Garmin autopilot system to bleed the hydraulic system.
Before use
- Ensure you have ORB-5 fittings (not included).
- Verify that hydraulic hoses connecting the pump to the check valve do not exceed 2 ft. (60 cm).
- Ensure you have the appropriate tools for your specific steering system to perform a power purge.
Images and diagrams
- The diagram illustrates the physical connection between the pump and the check valve.
- Item 1 indicates the pump and check valve connection point.
- Item 3 identifies the specific ports (V1/V2 and C1/C2) on the check valve.
- Item 4 clarifies that the return hose from the pump to the helm does not connect to the check valve.
- Item 5 shows the connection of C1/C2 ports to steering lines using T-connectors.
Model compatibility
- Compatible with Garmin 1.2L and 2.0L pumps.
- Requires ORB-5 fittings.
- Requires Garmin autopilot system instructions for bleeding.

Manual page author
David Miller
Documentation analyst
Organizes user manual content into clear summaries, with attention to model details, product context, and everyday usability.