Electronics / Marine Navigation
Installation Instructions for Garmin 12-Pin Transducer Adapter Box
Quick installation guide for the Garmin 12-Pin Transducer Adapter Box. Includes mounting instructions, wiring diagrams for various transducer models, and technical specifications.
Table of contents
Quick Guide
The Garmin 12-Pin Transducer Adapter Box allows you to connect various transducers (12-pin, 8-pin, or 6-pin) to a 12-pin sounder. Before installation, ensure your transducer is compatible. Note that water speed wheels are not supported on the 12-pin sounder connector.
Mounting the Adapter Box
Tools Needed: Drill with 3.2 mm (1/8 in.) bit, #2 Phillips screwdriver, 3 mm flat screwdriver, wire cutter, wire stripper, 21 mm wrench, and an optional 15 mm (or adjustable) wrench.
- Drill pilot holes using the 3.2 mm bit.
- Insert screws into the pilot holes, leaving them slightly loose.
- Place the adapter box on the screws and slide it into place.
- Connect the wires before fully mounting.
- Tighten the screws until the adapter box is securely fastened to the surface.
Mounting Considerations: Ensure the device is not submerged in water and is mounted at least 15.25 cm (6 in.) away from sources of electrical interference, such as motors.
Connecting the Device to a Transducer
Preparation:
- For transducers with a connector, cut the cable as close to the connector as possible.
- Feed the cut end through the nut on the side of the housing.
- Strip about 90 mm (3 1/2 in.) of the outer cable jacket and foil shield.
- Strip about 6 mm (1/4 in.) of insulation from each internal wire. Tinning the stripped wires is recommended.
- If your transducer lacks a temperature sensor, you can connect a separate one through the nut on the bottom of the housing.
Wiring:
- Use a 3 mm flat screwdriver to connect the transducer wires to the wire block inside the adapter.
- Refer to the specific wiring block tables in the manual to identify wire functions for your specific Garmin or Airmar transducer model.
- Once connections are secure, use a 21 mm wrench to tighten the nut around the transducer cable.
- Secure the lid on the adapter using the four captive Phillips screws.
Wiring Block Tables
The manual provides comprehensive wiring block tables for various transducer types, including Garmin 12-pin, Garmin 8-pin, and Airmar bare wire/8-pin transducers. These tables detail the color-coding and function for each of the 12 wire block positions (e.g., Shield/Ground, Temp+, GID, XID, SideVü, ClearVü). Always consult the specific table corresponding to your transducer model to ensure correct wiring.
Specifications
Dimensions: 59.1 x 48.97 x 104 mm (2.3 x 1.9 x 4.1 in.)Cable length: 61 cm (24 in.)Water rating: IEC 60529 IPX7 (withstands incidental exposure to water of up to 1 m for up to 30 min).
Manufacturer information
Garmin Ltd.
Practical help
Common problems
Speed wheel not working
Using the 12-pin wire block adapter for some transducers prevents speed wheel operation. If speed wheel operation is required, use an 8-pin sonar port with a 010-11613-00 wire block adapter.
Transducer compatibility
Verify your specific transducer model against the wiring block tables provided in the manual to ensure correct pin mapping.
Before use
- Verify transducer compatibility with the 12-pin sounder.
- Ensure the mounting location is not submerged in water.
- Maintain at least 15.25 cm (6 in.) distance from electrical interference sources like motors.
- Gather required tools: drill, 3.2 mm bit, #2 Phillips screwdriver, 3 mm flat screwdriver, wire cutter, wire stripper, 21 mm wrench.
Specs in practice
- Cable length
- 61 cm (24 in.)
- Water rating
- IPX7 (withstands incidental exposure to water of up to 1 m for up to 30 min)
Images and diagrams
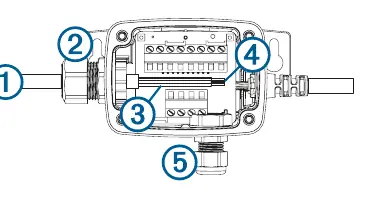
- The wiring diagram illustrates the adapter housing with numbered connection points (1-5) for the transducer cable and internal wiring.
Model compatibility
- Compatible with various Garmin and Airmar 12-pin, 8-pin, and 6-pin transducers.
- Water speed wheels are not supported on the 12-pin sounder connector.

Manual page author
Michael Turner
Technical manual editor
Reviews PDF manuals for structure, safety notes, and practical product details so readers can find the right information quickly.