Home Appliances / Small Kitchen Appliances
Assembly Instructions for Garvee 10x12 FT Hardtop Gazebo
Comprehensive assembly guide for the Garvee 10x12 FT Hardtop Gazebo. Includes step-by-step installation instructions, parts list, anchoring procedures, and safety guidelines for proper setup.
Table of contents
Manual images
Click an image to enlargeImportant Information Before You Begin
This gazebo is a temporary, portable shelter designed to provide protection from sunlight and rain. It is not a permanent structure and is not designed to withstand sustained high winds, heavy snow, or inclement weather. Professional installation is highly recommended.
- Safety Warning: Do not use the gazebo in high winds (exceeding 25 Mph) or heavy snow (accumulation over 2 inches).
- Assembly Requirements: Two or more people are required for assembly. A ladder and an electric drill may be necessary.
- Stability: You must use ground nails, ropes, and expansion screws appropriate for your installation surface to prevent collapse and injury.
- Installation Tip: Do not fully tighten screws initially; tighten them only after the structure is aligned to ensure proper fit.
Assembly Steps
The assembly process is divided into 29 steps. Ensure all parts are accounted for before starting.
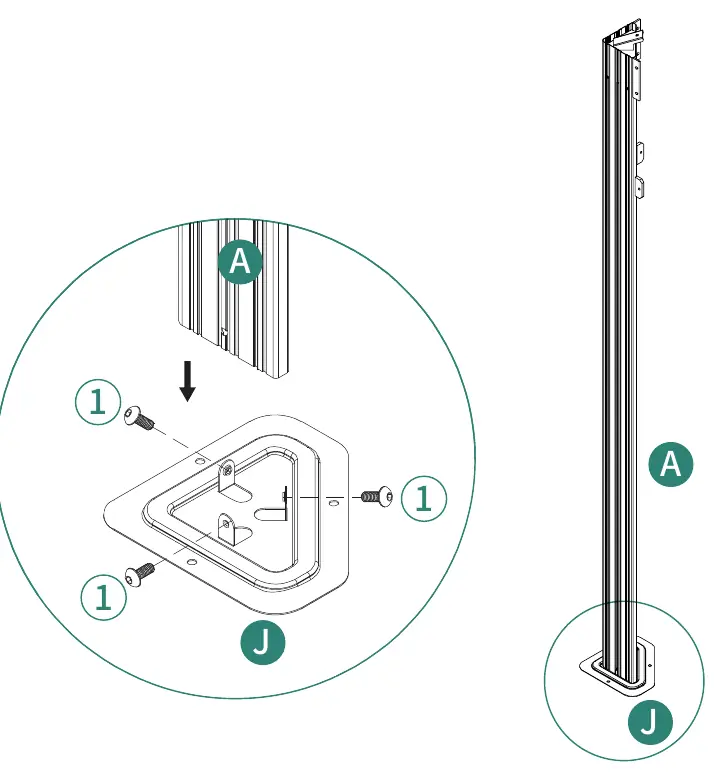
Frame and Base Assembly
Begin by assembling the base and corner posts. Use the provided hardware (screws 1, 8, etc.) to connect the main frame components (A, B, B1, B2, B3). Ensure the frame is square and level before proceeding to the roof structure.
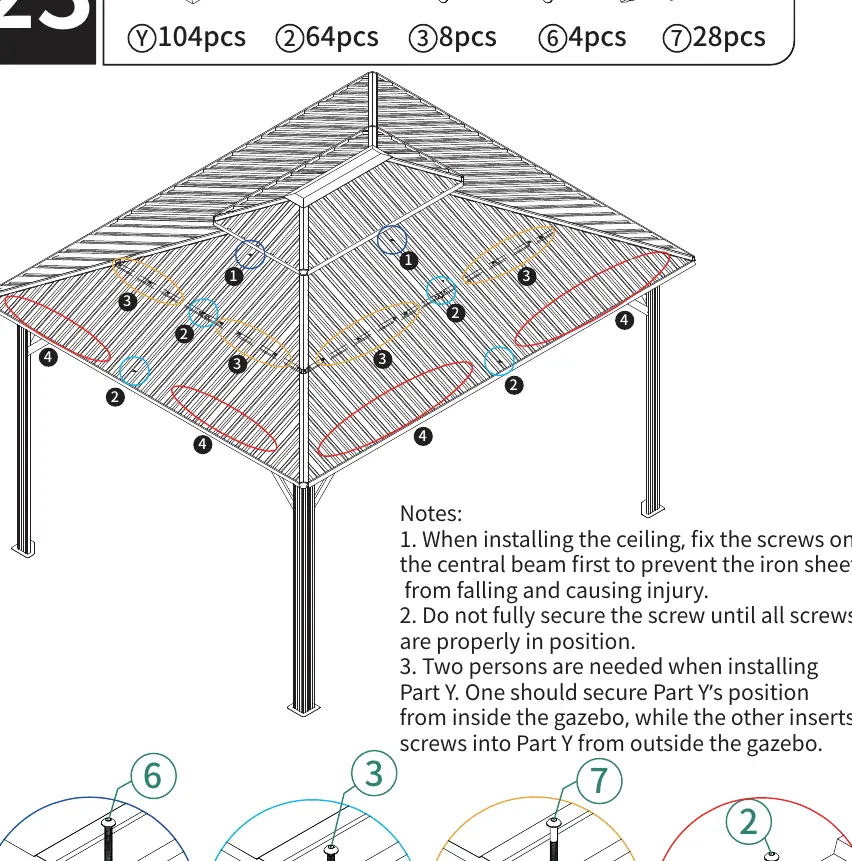
Roof Structure
The roof assembly involves connecting the roof beams (Ea, Eb, E1, F1, F2) and attaching the roof panels. Pay close attention to the orientation of parts as shown in the diagrams. When installing the ceiling, fix the screws on the central beam first to prevent the iron sheets from falling.
Curtains and Netting
Once the frame and roof are secure, install the curtains (T) and netting (T1). Use the provided hooks (U) to attach the curtains and netting to the frame. Ensure the curtains are positioned correctly according to the hole counts specified in the manual.
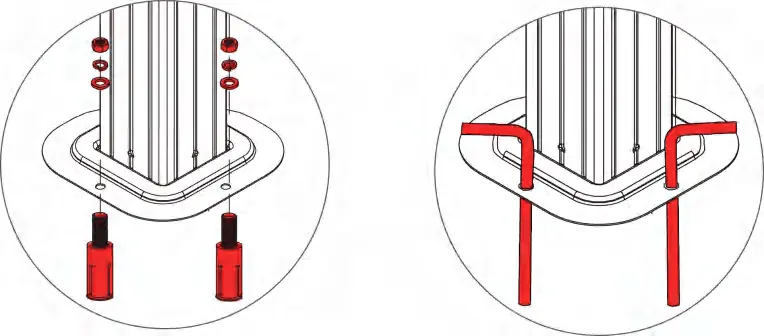
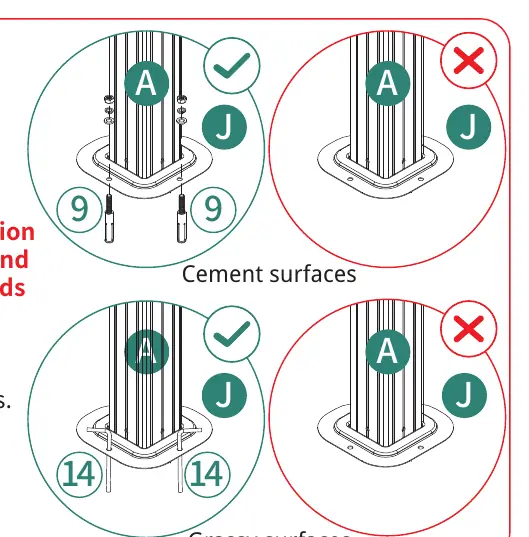
Anchoring and Stability
Proper anchoring is critical for the safety and longevity of your gazebo. Use expansion screws for cement surfaces and ground nails for grassy surfaces. Failure to properly anchor the gazebo can lead to structural failure during high winds.
Maintenance
Before use, thoroughly inspect the gazebo to ensure all bolts, nuts, and buckles are completely tightened and securely fastened. Regularly check the structure for loose hardware, especially after severe weather events.
Manufacturer information
Garvee
Practical help
Common problems
Gazebo instability
Ensure all bolts, nuts, and buckles are fully tightened. Verify that the correct anchoring method (ground nails for grass, expansion screws for cement) has been used.
Difficulty aligning screws
Do not fully tighten screws during the initial assembly phase. Keep them loose to allow for adjustments, then tighten them once the structure is fully aligned.
Roof panels falling during installation
When installing the ceiling, fix the screws on the central beam first to secure the iron sheets before attaching the rest.
Before use
- Two or more people available for assembly
- Ladder and electric drill ready
- Clear, level area for assembly
- Verify all parts against the parts list
- Determine installation surface (cement vs. grass) for anchoring
- Check weather forecast (do not assemble in high winds)
Specs in practice
- Wind speed limit
- Do not use the gazebo in wind speeds exceeding 25 Mph.
- Snow accumulation
- Clear snow immediately if it accumulates more than 2 inches.
Images and diagrams
- Steps 1-12 cover the frame and roof structure assembly.
- Steps 13-24 detail the roof panel and ceiling installation.
- Steps 25-28 cover curtain and netting installation.
- Step 29 illustrates the correct anchoring method for both cement and grassy surfaces.
Model compatibility
- Not designed for permanent installation.
- Not intended to withstand heavy snow or sustained high winds.
- Requires specific anchoring hardware included in the package.

Manual page author
Emily Carter
User documentation editor
Prepares concise manual descriptions and highlights the most useful setup, operation, and maintenance information for readers.