Garden / Garden Structures
Assembly Guide for Sunjoy 10x12 Soft Top Gazebo
Comprehensive assembly and maintenance guide for the Sunjoy 10x12 Soft Top Gazebo (A101001560). Includes safety warnings, required tools, step-by-step installation instructions, and care tips.
Table of contents
Manual images
Click an image to enlargeQuick Guide from the Manual
This document provides instructions for the assembly and maintenance of the Sunjoy 10x12 Soft Top Gazebo (A101001560). Key requirements include a minimum of 4 adults for assembly, installation on level ground, and regular maintenance to prevent rust and snow accumulation. Always check local regulations for installation permits before starting.
Safety Warnings
- Adults Only: Assembly and maintenance must be performed by adults. We recommend at least 4 people.
- Installation Surface: Install on level ground. Do not assemble on sandy, muddy, or loose soil as stakes will not provide sufficient anchorage.
- Weather Conditions: This gazebo is for decorative and sunshade purposes only. It is not designed to withstand high winds, heavy rain, or snow. Remove the canopy in winter or during high winds.
- Snow Removal: Clear snow from the roof if it exceeds 2 inches to avoid damage. Use a plastic snow rake.
- Fire Safety: Do not light fires under or near the product.
- Sharp Edges: Some parts may have sharp edges; wear protective gloves.
Assembly Preparation
Before beginning, clear a large area on the floor and verify all parts against the packaging contents list. Do not dispose of packing materials until assembly is complete.

Required Tools (Not Included):
- Cordless drill
- Hammer
- Screwdriver
- Ladder
Assembly Steps
The assembly process consists of 20 steps, involving the construction of the frame, installation of the roof structure, and attachment of the canopy and netting.

- Frame Construction: Assemble the posts (A1-A6) and base covers (B1-B2, C1-C2).
- Beam Assembly: Connect cross beams (D1-D4) and short cross beams (E1-E2).
- Roof Structure: Install rafters (F1-F4) and middle beams (J1-J2).
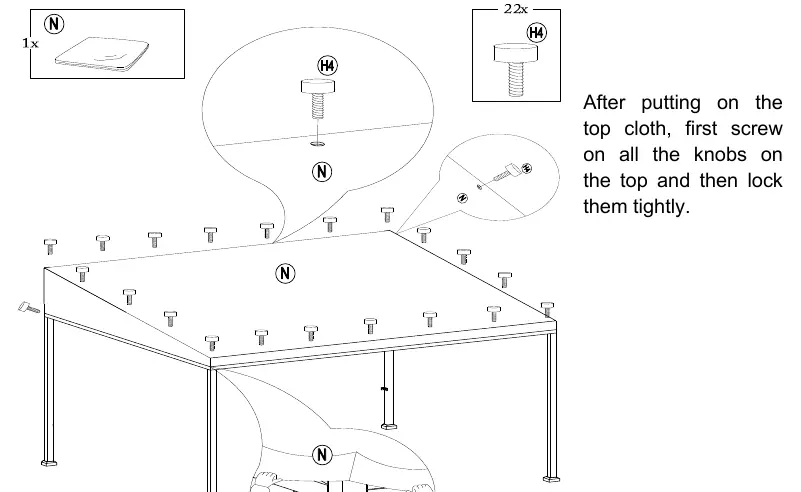
- Canopy and Netting: Attach the canopy (N), curtains (P), and mosquito netting (Q) using the provided rods and rings.
- Anchoring: Secure the gazebo to the ground using the provided stakes (HS).
Maintenance and Care
- Rust Prevention: Steel components are treated with rust-inhibiting paint. If scratched, touch up immediately with paint. Surface rust can be removed with cooking oil or WD-40.
- Cleaning: Rinse the top of the gazebo with water after use. Do not use acid, alkali, bleach, or abrasive cleaners. Do not use a pressure washer.
- Storage: If not used for a long period (e.g., winter), disassemble and store in a clean, dry environment.
- Bolts: Periodically check and tighten all nuts and bolts.
Warranty
Sunjoy Group provides a 1-year limited manufacturer's warranty for defects in workmanship and materials, valid for the original purchaser from the date of purchase. Proof of purchase is required.
Practical help
Common problems
Surface rust on steel components
Touch up scratches immediately with rust-inhibiting paint. Remove existing surface rust with a light application of cooking oil or WD-40.
Gazebo instability
Ensure installation is on level ground. Periodically check and tighten all nuts and bolts.
Snow accumulation damage
Remove snow from the roof when it exceeds 2 inches using a plastic snow rake.
Before use
- Ensure at least 4 adults are available for assembly.
- Verify all parts are present against the packaging contents list.
- Clear a large area on the floor for assembly.
- Check local regulations for installation permits.
- Have a cordless drill, hammer, screwdriver, and ladder ready.
Images and diagrams
- Exploded drawing shows the connection of posts (A1-A6) and beams (D1-D4, E1-E2).
- Hardware pack details bolts (H1-H6) and stakes (HS) for anchoring.
Model compatibility
- Not designed for harsh weather, high winds, or heavy snow.
- Not for commercial or non-residential use.

Manual page author
David Miller
Documentation analyst
Organizes user manual content into clear summaries, with attention to model details, product context, and everyday usability.