Home Appliances / Refrigerators
User Manual for GE Bottom Freezer Refrigerator
Comprehensive user guide for GE Bottom Freezer refrigerators. Includes installation instructions, temperature control settings, water filter replacement, cleaning, and troubleshooting tips.
Quick answers from the manual
Quick answer
- This manual provides installation, operation, and maintenance instructions for GE Bottom Freezer refrigerators. It covers models PFE, GFE, DFE, GNE, PYE, and PWE. p. 1
Key actions
- Install the anti-tip bracket (PYE, CYE, PWE models). p. 29, 30
- Replace the water filter every 6 months. p. 12
First start
- Purge the water line for at least 5 minutes. p. 10, 12
- Allow 24 hours for temperature stabilization. p. 6
Show 4 more answers Show less
Problems and fixes
Water filter indicator light remains lit
Reset the filter status via the control panel or by holding the Reset Filter button.
p. 38Maintenance and reset
- Reset water filter status. p. 12, 38
Technical specifications
| Parameter | Value | Meaning | Pages |
|---|---|---|---|
| Electrical Supply | 115V AC, 60 Hz, 15-20A | Required electrical supply. | p. 3 |
| Water Pressure | 20-120 p.s.i. | Operating water pressure range. | p. 35, 45 |
Where to find it in the PDF
- Safety Instructions p. 2, 3
- Operating Instructions p. 4, 19
- Installation Instructions p. 21, 36
- Troubleshooting p. 38, 39
Table of contents
Manual images
Click an image to enlargeQuick Guide from the Manual
This manual provides essential instructions for the installation, operation, and maintenance of GE Bottom Freezer refrigerators. Key procedures include:
- Installation: Proper placement, door removal, and water line connection.
- Controls: Adjusting temperature settings for different control styles (A, B, C, D).
- Water Filter: Replacement instructions and filter status reset.
- Maintenance: Cleaning the interior and exterior, and preparing for vacation or moving.
- Troubleshooting: Solutions for common issues like water dispenser problems, cooling issues, and indicator lights.
Safety Information
Read all instructions before using.
- Tip Over Hazard: Built-in style models (PYE, CYE, PWE) are top-heavy and must be secured with the anti-tip floor bracket.
- Electrical Shock: Plug into a grounded 3-prong outlet. Do not remove the ground prong or use an adapter.
- Disposal: Remove fresh-food and freezer doors before disposing of the old refrigerator to prevent child entrapment.
- Flammables: Keep flammable materials and vapors away from the refrigerator.
Installation
Proper installation is critical for performance and safety.
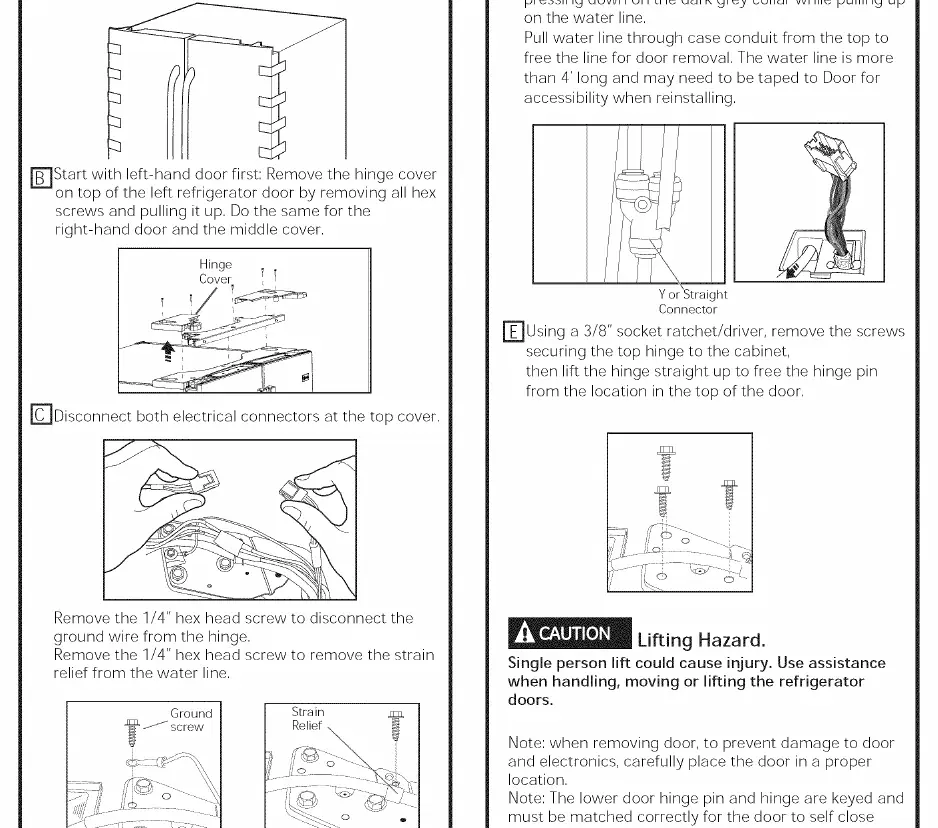
- Clearances: Allow 1/8" (3 mm) on sides, 1" (25 mm) on top, and 2" (50 mm) at the back.
- Moving: Use a padded hand truck. Two people are recommended for installation.
- Water Line: Connect to a cold water line with a shutoff valve. Purge the line for at least 2 minutes before connecting.
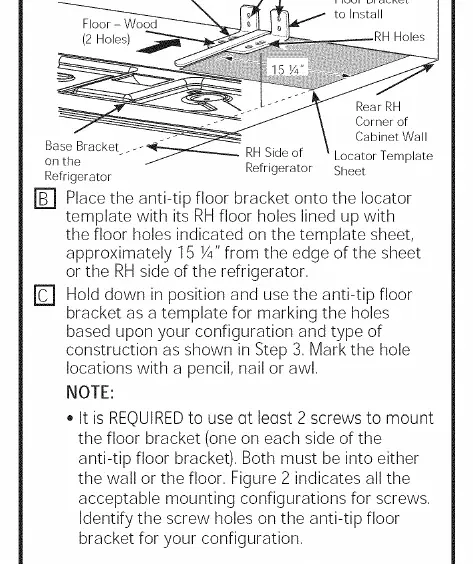
- Anti-Tip Bracket: Required for PYE, CYE, and PWE models. Follow the template provided to locate and secure the bracket to the floor or wall.
Controls and Temperature Settings
The refrigerator features different control styles depending on the model.
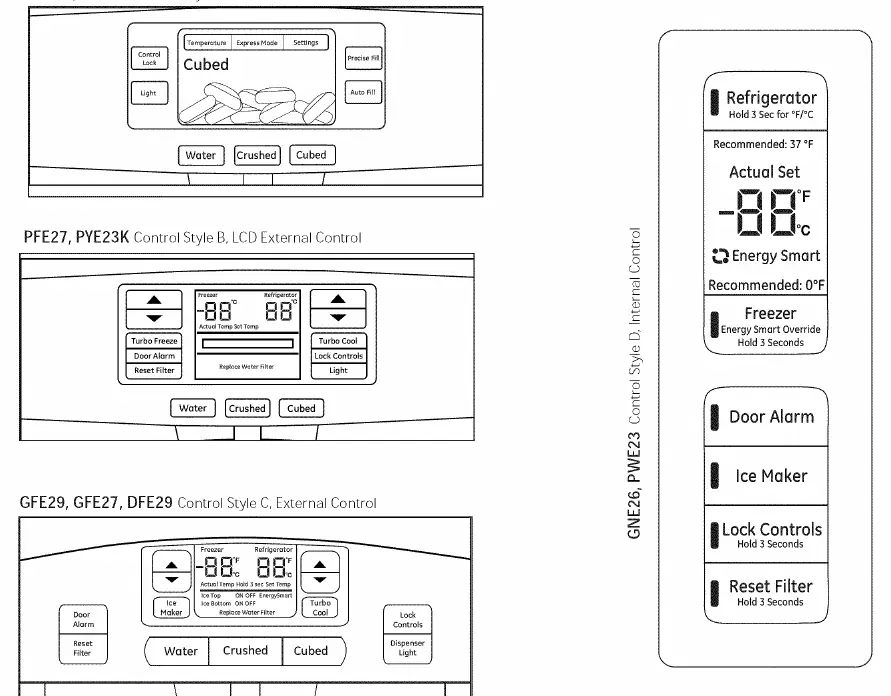
- Temperature Stabilization: Allow 24 hours for the temperature to stabilize after initial startup.
- Changing Temperature: Access the control panel to adjust the refrigerator and freezer temperatures.
- Cooling System: Can be turned on/off via the control panel without disconnecting electrical power.
- Turbo Features: TurboFreeze and TurboCool settings are available on some models to quickly restore temperatures after frequent door openings.
Dispenser and Autofill
- Dispenser: If no water is dispensed initially, press the paddle for at least 5 minutes to remove trapped air. Flush the first 6 glasses of water.
- Autofill: Use uniform containers between 4-8" tall and 2-6" wide. Keep sensors clean.
Water Filter Replacement
Replace the filter every six months or sooner if flow decreases.
- Remove the old cartridge by opening the filter door and pulling the bottom of the cartridge to swing it outward.
- Do not twist the cartridge.
- Align the new filter with the holder and push until seated.
- Swing the filter inward to a vertical position.
- Run 2 gallons of water through the dispenser to purge air.
- Reset the filter status on the control panel.
Care and Cleaning
- Outside: Use stainless steel cleaner for stainless panels. Do not use chlorine-based products.
- Inside: Use a warm water and baking soda solution. Unplug before cleaning.
- Vacation: Remove food, unplug, and leave doors open.
Practical help
Common problems
Water filter indicator light remains lit after replacement
Reset the filter status via the control panel (Settings menu for LCD models, or hold Reset Filter button for 3 seconds for non-LCD models).
Water dispenser does not work
Check if the water supply line is connected, the filter is clogged, or air is trapped in the system (press dispenser for 5 minutes).
Refrigerator beeping
This indicates a door alarm. Close the doors or disable the alarm.
Not cooling
Check if the cooling system is turned off in the control settings.
Before use
- Ensure the floor is strong enough to support the refrigerator fully loaded.
- Check that the refrigerator is properly leveled.
- Purge the water line for at least 2 minutes before connecting.
- Remove all tape, foam, and protective packing.
- Allow 24 hours for the temperature to stabilize.
Show more Show less
Specs in practice
- Electrical Requirement
- 115 Volt AC, 60 Hz, 15- or 20-amp fused, grounded electrical supply.
- Water Pressure
- Must be between 20 and 120 p.s.i. (1.4-8.1 bar).
Images and diagrams
- Control panels for different models (Styles A, B, C, D) are shown on page 6.
- Door removal and reinstallation steps are detailed on pages 24-25.
- Anti-tip floor bracket installation is shown on pages 29-30.
Model compatibility
- Use only GE-branded filters for optimal performance.
- Use only GE SmartConnect tubing kits.

Manual page author
David Miller
Documentation analyst