Home Appliances / Cooktops Hobs
User Manual for Gemini GVC150RD Cordless Stick Vacuum Cleaner
Quick guide for the Gemini GVC150RD cordless stick vacuum cleaner. Includes assembly, charging, cleaning, maintenance, and troubleshooting instructions.
Quick answers from the manual
Quick answer
- The Gemini GVC150RD is a 22.2V cordless stick vacuum. Charge it for 4-5 hours before first use. It features two speed modes and includes a motorized bed brush. p. 1, 5, 12
Key actions
- Charging the vacuum p. 5
- Assembling the vacuum p. 5, 6
- Cleaning the filter p. 8
First start
- Charge the battery for 4-5 hours before the first use. p. 5
Show 3 more answers Show less
Problems and fixes
Vacuum does not run
Charge battery or check charger.
p. 11
Weak suction
Clean dust cup, filter, or check for blockages.
p. 11Technical specifications
| Parameter | Value | Meaning | Pages |
|---|---|---|---|
| Voltage | DC 22.2V | Operating voltage | p. 12 |
| Charging time | 4-5 hours | Time to full charge | p. 12 |
Where to find it in the PDF
- Product Overview p. 4
- Troubleshooting p. 11
Table of contents
Manual images
Click an image to enlargeQuick guide from the manual
The Gemini GVC150RD is a 22.2V cordless stick vacuum cleaner. Before using it for the first time, ensure the battery is charged for approximately 4-5 hours. The vacuum features two speed modes (Low/High) and includes a motorized bed brush for versatile cleaning.
Product Overview
The vacuum consists of the following main components:
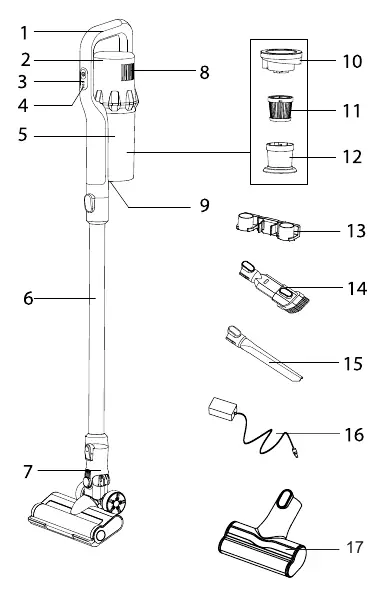
- Main unit with handle and speed mode button
- Dust container and filter assembly
- Aluminium tube
- LED floor brush
- Motorized bed brush
- 2-in-1 crevice tool and narrow nozzle
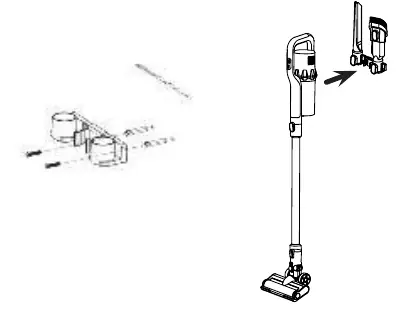
- Wall hanger
Charging
Connect the provided adapter to the socket. The charging indicator lights will cycle to show the machine is charging. When all three indicator lights are on, the battery is fully charged. Note that the vacuum cannot be operated while charging.
Assembly and Operation
Assembly: Insert the tube or brush attachment into the main unit until you hear a click. To disassemble, press the release button and pull the attachment outwards.
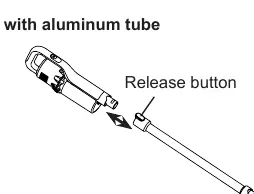
Operation: Long press the power button to start the vacuum in low speed. Short press the button to switch to high speed. Press again to stop.
Cleaning and Maintenance
Dust Container: Press the release button to detach the dust container from the main unit. Empty the contents. If necessary, rinse the container with water and let it air-dry completely before reassembly.
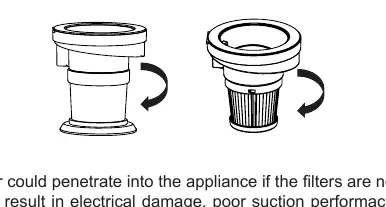
Filter: Remove the dust container, take out the filter assembly, and rotate the filter cover counterclockwise to remove it. Clean the filter and ensure it is completely dry before reinstalling. Do not use a hair dryer to speed up drying.
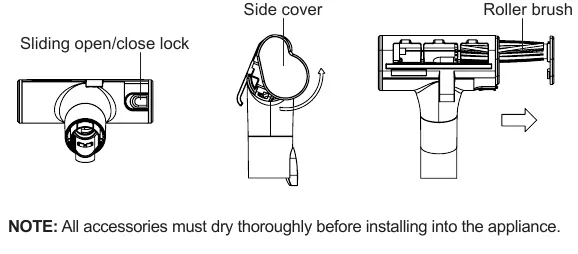
Floor and Bed Brushes: If the brush roller is blocked by hair or debris, press the release button on the bottom of the brush to remove the roller. Clean the roller, rinse with water if needed, and let it air-dry before reinstalling.
Troubleshooting
If the vacuum does not run, check if the battery is exhausted or if the charger is correct. If suction is weak, clean the dust cup and filter, or check for blockages in the tube and nozzle. If the LED floor brush stops working, check for hair entanglement or incorrect installation.
Practical help
Common problems
Vacuum cleaner does not run
Check if the battery is exhausted or if the charger is non-original.
Suction power is weakened
Clean the dust cup, clean or replace the filter, check for blockages in the nozzle/tube, or charge the battery.
LED floor brush does not work
Check for hair/string entanglement, ensure correct installation, or check the connection to the main unit.
Vacuum cleaner stops working automatically
Charge the battery, clean the suction port/tube, or clean the filter.
Before use
- Charge the battery for 4-5 hours before first use.
- Ensure all packaging materials are removed.
- Check that the filter is installed correctly.
- Ensure hands are dry before touching the appliance.
Show more Show less
Specs in practice
- Charging time
- Approx. 4-5 hours
- Output power
- 150W (Main unit), 15W (Floor brush), 12W (Bed brush)
Images and diagrams
- The vacuum consists of a main unit, aluminum tube, LED floor brush, and various accessories.
- The dust container and filter assembly are located on the main unit.
- Release buttons are located on the tube and main unit for assembly/disassembly.
Model compatibility
- Only use the provided charger.
- Do not use to suck up liquids, toner, or sharp objects.

Manual page author
Emily Carter
User documentation editor