Home Appliances / Vacuum Cleaners
User Manual for Gemini GCC2200BK Ceramic Cooker
Quick guide for the Gemini GCC2200BK 2200W Ceramic Cooker. Includes operating instructions, cooking functions, safety precautions, maintenance, and troubleshooting error codes.
Quick answers from the manual
Quick answer
- The Gemini GCC2200BK is a 2200W ceramic cooker. To operate, place it on a stable surface, plug it in, press 'On/Standby', select a function via 'Menu', and adjust settings as needed. p. 5, 6
Key actions
- Switching on/off p. 5, 6
- Selecting functions p. 6, 7
First start
- Place on a stable surface, connect to power, wait for the 'Bi' sound, and ensure the display shows '--' in standby mode. p. 5
Show 5 more answers Show less
Problems and fixes
E1 Error
Supply voltage lower than 100V; wait for voltage to return to normal.
p. 9
E2 Error
Supply voltage higher than 275V; wait for voltage to return to normal.
p. 9Error codes
| Code | Meaning | Action | Pages |
|---|---|---|---|
| E1 | Supply voltage < 100V | Wait for voltage to return to normal | p. 9 |
| E2 | Supply voltage > 275V | Wait for voltage to return to normal | p. 9 |
| E3 | Cooling fan circuit open | Repair/replace fan or main board | p. 9 |
| E4 | Cooling fan excessive current | Repair/replace fan or main board | p. 9 |
| E5 | Motherboard temperature sensor open/short | Check cooling fan/environment | p. 9 |
| E6 | Thermocouple open/surface overheat | Replace thermocouple | p. 9 |
| E7 | Thermocouple failure | Replace thermocouple/heating plate | p. 9 |
Maintenance and reset
- Clean after every use with a soft wet cloth and neutral detergent. Ensure the unit is unplugged and cooled down. p. 8
Technical specifications
| Parameter | Value | Meaning | Pages |
|---|---|---|---|
| Model | GCC2200BK | Product model number | p. 10 |
| Power | 2200W | Output power | p. 10 |
Where to find it in the PDF
- Safety Instructions p. 2, 3
- Operating Instructions p. 5, 6, 7
- Troubleshooting p. 9
Table of contents
Manual images
Click an image to enlargeQuick guide from the manual
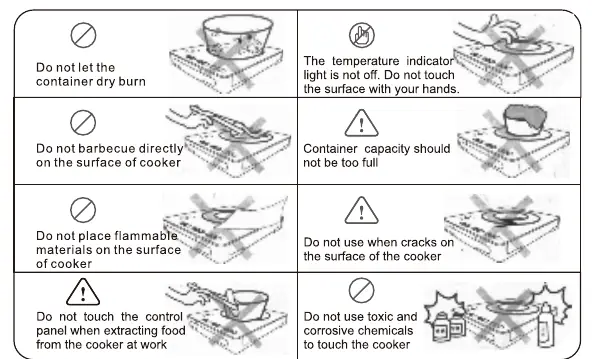
The Gemini GCC2200BK is a 2200W ceramic cooker designed for household use. Before first use, ensure the appliance is placed on a horizontal, stable surface and that the mains voltage matches the rating plate. Always use a grounded wall socket and keep the air inlet/outlet clear to prevent overheating.
Product Overview
The cooker features a glass panel with a touch-sensitive control panel. Key controls include:
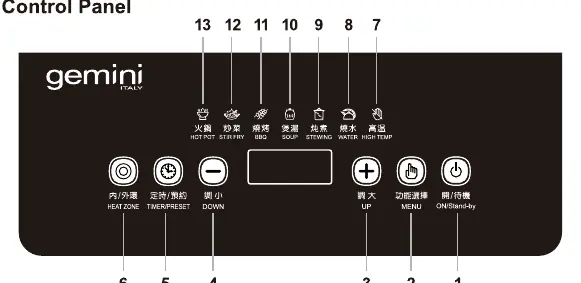
- Heat Zone: Switches between inner, outer, and both rings.
- Timer/Preset: Sets cooking time or automatic start.
- Menu: Selects cooking functions (Hot Pot, Stir Fry, BBQ, Soup, Stewing, Boiling Water).
- Up/Down: Adjusts power or temperature settings.
- On/Standby: Powers the unit on or enters standby mode.
Operating Instructions
To operate the cooker:
- Place the cooker on a stable surface and connect to power. A "Bi" sound will be heard, and the display will show '--'.
- Press the On/Standby button to enter standby mode.
- Press the Menu button to select the desired function.
- Use the Up/Down buttons to adjust power or temperature as needed.
- If desired, use the Timer/Preset button to set a countdown.
Cooking Functions
- Hot Pot: Default 1200W. Power range: 200W-2200W.
- Stir Fry: Default 650°C. Temperature range: 200°C-650°C.
- BBQ: Default 400°C. Temperature range: 200°C-500°C.
- Soup: Default 1600W. Preset time range: 0:01-24:00 hours.
- Stewing: Default 1900W. Preset time range: 0:01-24:00 hours.
- Boiling Water: Default 2200W.
Cleaning and Maintenance
Always switch off and unplug the appliance before cleaning. Allow the surface to cool completely. Use a soft, wet cloth with neutral detergent to wipe the glass panel. Do not use corrosive cleaning agents or sharp objects. Never immerse the main body in water.
Safety and Protection
The appliance includes several safety features:
- Overheating Protection: Automatically lowers temperature if the surface reaches 650°C and shuts down at 700°C.
- Voltage Protection: Stops heating if voltage exceeds 275V or falls below 100V.
- High Temperature Warning: The "HOT" indicator remains on until the surface temperature drops below 85°C.
Practical help
Common problems
Power indicator light does not light up
Check if the plug is securely connected to the socket and if the power cord is intact.
Electric heating plate is not heated
Send the unit to the maintenance department for inspection.
Suddenly stops heating during use
Ensure the surrounding temperature is not too high, suction/exhaust ports are not blocked, and the set time has not expired.
Before use
- Ensure the appliance is on a horizontal, stable surface.
- Verify mains voltage matches the rating plate.
- Use a grounded wall socket.
- Ensure cookware has a flat base.
- Keep air inlet and outlet clear.
Show more Show less
Specs in practice
- Output Power
- 2200W
Images and diagrams
- The control panel features touch buttons for Heat Zone, Timer/Preset, Down, Up, Menu, and On/Standby.
- The display shows error codes (E1-E7) for quick diagnosis.
Model compatibility
- Use flat-bottomed cookware.
- Suitable materials include iron, aluminum, ceramics, clay pots, and heat-resistant glass.
- Do not use cookware larger than the glass panel.

Manual page author
Michael Turner
Technical manual editor