Tools / Drills
User Manual for Genesis 20V 1/2" Drill/Driver GLCD2012B
Quick guide for the Genesis 20V 1/2" Drill/Driver (GLCD2012B). Includes setup, battery charging, operation, safety instructions, and maintenance tips.
PDF source: Français · summary: English
Quick answers from the manual
Quick answer
- The Genesis GLCD2012B is a 20V 1/2" cordless drill/driver. It features a 2-speed gear switch, 22+Drill torque settings, and a keyless metal chuck. p. 6
Key actions
- Install battery p. 7
- Charge battery p. 7
- Change bits p. 8
First start
- Ensure the battery is fully charged, insert it into the tool, select the desired speed range, and check the rotation direction before starting. p. 7
Show 4 more answers Show less
Problems and fixes
Tool fails to stop
Have a qualified serviceman examine the electric brake.
p. 8
Bit overheats
Use a coarser bit, slower speed, or apply light oil when drilling metal.
p. 8Maintenance and reset
- The tool is permanently lubricated and requires no additional lubrication. Clean the tool using a clean cloth. p. 9
Technical specifications
| Parameter | Value | Meaning | Pages |
|---|---|---|---|
| Motor Power | 20V DC | Voltage rating | p. 6 |
| No-Load Speed | 0-380 / 0-1500 RPM | Speed ranges | p. 6 |
| Chuck Size | 1/2 inch (13mm) | Chuck capacity | p. 6 |
| Max Torque | 450 in-lb | Torque capacity | p. 6 |
Where to find it in the PDF
- Product Overview p. 6
- Battery Operation p. 7
- Trigger and Speed p. 7
- Chuck Operation p. 8
Table of contents
Manual images
Click an image to enlargeQuick guide from the manual
This manual provides essential safety, operation, and maintenance instructions for the Genesis 20V 1/2" Drill/Driver (GLCD2012B). Always read the full safety rules before operating the tool. Key operations include battery installation, charging, adjusting torque settings, and changing drill bits.
Product Overview
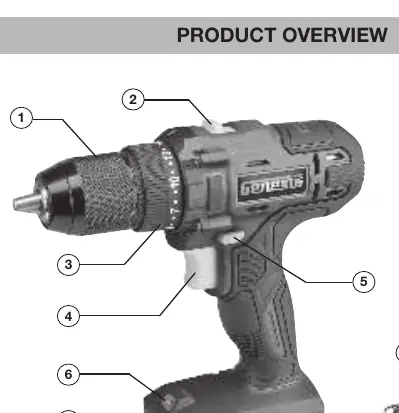
The drill features a keyless metal chuck, a 2-speed gear switch, a clutch/torque ring, a trigger switch, a reversing switch, and an LED work light. The battery pack includes power indicators to check the charge level.
Battery and Charging
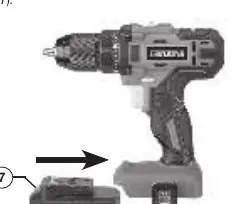
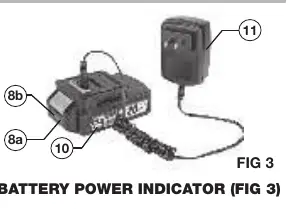
To install the battery, slide it into the bottom of the tool until it clicks. To remove, press the battery locking tab and pull. Charge the battery using the provided charger connected to a 120V AC source. The red light indicates charging, and solid green indicates a full charge. A completely discharged 2.0Ah battery takes approximately 80 minutes to charge.
Operation
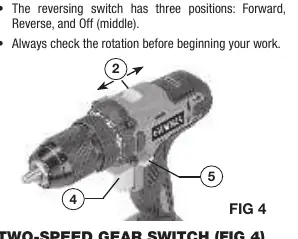
- Trigger Switch: Depress the trigger to turn the drill on. Increasing pressure increases speed and torque.
- Reversing Switch: Use this to change the direction of rotation (Forward, Reverse, and Off/Middle).
- 2-Speed Gear Switch: Position 1 provides high speed (0-1500 RPM) for drilling/driving. Position 2 provides low speed (0-380 RPM) for high-torque applications.
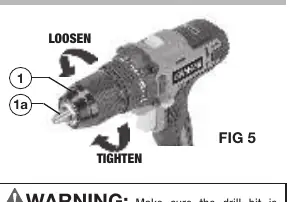
- Chuck: To change bits, set the reversing switch to the middle (Off) position. Rotate the chuck body counter-clockwise to open the jaws, insert the bit, and rotate clockwise to tighten.
- Clutch Settings: Adjust the torque ring from 1 (lightest) to 22 (heaviest) for screw driving. Use the Drill mode for drilling operations.
Maintenance
The tool is permanently lubricated and requires no additional lubrication. Clean the tool using a clean cloth; avoid using solvents on plastic parts. If working with abrasive materials like fiberglass or plaster, clean the tool with compressed air after use.
Practical help
Common problems
Drill bit wobbles or is unstable
Ensure the bit is seated firmly between the chuck jaws and the chuck is fully tightened.
Battery not charging
Check that the charger is plugged into a 120V AC source and the battery is properly connected. Allow the battery to cool if it is hot from continuous use.
Tool fails to stop quickly
The drill is equipped with an electric brake. If it fails to stop consistently, have a qualified serviceman examine the tool.
Before use
- Wear safety glasses with side shields.
- Ensure the switch is in the OFF position before inserting the battery.
- Check that the battery is fully charged.
- Verify the correct drill bit is securely tightened in the chuck.
- Select the appropriate speed range (1 or 2) for your task.
Show more Show less
Specs in practice
- 0-380 / 0-1500 RPM
- Speed ranges for low (torque) and high (speed) applications.
- 22+Drill Mode
- Clutch settings for precise screw driving and drilling.
Images and diagrams
- Fig 1: Shows the main components including the keyless chuck, speed switch, and battery.
- Fig 2: Illustrates battery installation and removal.
- Fig 3: Shows battery charging and power indicator.
- Fig 4: Details the trigger switch and speed gear switch.
- Fig 5: Demonstrates how to loosen and tighten the chuck.
Model compatibility
- Use only Genesis Model GLAB2020B or GLAB2040B battery packs.
- Use only the charger provided with the product.

Manual page author
Michael Turner
Technical manual editor